
1. Kirish
This manual provides essential information for the safe and efficient operation of your Technaxx Wireless CarPlay & Android Car Monitor TX-361. Please read this manual thoroughly before using the device and retain it for future reference. The TX-361 is designed to integrate modern smartphone connectivity, including Apple CarPlay and Android Auto, into your vehicle without requiring a complex car radio replacement. It also features an integrated DAB digital radio for enhanced audio experience.
2. Xavfsizlik ma'lumotlari
- Qurilmani har doim mas'uliyat bilan va mahalliy yo'l harakati qoidalariga muvofiq boshqaring. Chalg'igan holda haydash baxtsiz hodisalarga olib kelishi mumkin.
- Qurilmani qismlarga ajratishga yoki o'zgartirishga urinmang. Bu kafolatni bekor qilishi va xavfsizlik uchun xavf tug'dirishi mumkin.
- Qurilmani haddan tashqari harorat, to'g'ridan-to'g'ri quyosh nuri va namlikdan uzoqroq tuting.
- Qurilmaning ishonchli o'rnatilganligiga va sizga to'sqinlik qilmasligiga ishonch hosil qiling view yoki avtomobil boshqaruviga xalaqit beradi.
- Faqat taqdim etilgan quvvat kabeli va aksessuarlaridan foydalaning.
- If the device malfunctions, disconnect it from the power source and contact customer support.
3. Paket tarkibi
Quyida sanab o'tilgan barcha narsalar paketingizga kiritilganligini tekshiring:
- DAB 7-inch CarPlay with Touch Screen TX-361
- Power Supply (USB-A to USB-C, 1.5m cable)
- AUX Cable (1m)
- DAB antennasi
- Holder (Mounting Bracket)
- Foydalanuvchi uchun qo'llanma
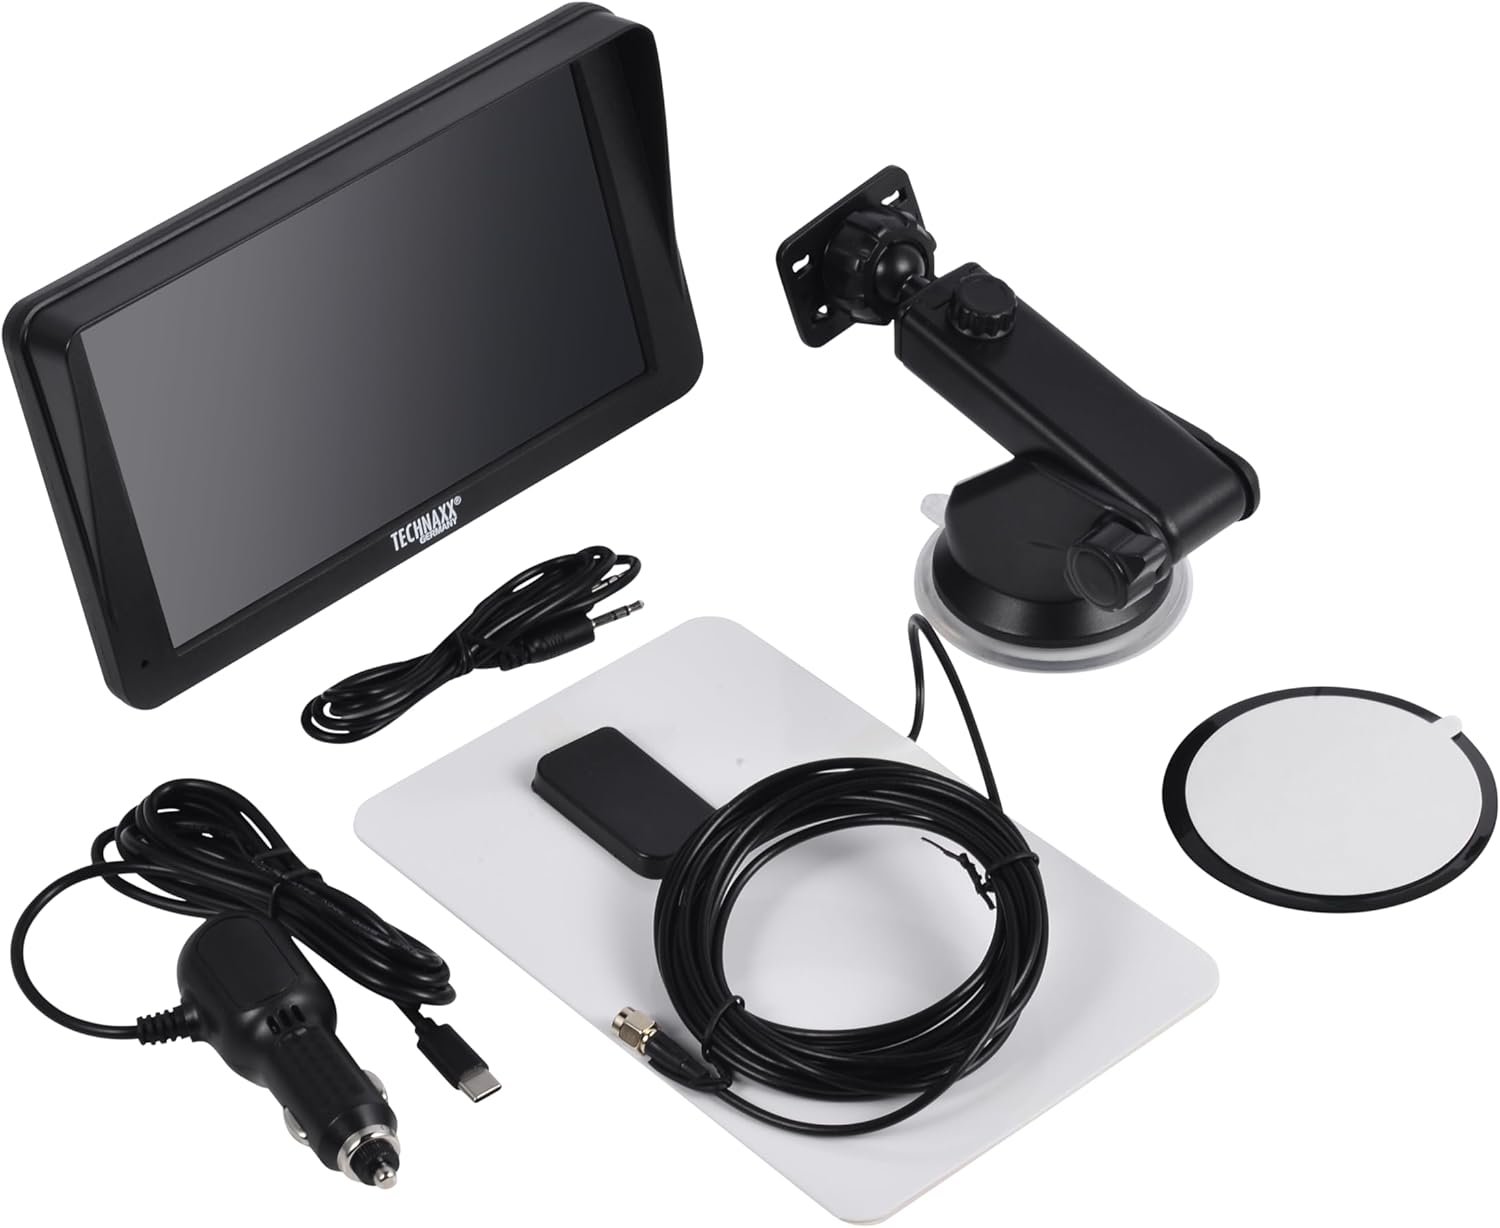
Image: All components included in the Technaxx TX-361 package, neatly laid out.
4. Mahsulot tugadiview
Familiarize yourself with the main components of your TX-361 monitor.
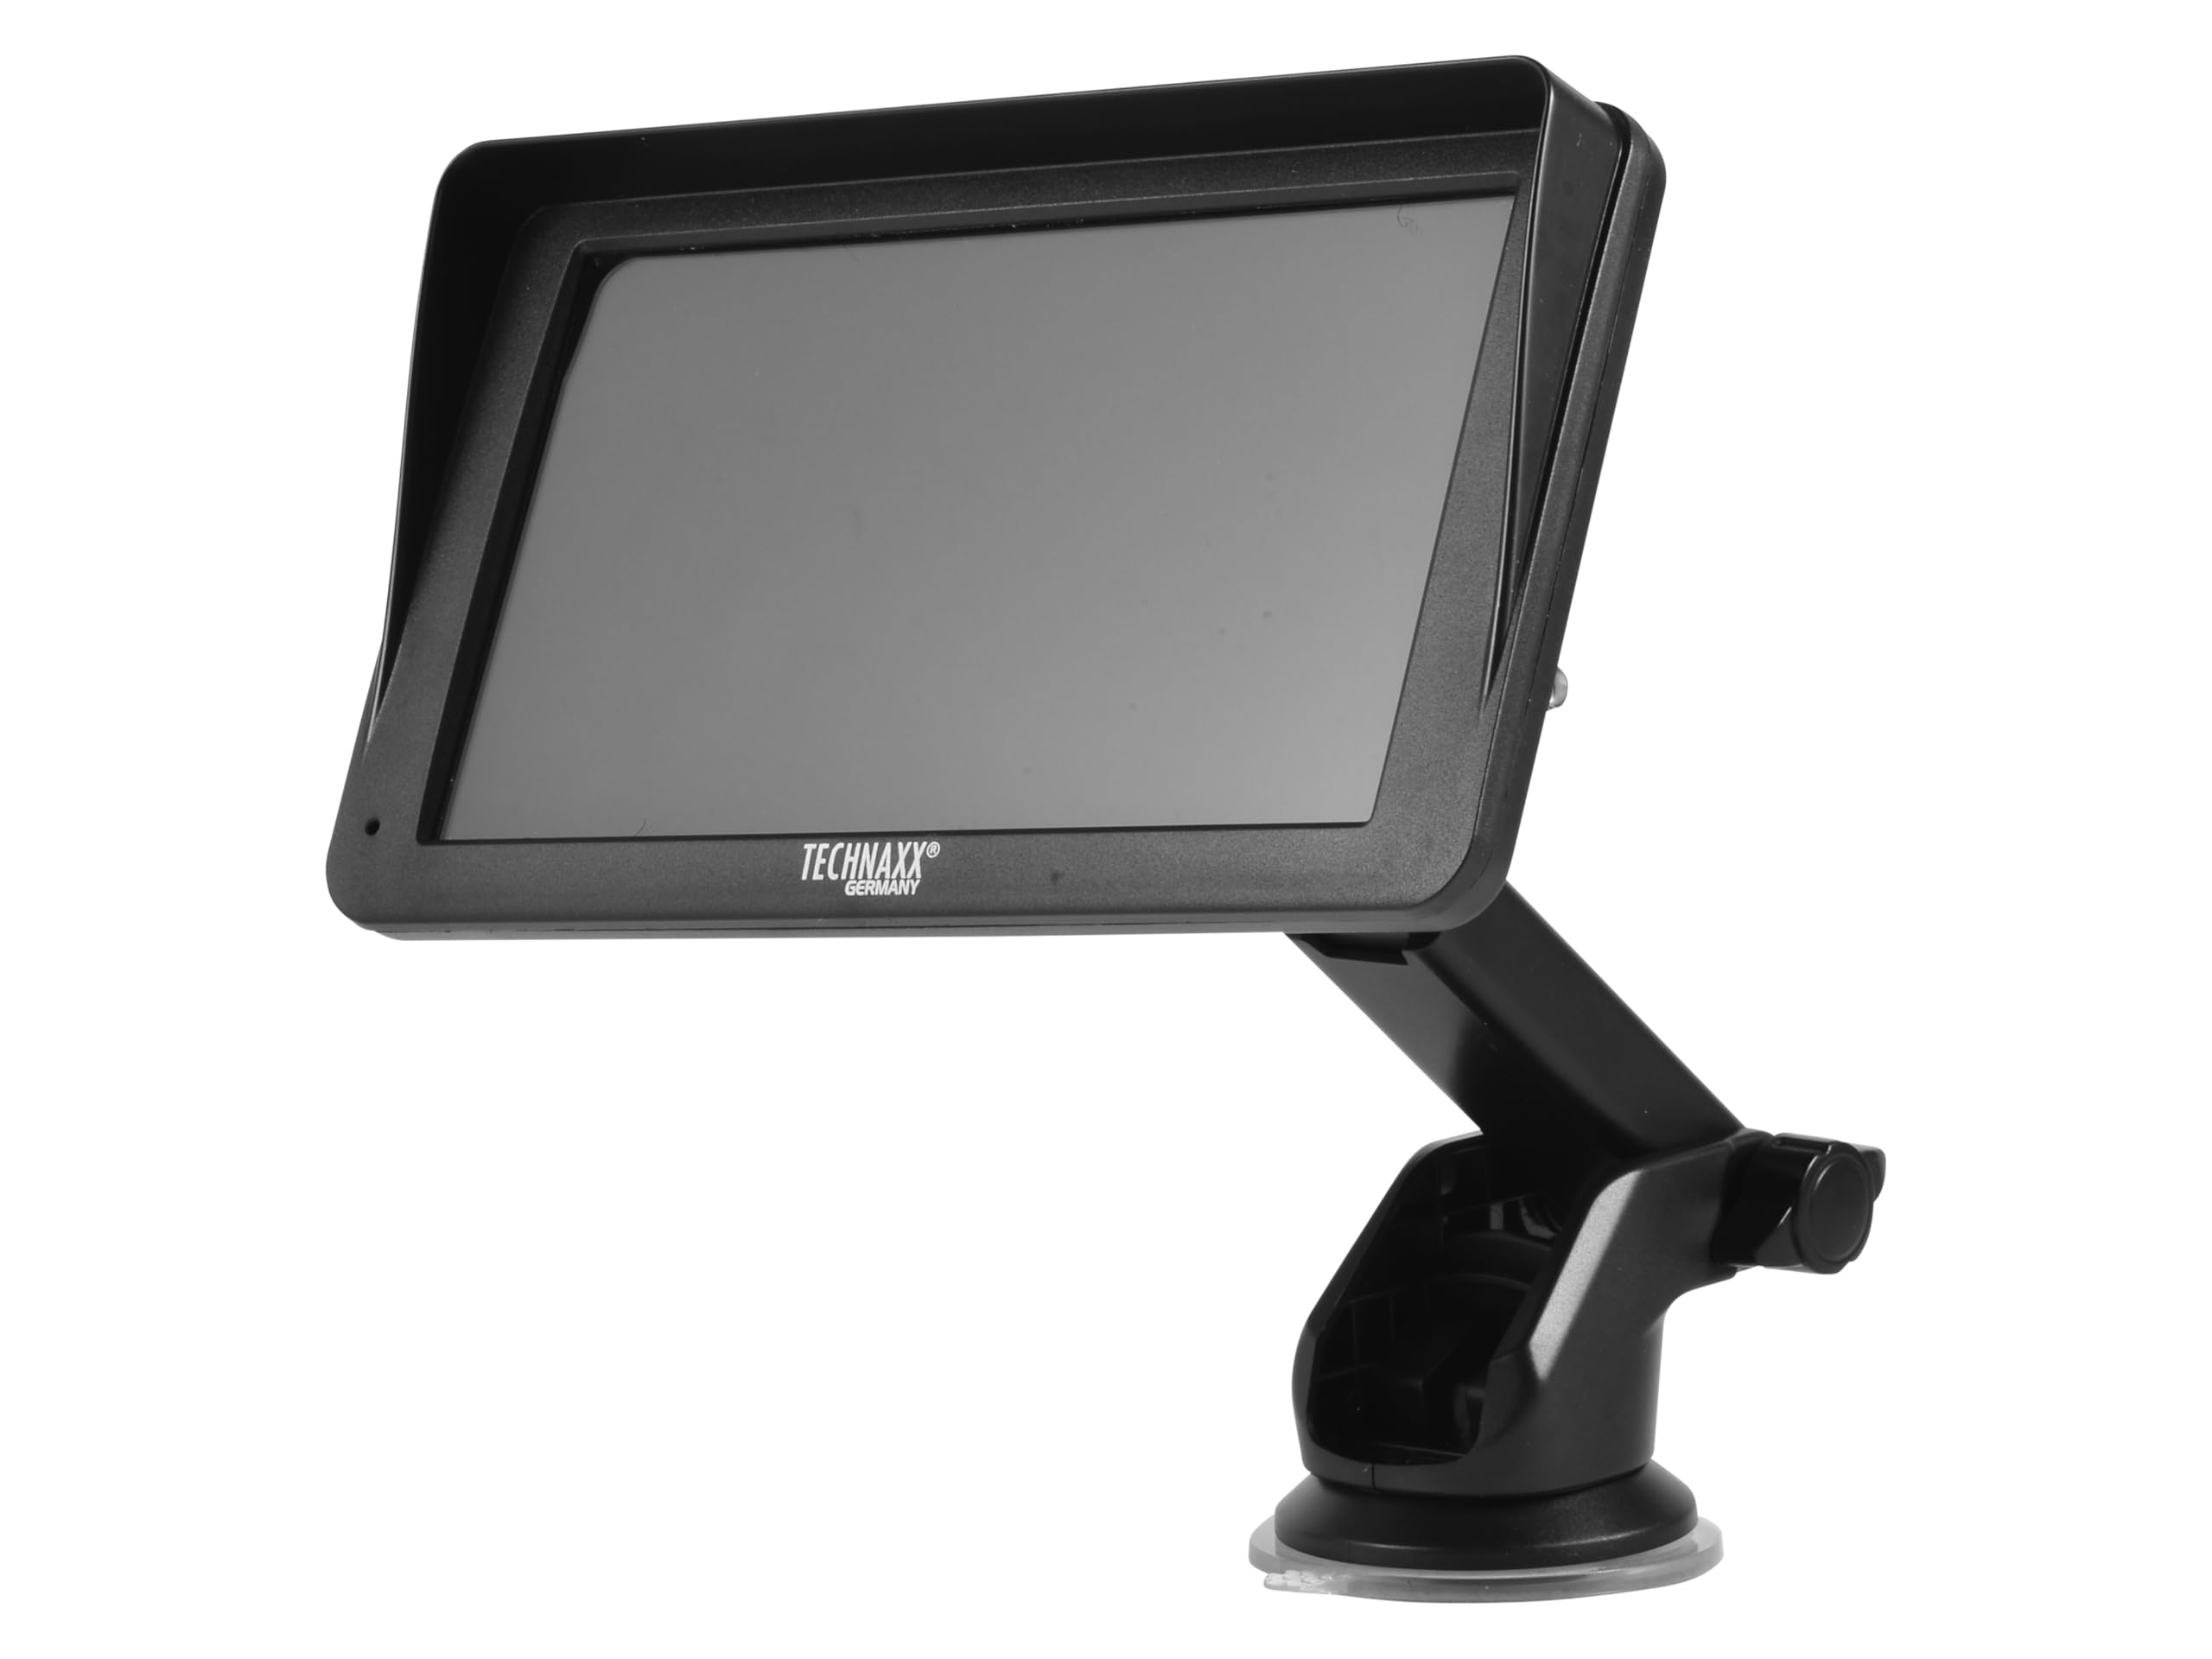
Rasm: old view of the TX-361 monitor with its 7-inch display and 'TECHN AXX GERMANY' branding, attached to the adjustable mounting stand.

Rasm: orqa view of the TX-361 monitor, highlighting the ventilation grilles and the attachment point for the mounting bracket.

Rasm: batafsil view of the right side of the TX-361 monitor, showing the power button, reset button, USB-C power input, AUX output, and USB-A port.
4.1. Qurilma komponentlari
- 7 dyuymli sig'imli sensorli ekran: Main display for all functions.
- Quvvat tugmasi: Located on the top right side.
- Qayta tiklash tugmasi: Small pinhole button for system reset.
- USB-C porti: Quvvat kiritish uchun.
- AUX chiqishi: 3.5mm jack for wired audio transmission.
- USB-A porti: For media playback or charging external devices.
- DAB Antenna Input: Connector for the external DAB antenna.
- Birlashtirilgan dinamik: For direct audio playback.
5. Sozlash
5.1. Qurilmani o'rnatish
The TX-361 can be mounted on your vehicle's windscreen or dashboard using the provided holder.
- Attach the monitor to the mounting bracket.
- For Windscreen Mounting: Clean the desired area on the windscreen. Press the suction cup firmly against the glass and engage the lever to secure it.
- Boshqaruv panelini o'rnatish uchun: Clean the desired area on the dashboard. If necessary, use the adhesive disc provided for a more secure attachment point for the suction cup. Press the suction cup firmly and engage the lever.
- Optimal bo'lishi uchun monitor burchagini sozlang viewing without obstructing your driving view.

Image: The TX-361 monitor securely mounted on a car dashboard, showing its position relative to the driver's view.

Image: The TX-361 monitor mounted on a car windscreen, demonstrating an alternative placement option.
5.2. Quvvatga ulanish
- Connect the USB-C end of the power cable to the USB-C port on the monitor.
- Plug the USB-A end of the power cable into the provided 12V/24V cigarette lighter adapter.
- Insert the cigarette lighter adapter into your vehicle's 12V/24V power socket. The device will power on automatically or can be turned on using the power button.
5.3. DAB Antenna Connection
For optimal DAB radio reception, connect the included DAB antenna:
- Connect the DAB antenna cable to the dedicated DAB antenna input on the monitor.
- Mount the DAB antenna on your windscreen or another suitable location, ensuring it has clear line of sight for best signal reception.
6. Foydalanish bo'yicha ko'rsatmalar
6.1. Quvvatni yoqish/o'chirish
- Yoqilgan: The device typically powers on automatically when connected to the vehicle's power. If not, press and hold the power button on the top right side.
- O'chirish: Press and hold the power button until the device shuts down. A short press will turn the screen off/on.
6.2. Initial Setup and Smartphone Connection
The TX-361 supports wireless Apple CarPlay and Android Auto via Wi-Fi and Bluetooth 5.0.
- Smartfoningizning Wi-Fi va Bluetooth funksiyalari yoqilganligiga ishonch hosil qiling.
- On the TX-361 monitor, navigate to the CarPlay or Android Auto section.
- The monitor will display a Bluetooth name. On your smartphone, search for and connect to this Bluetooth device.
- Once connected via Bluetooth, the device will prompt you to enable Wi-Fi for CarPlay/Android Auto functionality. Confirm the connection on your phone.
- After successful pairing, Apple CarPlay or Android Auto will launch automatically on the monitor.
6.3. Sensorli ekranning ishlashi
The 7-inch capacitive touchscreen allows for intuitive control:
- Bosing: Select items or confirm actions.
- Surish: Navigate through menus or lists.
- Kattalashtirish uchun chimchilash: (Where supported, e.g., in navigation apps) Adjust map zoom levels.
6.4. DAB Digital Radio
To use the integrated DAB digital radio:
- Ensure the DAB antenna is properly connected.
- From the main menu, select the 'DAB Radio' option.
- The device will automatically scan for available DAB stations.
- Select your desired station from the list.
6.5. FM radio
For traditional FM radio reception:
- From the main menu, select the 'FM Radio' option.
- Use the on-screen controls to scan for stations or manually tune to a frequency.
6.6. Ovoz chiqarish parametrlari
The TX-361 offers several ways to transmit audio to your vehicle's sound system:
- Birlashtirilgan dinamik: Audio will play directly from the monitor's built-in speaker.
- AUX kabeli: Connect the provided 3.5mm AUX cable from the monitor's AUX output to your car's AUX input. Select 'AUX' as the input source on your car radio.
- FM uzatish: Select an unused FM frequency on the TX-361 and tune your car radio to the same frequency. Audio will be transmitted wirelessly to your car's speakers.
7. Xizmat ko'rsatish
- Tozalash: Qurilmaning ekranini va tashqi qismini tozalash uchun yumshoq, quruq matodan foydalaning. Abraziv tozalagichlar yoki erituvchilardan foydalanmang.
- Saqlash: Agar qurilma uzoq vaqt saqlansa, uni elektrdan uzing va salqin, quruq joyda saqlang.
- Dasturiy ta'minot yangilanishlari: Vaqti-vaqti bilan ishlab chiqaruvchini tekshiring weboptimal ishlashni ta'minlash uchun har qanday mavjud proshivka yangilanishlari uchun sayt.
8. Muammolarni bartaraf qilish; nosozliklarni TUZATISH
| Muammo | Mumkin yechim |
|---|---|
| Qurilma yoqilmaydi. |
|
| Cannot connect to CarPlay/Android Auto. |
|
| Poor DAB/FM radio reception. |
|
| Ovoz chiqishi yo'q. |
|
9. Texnik shartlar
| Xususiyat | Spetsifikatsiya |
|---|---|
| Model raqami | 5361 |
| Displey | 7 dyuymli sig'imli sensorli ekran |
| Ulanish texnologiyasi | Wi-Fi (Dual-band 2.4 / 5 GHz), Bluetooth 5.0 |
| Maxsus xususiyatlar | Wireless CarPlay & Android Auto, DAB Digital Radio, FM Radio, Touchscreen Display |
| DAB chastota diapazoni | Band III: 174-240 MHz |
| Ovoz chiqishi | AUX, FM Transmission, Integrated Speaker |
| Quvvatlantirish manbai | 12V/24V via Cigarette Lighter |
| Mahsulot o'lchamlari (D x G x Y) | 18.8D x 10.8 Vt x 3.5 H santimetr |
| Element og'irligi | 0.58 funt (taxminan 263 gramm) |
10. Kafolat va qo'llab-quvvatlash
Technaxx products are covered by a manufacturer's warranty. For detailed warranty information, please refer to the warranty card included with your product or visit the official Technaxx website. For technical support, troubleshooting assistance, or service inquiries, please contact Technaxx customer support through their official channels.
Ko'pincha qo'shimcha resurslar, tez-tez so'raladigan savollar va aloqa ma'lumotlarini topishingiz mumkin Technaxx official websayt.