

1. Kirish
This manual provides essential information for the safe and effective operation, maintenance, and troubleshooting of your RYOBI 2300W Metal Chop Saw, model ECO2335HG. Please read these instructions carefully before using the tool and keep them for future reference. This powerful tool is designed for precise and rapid cutting of various metal materials, including tubes, profiles, and flat metals, making it suitable for both construction sites and workshops.
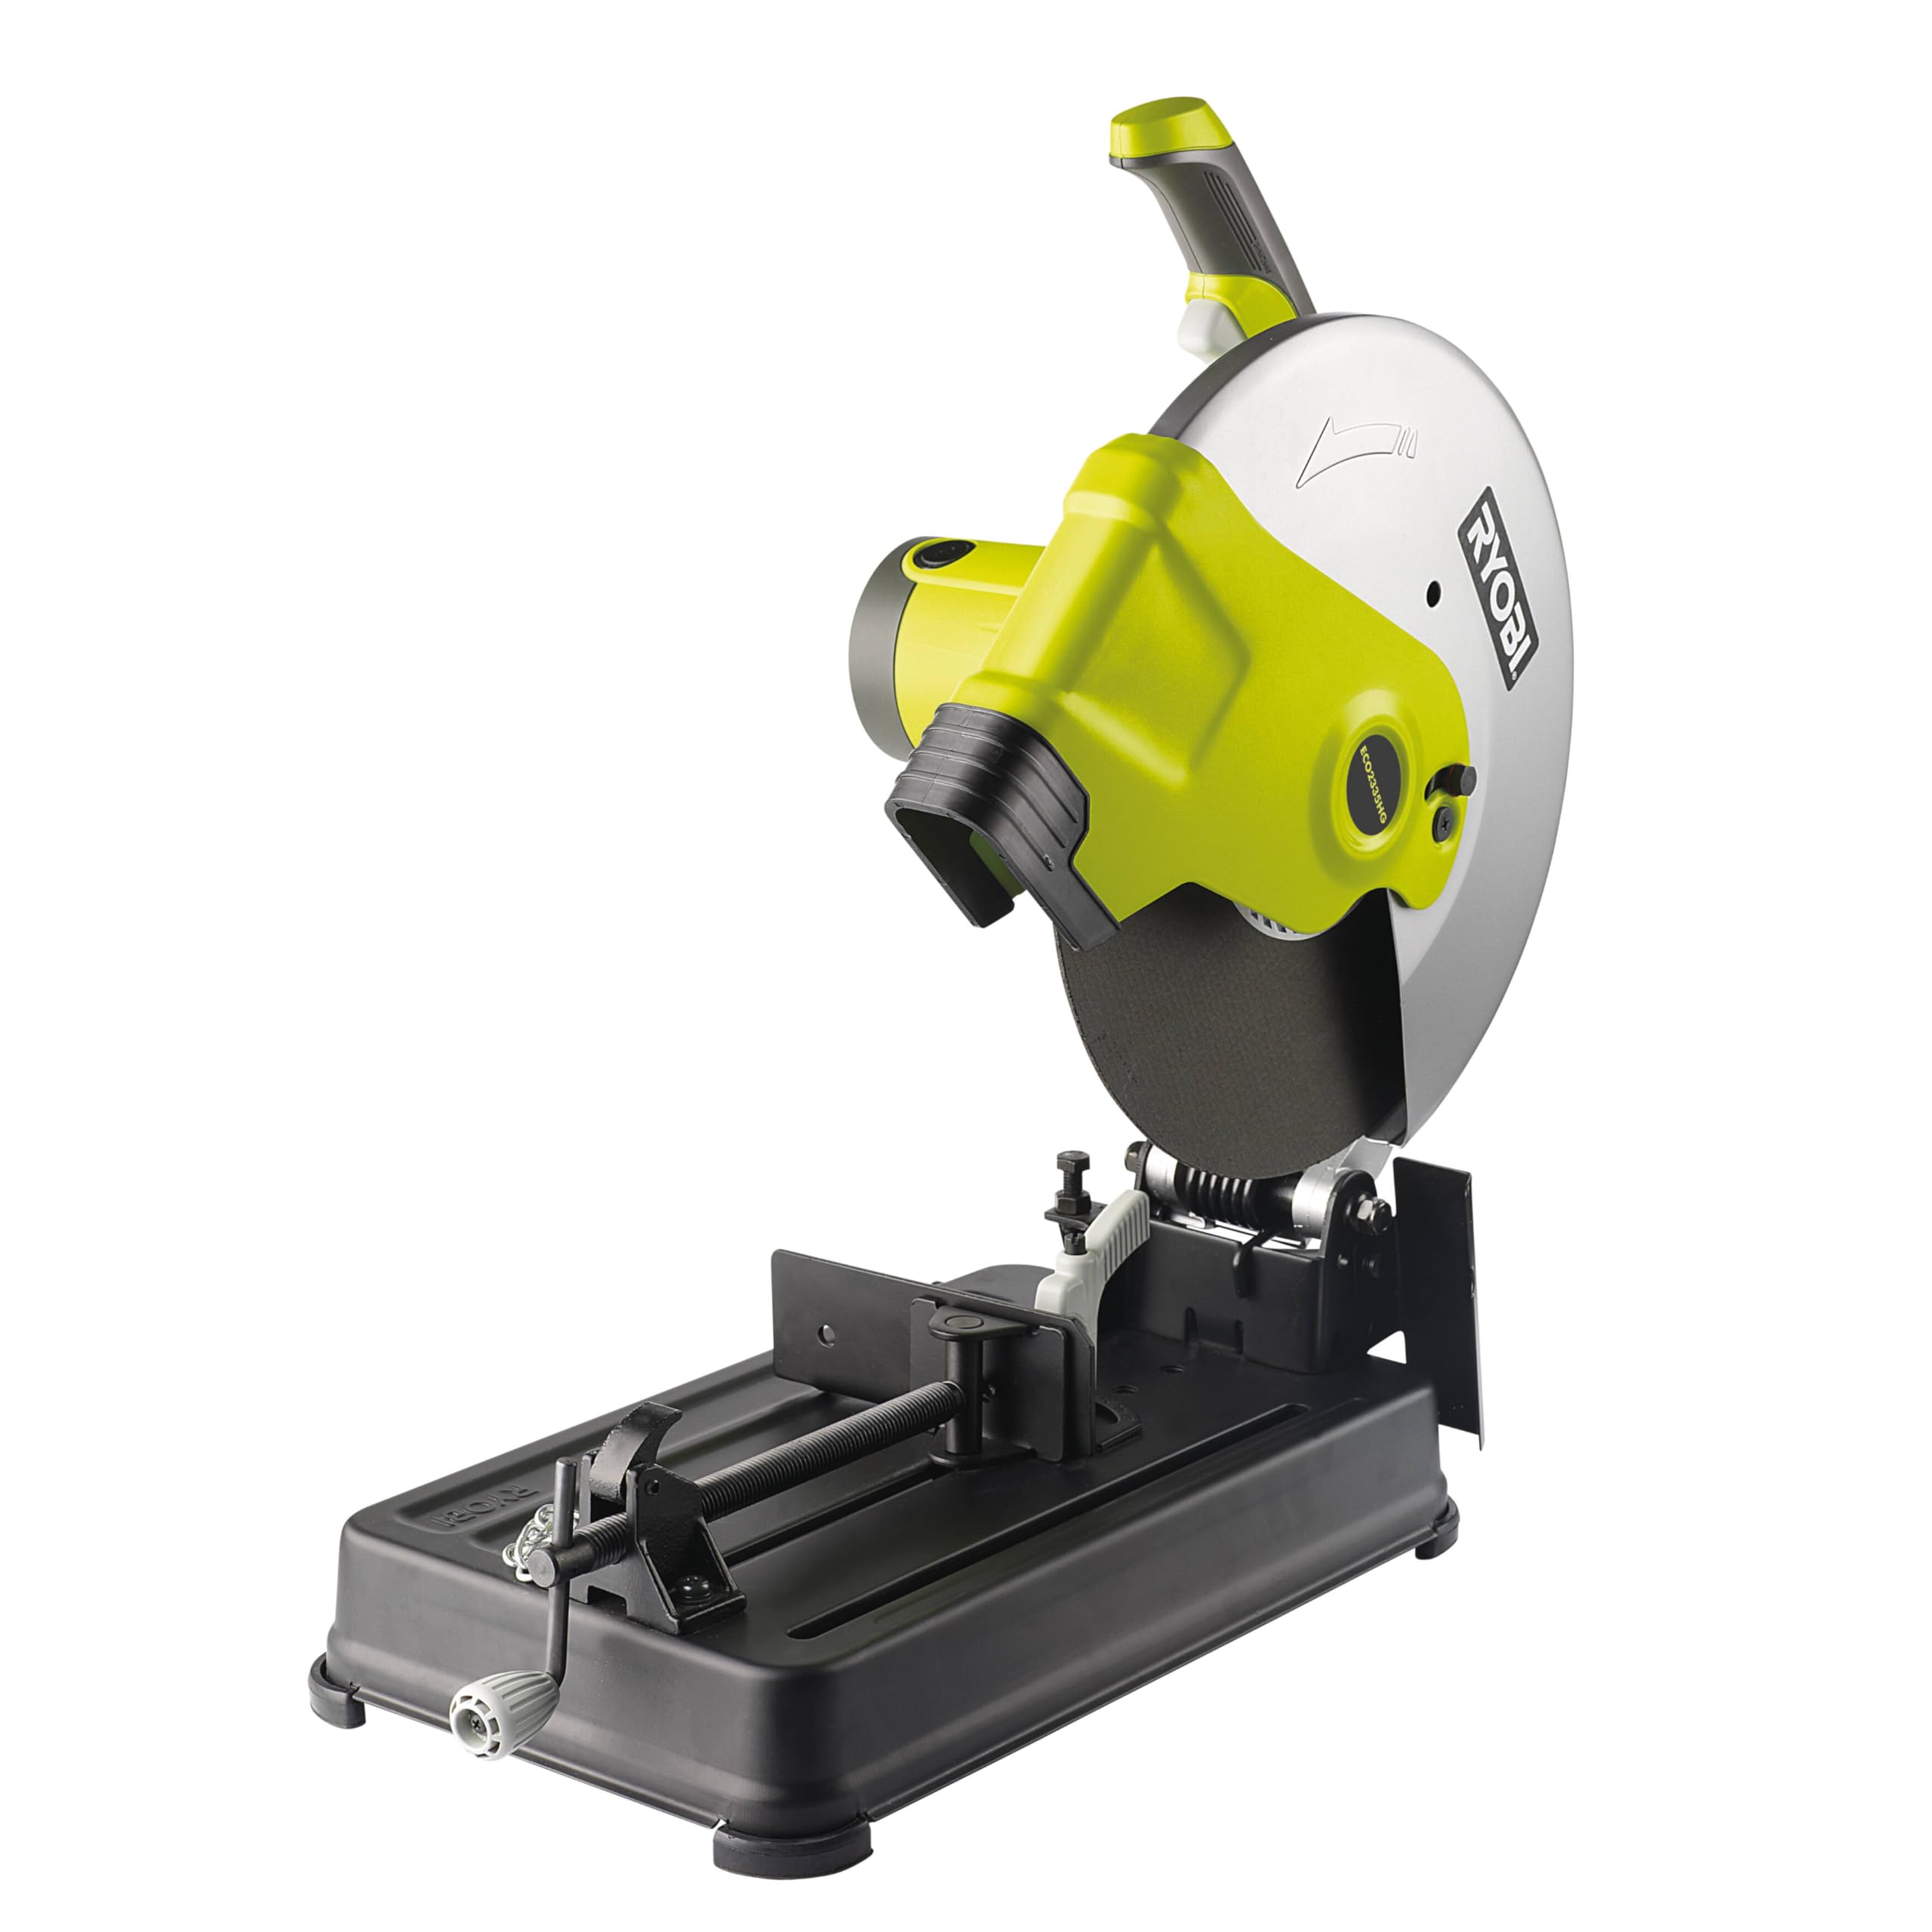
Figure 1: RYOBI ECO2335HG Metal Chop Saw. This image shows the overall view of the chop saw, highlighting its robust construction and design.
2. Umumiy xavfsizlik ma'lumotlari
Yong'in, elektr toki urishi va shaxsiy jarohatlar xavfini kamaytirish uchun har doim asosiy xavfsizlik choralariga rioya qiling. Tezkor ma'lumot olish uchun ushbu qo'llanmani qo'lingizda saqlang.
2.1. Ish maydoni xavfsizligi
- Ish joyini toza va yaxshi yoritilgan holda saqlang. Tartibsiz yoki qorong'i joylar baxtsiz hodisalarni chaqiradi.
- Elektr asboblarini portlovchi muhitda, masalan, yonuvchan suyuqliklar, gazlar yoki changlar mavjud bo'lganda ishlatmang. Elektr asboblari chang yoki tutunni yoqishi mumkin bo'lgan uchqun hosil qiladi.
- Elektr asbobini ishlatayotganda bolalar va atrofdagilarni uzoqroq tuting. Chalg'itadigan narsalar sizni nazoratni yo'qotishga olib kelishi mumkin.
2.2. Elektr xavfsizligi
- Elektr asbob vilkalari rozetkaga mos kelishi kerak. Hech qachon vilkani hech qanday tarzda o'zgartirmang.
- Quvurlar, radiatorlar, poligonlar va muzlatgichlar kabi tuproqli yoki tuproqli yuzalar bilan tanaga tegmang. Agar tanangiz erga ulangan yoki erga ulangan bo'lsa, elektr toki urishi xavfi ortadi.
- Elektr asboblarini yomg'ir yoki nam sharoitda qoldirmang. Elektr asbobiga suv tushishi elektr toki urishi xavfini oshiradi.
- Shnurni suiiste'mol qilmang. Elektr asbobini tashish, tortib olish yoki elektr tarmog'idan uzish uchun hech qachon shnurdan foydalanmang. Shnurni issiqlikdan, yog'dan, o'tkir qirralardan yoki harakatlanuvchi qismlardan uzoqroq tuting.
- The Livetool Indicator™ light will illuminate when the tool is connected to power, indicating it is live. This helps prevent accidental startup.
2.3. Shaxsiy xavfsizlik
- Always wear eye protection. Use safety glasses with side shields or goggles.
- Asbobni uzoq vaqt ishlatganda eshitish himoyasini taqing.
- To'g'ri kiyinish. Keng kiyim yoki zargarlik buyumlarini kiymang. Sochingizni, kiyimingizni va qo'lqopingizni harakatlanuvchi qismlardan uzoqroq tuting.
- Ogoh bo'ling, nima qilayotganingizni kuzatib boring va elektr asbobini ishlatganda aql-idrokdan foydalaning.
- Use safety equipment such as dust masks, non-skid safety shoes, hard hats, or hearing protection for appropriate conditions.
- Ensure the large blade guard is always in place and functioning correctly to protect against debris.
3. Mahsulot tugadiview va komponentlar
Familiarize yourself with the main parts of your RYOBI ECO2335HG Metal Chop Saw before operation.
- Cutting Wheel (Blade): 355 mm abrasive wheel for metal cutting.
- Pichoq himoyachisi: Large protective cover for user safety.
- Dvigatel korpusi: Contains the powerful 2300W motor.
- GripZone™ Handle: Bi-material handle for ergonomic and comfortable grip.
- Quick-Release Vise: Secures workpieces for cutting.
- Adjustable Miter Fence: Allows for straight and angle cuts up to 45°.
- Non-Slip Work Table: Provides stability for workpieces.
- Spindle Lock System: For quick and secure blade changes.
- Livetool Indicator™: Power-on indicator light.
- Power Cord Locking Clip: Secures the power cord.
- Accessible Safety Brushes: For easy maintenance.
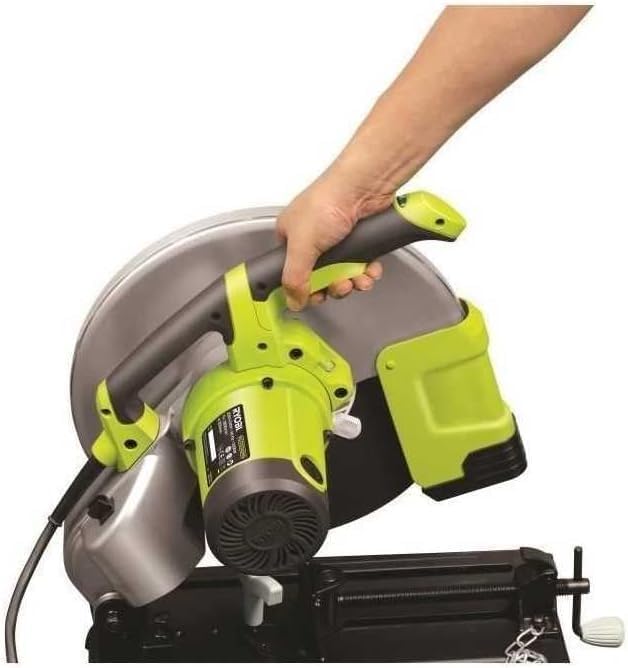
2-rasm: yon view of the chop saw, showing the GripZone™ handle for comfortable operation.

Figure 3: Close-up of the quick-release vise and non-slip work table, essential for securing materials during cutting.
4. O'rnatish va yig'ish
Before initial use, ensure the chop saw is properly assembled and secured.
4.1. Paketni ochish
- Paketdagi barcha komponentlarni ehtiyotkorlik bilan olib tashlang.
- Verify that all included items are present: chop saw unit, 355 mm cutting wheel, and service wrench.
- Yuk tashish paytida yuzaga kelishi mumkin bo'lgan har qanday zarar uchun asbobni tekshiring. Agar shikastlangan bo'lsa, ishlamang.
4.2. Mounting the Chop Saw
For optimal stability and safety, it is recommended to mount the chop saw to a sturdy workbench using appropriate fasteners (not included).
4.3. Installing/Changing the Cutting Wheel
- Quvvatni uzish: Always unplug the tool from the power source before performing any adjustments or maintenance.
- Access the Spindle: Loosen the screws and open the blade guard to access the cutting wheel.
- Shpindel qulfini yoqing: Milning aylanishini oldini olish uchun milni qulflash tugmasini bosing va ushlab turing.
- Eski g'ildirakni olib tashlang: Use the provided service wrench to loosen the arbor nut. Remove the outer flange and the old cutting wheel.
- Yangi g'ildirakni o'rnatish: Place the new 355 mm cutting wheel onto the spindle, ensuring it is correctly seated. The arrow on the wheel should match the rotation direction indicated on the tool.
- Xavfsiz g'ildirak: Replace the outer flange and tighten the arbor nut firmly with the service wrench while holding the spindle lock. Do not overtighten.
- Close Guard: Close and secure the blade guard.

4-rasm: orqa view of the chop saw, showing the motor housing and power cord connection point.

Figure 5: Close-up showing the accessible safety brushes, which are important for motor maintenance.
5. Foydalanish bo'yicha ko'rsatmalar
Follow these steps for safe and effective operation of your metal chop saw.
5.1. Preparing the Workpiece
- Ensure the workpiece is clean and free of obstructions.
- Mark the cutting line clearly on the material.
- Place the workpiece firmly against the miter fence and secure it with the quick-release vise. Ensure the material is stable and will not shift during cutting.
5.2. Adjusting for Angle Cuts
The miter fence can be adjusted up to 45° for angle cuts.
- Loosen the locking mechanism for the miter fence.
- Pivot the fence to the desired angle (up to 45°).
- Tighten the locking mechanism securely to fix the fence in position.
- Always perform a test cut on scrap material to verify the angle before cutting your final workpiece.
5.3. Kesim yasash
- Quvvatni ulash: Plug the tool into a suitable power outlet. The Livetool Indicator™ will light up.
- O'zingizni joylashtiring: Stand to the side of the cutting line, away from the path of the blade and any potential sparks or debris.
- Start the Tool: Press the trigger switch to start the motor. Allow the cutting wheel to reach full speed before beginning the cut.
- Lower the Blade: Slowly and steadily lower the cutting wheel into the workpiece. Apply even pressure. Do not force the cut.
- Kesishni yakunlang: Continue lowering until the cut is complete.
- Triggerni chiqarish: Release the trigger switch and allow the blade to stop completely before raising it from the workpiece.
- Ish qismini olib tashlash: Once the blade has stopped and is raised, carefully unclamp and remove the cut workpiece.
WARNING: Sparks and hot debris will be generated during cutting. Ensure proper ventilation and keep flammable materials away from the work area.
6. Xizmat ko'rsatish
Regular maintenance ensures the longevity and safe operation of your RYOBI ECO2335HG Metal Chop Saw.
6.1. Tozalash
- Quvvatni uzish: Tozalashdan oldin har doim asbobni elektr tarmog'idan uzing.
- Asbobni muntazam ravishda yumshoq, d bilan tozalangamp mato. Qattiq kimyoviy moddalar yoki abraziv tozalash vositalaridan foydalanmang.
- Remove any metal dust or debris from the motor vents and around the blade guard using compressed air or a brush.
- Keep the non-slip work table clean to ensure proper workpiece stability.
6.2. Karbon cho'tkasini almashtirish
The motor's carbon brushes are wear items and will need replacement over time. The ECO2335HG features accessible safety brushes for easy replacement.
- Quvvatni uzish: Asbobni elektr tarmog'idan uzing.
- Cho'tka qopqoqlarini toping: Identify the brush caps on the motor housing (refer to Figure 5).
- Remove Caps: Use a screwdriver to unscrew the brush caps.
- Replace Brushes: Remove the old carbon brushes and insert new, genuine RYOBI replacement brushes.
- Xavfsiz qopqoqlar: Replace and tighten the brush caps.
- After replacing brushes, run the tool at no-load for a few minutes to allow the new brushes to seat properly.
6.3. Blade Inspection and Replacement
- Regularly inspect the cutting wheel for wear, cracks, or damage. A worn or damaged wheel can be dangerous and reduce cutting efficiency.
- Replace the cutting wheel as described in Section 4.3 when it becomes dull or damaged.
- Only use 355 mm abrasive cutting wheels designed for metal.
7. Muammolarni bartaraf qilish; nosozliklarni TUZATISH
This section addresses common issues you might encounter with your chop saw.
| Muammo | Mumkin sabab | Yechim |
|---|---|---|
| Asbob ishga tushmaydi. | Elektr ta'minoti yo'q. Noto'g'ri quvvat simi/vilka. Eskirgan uglerod cho'tkalari. Noto'g'ri kalit. |
Elektr ulanishini va rozetkani tekshiring. Inspect cord/plug for damage. Replace if necessary. Replace carbon brushes (Section 6.2). Malakali xizmat ko'rsatish xodimlariga murojaat qiling. |
| Motordan haddan tashqari uchqun chiqmoqda. | Eskirgan uglerod cho'tkalari. Dvigatelning haddan tashqari yuklanishi. |
Replace carbon brushes (Section 6.2). Reduce cutting pressure. Allow motor to cool. |
| Poor cutting performance / Slow cutting. | Dull or worn cutting wheel. Incorrect cutting technique. Dvigatelning haddan tashqari yuklanishi. |
Replace cutting wheel (Section 4.3). Apply steady, even pressure. Do not force. Reduce cutting pressure. Ensure proper material clamping. |
| Noto'g'ri burchaklarni kesish. | Miter fence not securely locked. Workpiece not properly clamped. |
Ensure miter fence is tightly secured after adjustment. Verify workpiece is firmly held by the vise. |
If you encounter problems not listed here or if solutions do not resolve the issue, contact RYOBI customer service or a qualified service center.
8. Texnik spetsifikatsiyalar
| Xususiyat | Spetsifikatsiya |
|---|---|
| Model raqami | ECO2335HG (5133000704) |
| Quvvat kiritish | 2300W (Note: Some specifications may list 1800W, but the product is marketed as 2300W) |
| Yuksiz tezlik | 3800 aylanish tezligi |
| G'ildirak diametri | 355 mm |
| Arbor diametri | 25.4 mm |
| Max. Cutting Capacity (Tube 90°) | 115 mm |
| Max. Cutting Capacity (Tube 45°) | 115 mm |
| Max. Cutting Capacity (L-Profile 90°) | 137 mm |
| Max. Cutting Capacity (L-Profile 45°) | 100 mm |
| Adjustable Cutting Angle | 45 darajagacha |
| Element og'irligi | 16 kilogramm |
| Mahsulot o'lchamlari (U x G x Y) | 200 x 120 x 91.4 sm |
| Quvvat manbai | Simli elektr |
| Pichoq materiali | Metal (Abrasive) |
| Tutqich materiali | Plastic, Rubber (GripZone™) |
9. Kafolat va qo'llab-quvvatlash
9.1. Cheklangan kafolat
This RYOBI product is covered by a limited warranty. Please refer to the warranty card included with your product or visit the official RYOBI website for full terms and conditions. Keep your proof of purchase for warranty claims.
9.2. Ehtiyot qismlar mavjudligi
Spare parts for the ECO2335HG model are generally available for up to 5 years from the date of purchase. Contact your local RYOBI service center for spare parts inquiries.
9.3. Mijozlarni qo'llab-quvvatlash
For technical assistance, service, or questions regarding your RYOBI Metal Chop Saw, please contact RYOBI customer support through their official websayt yoki mahsulot hujjatlarida ko'rsatilgan aloqa ma'lumotlari.