
Kirish
This manual provides detailed instructions for the installation, operation, and maintenance of your Venstar T1900 Residential Slimline Platinum Thermostat. Please read this manual thoroughly before attempting to install or operate the thermostat to ensure proper function and to avoid potential damage.
Xavfsizlik bo'yicha muhim ma'lumotlar
- Always turn off power to the heating/cooling system at the main circuit breaker or fuse box before installing or servicing the thermostat.
- This thermostat operates on 24 Volts AC. Do not connect to line voltage (120V yoki 240V).
- Agar siz elektr simlarini o'rnatish bilan tanish bo'lmasangiz, o'rnatish malakali texnik tomonidan amalga oshirilishi kerak.
- Do not short circuit the terminals on the gas valve or at the system control to test the thermostat. This will damage the thermostat and void the warranty.
- Ensure all wiring connections are secure and insulated to prevent short circuits.
Paket tarkibi
Paketingizda quyidagi elementlar mavjudligiga ishonch hosil qiling:
- Venstar T1900 Thermostat Unit
- O'rnatish moslamalari (vintlar va devor ankrajlari)
- Foydalanuvchi uchun qo'llanma (ushbu hujjat)
Mahsulot tugadiview
The Venstar T1900 is a 7-day programmable digital thermostat designed for residential use. It offers precise temperature control and energy-saving scheduling capabilities. This thermostat is compatible with heat/cool, heat pump, and dual-fuel systems, controlling up to three heat stages va ikkita ajoyib stages.
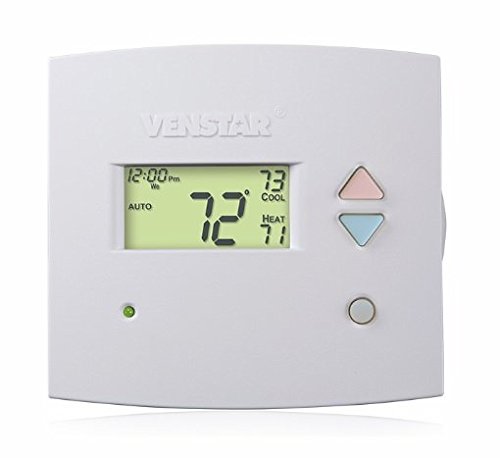
1-rasm: Old view of the Venstar T1900 Thermostat. This image displays the thermostat's LCD screen and control buttons, indicating its slimline design.
Asosiy xususiyatlar:
- 7 kunlik dasturlash imkoniyati: Allows for customized heating and cooling schedules for each day of the week.
- Tizim muvofiqligi: Works with heat/cool, dual-fuel, and heat pump systems.
- Multi-Stage Boshqarish: Manages up to three heat stages va ikkita ajoyib stages.
- Masofadan boshqarish qobiliyati: Controllable by phone using an optional add-on (sold separately).
- Automatic or Manual Operation: Provides flexibility for scheduled or on-demand temperature adjustments.
O'rnatish uchun qo'llanma
Kerakli vositalar:
- Screwdriver (Phillips and/or flathead)
- Drill with appropriate drill bit (if installing new wall anchors)
- Telli shtutserlar
- Qalam
- Daraja (ixtiyoriy)
1. Quvvatni o'chiring
Locate the circuit breaker or fuse box that controls your heating and cooling system. Turn off the power completely before proceeding with any wiring.
2. Remove Old Thermostat (if applicable)
- Eski termostatingizning qopqog'ini ehtiyotkorlik bilan olib tashlang.
- Ma'lumot uchun mavjud sim ulanishlarining rasmini oling.
- Label each wire with the terminal designation it was connected to (e.g., R, G, Y, W).
- Simlarni ajratib oling va eski termostatning o'rnatish plitasini devordan olib tashlang.
3. Mount the New Thermostat Base
- Separate the front cover of the T1900 thermostat from its base plate.
- Position the base plate on the wall where you want to install the thermostat. Ensure it is level.
- O'rnatish teshiklarini qalam bilan belgilang.
- Drill pilot holes if necessary and insert wall anchors.
- Secure the thermostat base plate to the wall using the provided screws.
4. Elektr kabellari
Connect the wires from your HVAC system to the corresponding terminals on the T1900 thermostat base. Refer to the wiring diagram provided with your specific HVAC system for precise connections. Ensure wires are stripped approximately 3/8 inch and securely fastened under the terminal screws.
Common Terminal Designations:
- R/Rc/Rh: 24V Power (Heating/Cooling)
- C: Common (24V return)
- G: Muxlis
- Y/Y1: Kompressor S.tage 1 (sovutish)
- Y2: Kompressor S.tage 2 (sovutish)
- W/W1: Issiqlik S.tage 1 (isitish)
- W2: Issiqlik S.tage 2 (isitish)
- O / B: Reversing Valve (Heat Pumps)
Note: The T1900 supports various system types. Consult the detailed wiring diagrams in the full installation manual for specific configurations (e.g., heat pump with auxiliary heat, conventional multi-stage tizimlar).
5. Attach Thermostat to Base
Once wiring is complete and verified, carefully align the thermostat front cover with the mounted base plate and snap it into place.
6. Quvvatni tiklash
Return to your circuit breaker or fuse box and restore power to your heating and cooling system.
Dastlabki sozlash
Upon initial power-up, the thermostat may prompt you to configure basic settings. Follow the on-screen instructions to set the current date, time, and system type (e.g., Conventional, Heat Pump).
System Type Configuration:
It is crucial to correctly configure the thermostat for your specific HVAC system. Incorrect settings can lead to improper operation or damage. Access the installer settings menu (refer to the full installation guide for specific button sequences) to select:
- Tizim turi: Heat/Cool, Heat Pump, Dual Fuel
- Issiqlik soni Stages
- Salqin S sonitages
- Reversing Valve Operation: O (Cooling) or B (Heating)
Foydalanish bo'yicha ko'rsatmalar
Displeyni tushunish:
The LCD screen displays the current temperature, set temperature, system mode, fan mode, time, and programming status. Refer to the icons and indicators on the screen for current operational status.
Setting System Mode:
ni bosing REJIM Mavjud tizim rejimlari orasida o'tish uchun tugma:
- ISITISH: The system will operate to maintain the heating setpoint.
- SAVOL: The system will operate to maintain the cooling setpoint.
- AVTO: The thermostat automatically switches between heating and cooling as needed to maintain the set temperature range.
- O'chirish: Isitish va sovutish tizimi o'chirilgan.
Setting Fan Mode:
ni bosing MUHLIS fan rejimlari orasida aylanish uchun tugma:
- AVTO: Fan faqat isitish yoki sovutish tizimi faol ishlaganda ishlaydi.
- ON: Ventilyator isitish yoki sovutish chaqiruvlaridan qat'i nazar, uzluksiz ishlaydi.
Haroratni sozlash:
dan foydalaning UP va PASTGA arrow buttons to adjust the desired temperature setpoint. In programmable modes, this will temporarily override the schedule until the next scheduled change.
Programming Schedules (7-Day):
The T1900 allows for 7-day programming, enabling different schedules for each day of the week. This feature helps save energy by adjusting temperatures when you are away or asleep.
- ni bosing DASTUR dasturlash rejimiga kirish uchun tugma.
- dan foydalaning KUN button to select the day or group of days you wish to program (e.g., Mon-Fri, Sat-Sun, or individual days).
- dan foydalaning TIME button to cycle through the four available periods: Wake, Leave, Return, Sleep.
- dan foydalaning UP va PASTGA arrow buttons to set the desired temperature for each period.
- dan foydalaning TUTING button to exit programming mode or save changes.
Refer to the detailed programming section in the full user guide for advanced options and specific button sequences.
Remote Control (Optional Add-on):
The Venstar T1900 thermostat can be controlled remotely via a phone using an optional add-on module (sold separately). This module connects to the thermostat and allows for remote access and control through a dedicated application. Installation and setup instructions for the remote control module are provided with the module itself.
Xizmat
Cleaning the Thermostat:
To maintain the appearance and functionality of your thermostat, periodically wipe the exterior with a soft, damp mato. Abraziv tozalagichlar, erituvchilar yoki kimyoviy purkagichlardan foydalanmang, chunki ular plastik va elektron qismlarga zarar etkazishi mumkin.
Batareyani almashtirish:
The Venstar T1900 thermostat does not require batteries for operation as it is powered by the 24V AC system.
Muammolarni bartaraf qilish; nosozliklarni TUZATISH
If you experience issues with your Venstar T1900 thermostat, consult the following common problems and solutions:
| Muammo | Mumkin sabab | Yechim |
|---|---|---|
| Termostat ekrani bo'sh | Termostatga quvvat yo'q. | Check the circuit breaker for your HVAC system. Ensure all wiring connections are secure. |
| Heating/Cooling system does not respond | Incorrect system mode selected; wiring issue; system lockout. | Verify the system mode (HEAT/COOL/AUTO). Check wiring connections. Wait 5 minutes for system lockout to reset. |
| Haroratni o'qish noto'g'ri ko'rinadi | Thermostat location; sensor obstruction. | Ensure the thermostat is not exposed to direct sunlight, drafts, or heat sources. Clean any dust from the thermostat vents. |
| Programming schedule is not working | Program not saved; temporary override active; incorrect time/day setting. | Ensure programs are saved. Check if a temporary override is active and cancel it. Verify current time and day settings. |
| Fan runs continuously in AUTO mode | Fan mode set to ON; wiring issue. | Press the FAN button to ensure it is set to AUTO. Check fan wiring. |
If these solutions do not resolve the issue, please contact customer support or a qualified HVAC technician.
Texnik xususiyatlari
| Xususiyat | Spetsifikatsiya |
|---|---|
| Brend | Venstar |
| Model nomi | Venstdar t1900 |
| Nazoratchi turi | Bosish tugmasi |
| Maxsus xususiyat | Dasturlashtiriladigan |
| Rang | Oq |
| Mahsulot uchun maxsus foydalanish | Heat Pump, Heater |
| Haroratni nazorat qilish turi | Programmable, Smart/Remote (with add-on) |
| jildtage | 24 voltli o'zgaruvchan tok |
| Displey turi | LCD yoki LED |
| Nazorat usuli | Remote (with add-on) |
| Orqa yorug'lik | Ha |
| Mahsulot o'lchamlari | 5.3 x 2 x 2 dyuym |
| Element og'irligi | 0.01 untsiya |
| Batareyalar kerakmi? | Yo'q |
Kafolat haqida ma'lumot
Venstar products are manufactured to high-quality standards. This product is covered by a limited warranty against defects in materials and workmanship. The specific terms and duration of the warranty may vary. Please refer to the warranty card included with your product or visit the official Venstar website for detailed warranty information and registration procedures.
Mijozlarni qo‘llab-quvvatlash
For technical assistance, troubleshooting, or warranty inquiries, please contact Venstar customer support. You can typically find contact information, including phone numbers and email addresses, on the official Venstar websayt (www.venstar.com) or on the product packaging.
When contacting support, please have your thermostat model number (T1900) and any relevant purchase information ready.