
Kirish
This manual provides essential information for the safe and efficient operation of your BEPER P102CON001 Vacuum Sealer. This appliance is designed to extend the freshness of food by removing air from specially designed bags and sealing them, preventing freezer burn, reducing spoilage, and preserving nutritional value. Please read these instructions carefully before first use and keep them for future reference.
Xavfsizlik bo'yicha ko'rsatmalar
- Tozalashdan oldin yoki ishlatilmaganda har doim jihozni elektr rozetkasidan uzing.
- Jihozni, quvvat simini yoki suvga yoki boshqa suyuqlikka botirmang.
- Ushbu jihoz jismoniy, hissiy yoki aqliy qobiliyatlari cheklangan yoki tajribasi va bilimi kam bo'lgan shaxslar (jumladan, bolalar) foydalanishi uchun mo'ljallanmagan, agar ularga xavfsizlik uchun mas'ul shaxs tomonidan nazorat qilinmagan yoki asbobdan foydalanish bo'yicha ko'rsatma berilmagan bo'lsa. .
- Keep children away from the appliance during operation and storage.
- Elektr shnuri yoki vilkasi shikastlangan bo'lsa yoki jihoz ishlamay qolsa yoki biron bir tarzda shikastlangan bo'lsa, jihozni ishlatmang.
- Use only original BEPER accessories and bags designed for this vacuum sealer.
- The appliance features an overheating protection system. If the device overheats, allow it to cool down before resuming operation.
- Ensure the sealing strip is clean and dry before each use to ensure a proper seal.
Mahsulot komponentlari
Familiarize yourself with the main parts of your BEPER P102CON001 Vacuum Sealer:
- Qopqoq: Covers the vacuum chamber and sealing strip.
- Vakuum kamerasi: Area where air is removed from the bag.
- Muhrlash tasmasi: Heats up to create a secure seal on the bag.
- Releasing Valve: Used to release pressure after vacuum sealing.
- Air Suction Port: Where air is drawn out during vacuuming.
- Boshqarish tugmalari:
- VAC SEAL: Initiates vacuuming and then sealing.
- STOP: Joriy operatsiyani to'xtatadi.
- MUHR: Initiates sealing only (without vacuuming).
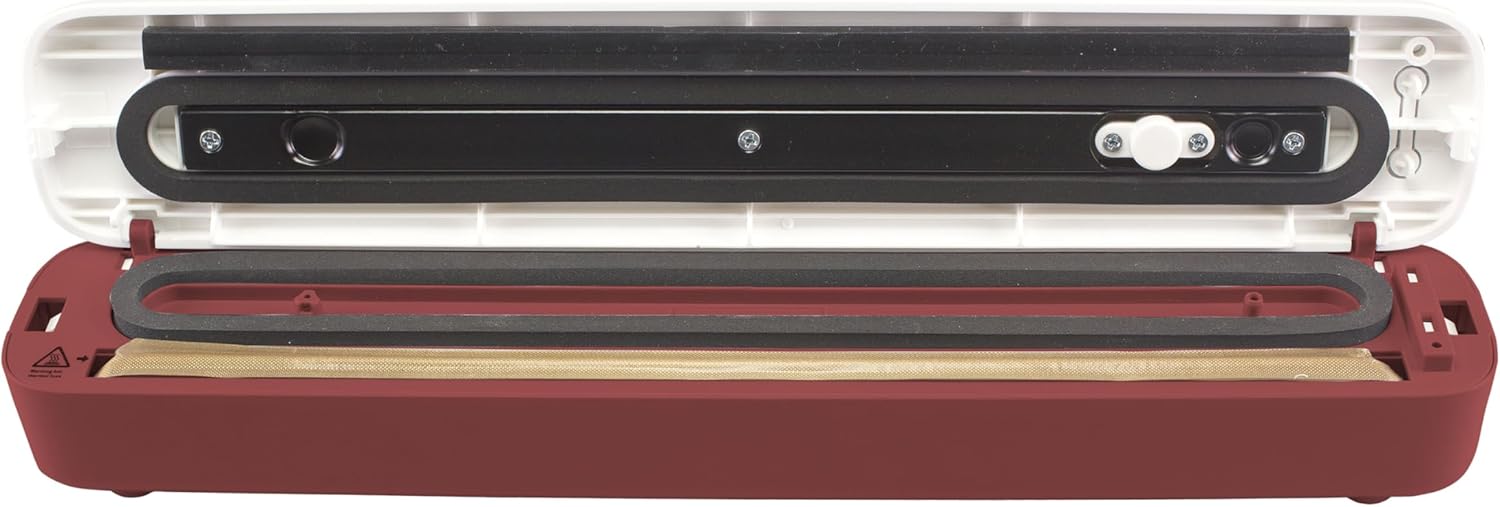
Image: The BEPER P102CON001 Vacuum Sealer with its lid open, revealing the internal components such as the sealing strip and vacuum chamber, essential for its operation.
Sozlash; o'rnatish
- Paketni ochish: Carefully remove the vacuum sealer and all accessories from its packaging.
- Tekshirish: Jihozni shikastlanganlik belgilarini tekshiring. Agar shikastlangan bo'lsa, foydalanmang.
- Joylashtirish: Vakuum plomba vositasini tekis, barqaror va quruq yuzaga qo'ying. Jihoz atrofida to'g'ri shamollatish uchun yetarli joy borligiga ishonch hosil qiling.
- Quvvat ulanishi: Elektr simini mos keladigan elektr rozetkaga ulang.

Rasm: yuqoridan pastga view of the BEPER P102CON001 Vacuum Sealer, illustrating its compact design and readiness for setup on a kitchen counter.
Foydalanish bo'yicha ko'rsatmalar
Xaltani tayyorlash
Ensure the bag is clean and dry, especially the area where the seal will be made. Do not overfill the bag; leave at least 7-10 cm of space from the top for proper sealing. The appliance comes with 5 reusable bags measuring 25 x 30 cm.

Image: A stack of five clear, reusable vacuum sealer bags, each measuring 25x30 cm, included with the BEPER P102CON001.
Vakuumli muhrlangan oziq-ovqat
- Place the food item inside a vacuum sealer bag.
- Vakuum plomba qopqog'ini oching.
- Place the open end of the bag into the vacuum chamber, ensuring it lies flat and smooth over the sealing strip. The bag should not extend beyond the sealing strip.
- Close the lid firmly until you hear a click, indicating it is securely locked.
- ni bosing VAC muhri button. The appliance will automatically vacuum the air out of the bag and then proceed to seal it.
- Once the process is complete, the indicator light will turn off. Press the Releasing Valve to release the vacuum pressure, then open the lid.
- Remove the sealed bag. Check the seal to ensure it is airtight.

Image: A close-up of a hand initiating the vacuum and seal process by pressing the 'VAC SEAL' button on the BEPER P102CON001, with a bag containing food positioned for sealing.

Image: The BEPER P102CON001 Vacuum Sealer shown with a perfectly vacuum-sealed steak in a bag, demonstrating the successful preservation of food.
Sealing Only (without Vacuum)
This function is useful for sealing bags of dry goods that do not require vacuuming, such as chips or bread, or for creating custom-sized bags from a roll.
- Place the open end of the bag directly over the sealing strip, ensuring it is flat and smooth. Do not place it inside the vacuum chamber.
- Qopqoqni chertib chiqmaguncha mahkam yoping.
- ni bosing MUHR button. The appliance will heat the sealing strip to create a seal.
- Once the indicator light turns off, press the Releasing Valve and open the lid.
- Remove the sealed bag.

Image: An illustrative diagram of the BEPER P102CON001 Vacuum Sealer, highlighting its dual functions (vacuum+seal, seal only), the 30 cm sealing area, and the inclusion of 5 bags.
Xizmat va tozalash
Muntazam tozalash optimal ishlashni ta'minlaydi va vakuum plomba vositangizning ishlash muddatini uzaytiradi.
- Rozetkadan uzing: Tozalashdan oldin har doim jihozni elektr tarmog'idan uzing.
- Tashqi: Jihozning tashqi qismini yumshoq mato bilan artib oling, damp mato. Abraziv tozalash vositalarini yoki erituvchilarni ishlatmang.
- Vacuum Chamber and Sealing Strip: Carefully wipe the vacuum chamber and the sealing strip with a damp cloth to remove any food residue or moisture. Ensure these areas are completely dry before closing the lid or storing the appliance.
- Saqlash: Store the appliance in a dry place, away from direct sunlight and out of reach of children.
Muammolarni bartaraf qilish; nosozliklarni TUZATISH
| Muammo | Mumkin sabab | Yechim |
|---|---|---|
| Qurilma yoqilmaydi. | Rozetkaga ulanmagan; elektr rozetkasining noto'g'ri ishlashi. | Elektr shnuri ishlaydigan rozetkaga mahkam ulanganligiga ishonch hosil qiling. |
| Vacuuming is not effective. | Bag not properly placed; lid not fully closed; bag leakage. | Ensure the bag opening is flat within the vacuum chamber. Close the lid firmly until it clicks. Check the bag for holes or tears. |
| Paket to'g'ri yopilmaydi. | Sealing strip is dirty or wet; bag is wrinkled; appliance overheated. | Clean and dry the sealing strip. Smooth out any wrinkles in the bag. Allow the appliance to cool down if it has been used continuously. |
| Air re-enters the bag after sealing. | Improper seal; food with sharp edges; bag not suitable. | Ensure a complete, even seal. Pad sharp food items. Use only bags designed for vacuum sealing. |
If you encounter issues not listed here or if problems persist, please contact customer support or a qualified service technician.
Texnik xususiyatlari
- Brend: BEPER
- Model: P102CON001
- Quvvat: 85 Vt
- Material: ABS plastik
- Mahsulot o'lchamlari: 43 x 10 x 7 sm
- Sealing Strip Length: 30 sm
- Kiritilgan aksessuarlar: 5 reusable vacuum bags (25 x 30 cm)
- Maxsus xususiyatlar: Automatic vacuum and sealing function, prevents mold and bacteria, reduces food waste.
Kafolat va qo'llab-quvvatlash
For detailed warranty information, please refer to the documentation provided with your purchase or visit the official BEPER website. If you require technical support or have questions regarding your BEPER P102CON001 Vacuum Sealer, please contact your retailer or the manufacturer's customer service department.