
MU0034 MOUNTUP
MOUNTUP MU0034 Yagona monitor stoliga oʻrnatish boʻyicha qoʻllanma
Brend: MOUNTUP | Model: MU0034
1. Kirish
This manual provides detailed instructions for the installation, operation, and maintenance of your MOUNTUP MU0034 Single Monitor Desk Mount. Please read this manual thoroughly before installation to ensure correct setup and safe operation. This monitor mount is designed to enhance your workspace ergonomics by providing adjustable positioning for a single monitor.
2. Xavfsizlik ma'lumotlari
- Ensure all components are present and undamaged before installation. Do not use if any parts are missing or faulty.
- This product is intended for monitors weighing up to 17.6 lbs (8 kg) and screen sizes from 17 to 32 inches. Do not exceed the maximum weight capacity.
- Compatible VESA patterns are 75x75mm and 100x100mm. Verify your monitor's VESA pattern before proceeding.
- Ensure the desk surface is stable and strong enough to support the combined weight of the mount and monitor.
- Barcha vintlarni mahkam torting, lekin iplarni echib tashlamaslik yoki qismlarga shikast etkazmaslik uchun ortiqcha tortmang.
- O'rnatish vaqtida bolalar va uy hayvonlarini uzoqroq tuting.
- If you have any doubts about the installation process, consult a qualified professional.
3. Paket tarkibi
Iltimos, barcha qismlar paketingizga kiritilganligiga ishonch hosil qiling:
- Monitor qo'llarini yig'ish
- Ish stoli Clamp Baza
- Grommet asos komponentlari
- VESA plitasi
- Uskuna to'plami (vintlar, yuvgichlar, olti burchakli kalitlar)
- Qo'llanma
4. Texnik shartlar
| Xususiyat | Spetsifikatsiya |
|---|---|
| Model raqami | MU0034 |
| Material | Jilolangan alyuminiy |
| Ekran o'lchamining mosligi | 17" to 32" (flat or curved) |
| Og'irlik sig'imi | 17.6 funtgacha (8 kg) |
| VESA muvofiqligi | 75x75mm, 100x100mm |
| Balandlikni sozlash | Up to 11" (16.3" total height adjustment range) |
| Nishab diapazoni | +45° dan -45° gacha |
| Burilish oralig'i | 360° (arm), 180° (monitor plate) |
| Aylanish | 360° (landscape to portrait) |
| Max Desk Thickness (C-clamp) | 3.35" |
| Grommet teshigi diametri | 0.39" - 3.1" |
5. O'rnatish va o'rnatish
The MOUNTUP MU0034 offers two installation options: C-clamp mounting and Grommet mounting. Choose the method suitable for your desk.
5.1. C-Clamp O'rnatish
This method is for desks without existing grommet holes, or if you prefer clamping to the edge of your desk. Ensure your desk thickness is no more than 3.35 inches.
- C-cl ni ulangamp: Assemble the C-clamp components to the base of the monitor arm. Position the base on the edge of your desk and tighten the clamp screw until it is secure.
- VESA plitasini monitorga ulang: Secure the VESA plate to the back of your monitor using the appropriate screws from the hardware kit. Ensure the screws are tightened securely.
- Slide Monitor onto Arm: Carefully slide the monitor (with the attached VESA plate) onto the monitor arm's VESA head. Ensure it clicks into place or is secured with the provided locking mechanism.
- Taranglikni sozlash: Refer to Section 6.1 for adjusting the gas spring tension to match your monitor's weight.

Figure 1: Illustration of C-clamp and Grommet mounting options. The C-clamp is shown securing the mount to the desk edge, while the grommet mount uses a desk hole.
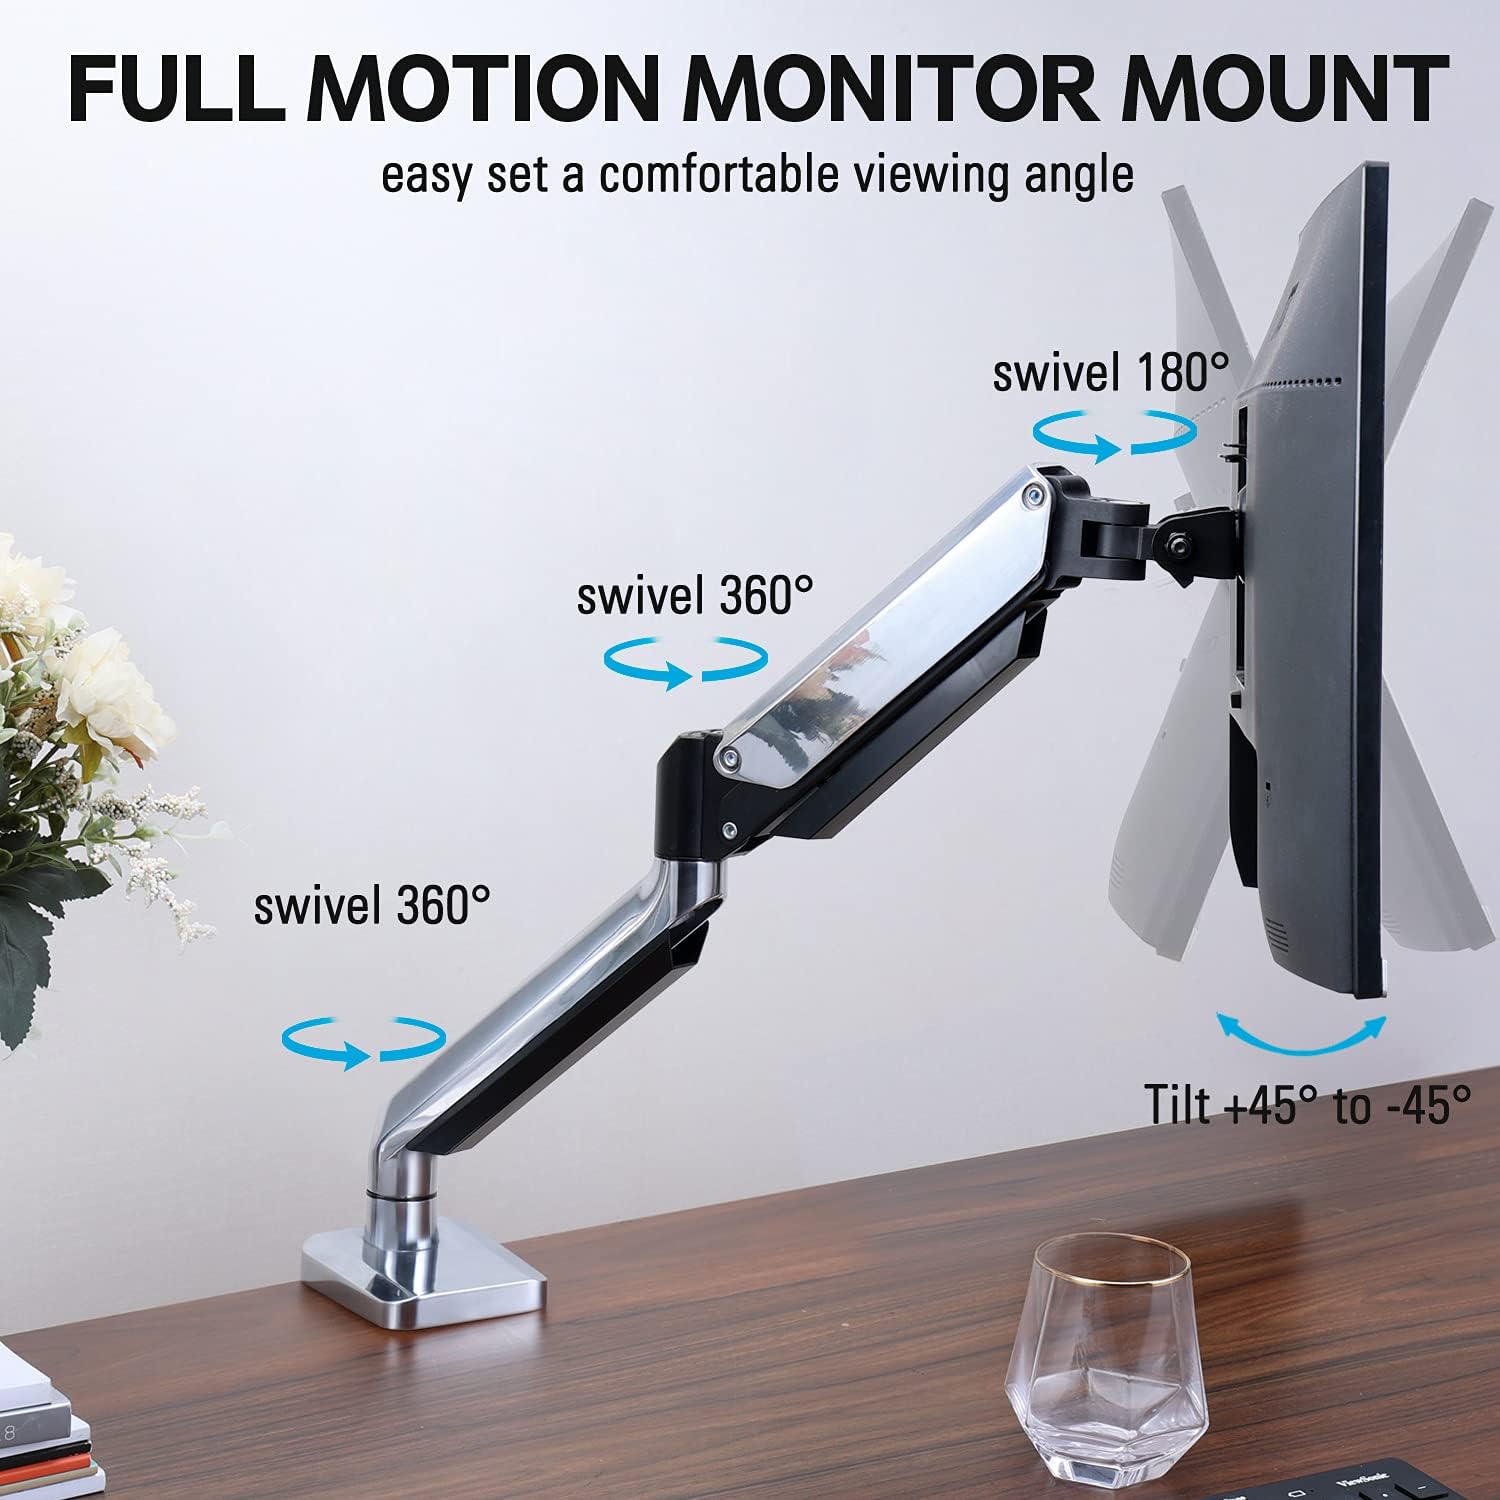
Figure 2: The removable VESA plate being attached to the back of a monitor, then sliding onto the monitor arm for easier installation.
5.2. Grommetni o'rnatish
This method utilizes an existing hole in your desk. Ensure your desk thickness is no more than 3.35 inches and the grommet hole diameter is between 0.39 and 3.1 inches.
- Assemble Grommet Base: Insert the grommet base components through the desk hole and secure them from underneath the desk using the provided plate and nut.
- VESA plitasini monitorga ulang: Secure the VESA plate to the back of your monitor using the appropriate screws from the hardware kit. Ensure the screws are tightened securely.
- Slide Monitor onto Arm: Carefully slide the monitor (with the attached VESA plate) onto the monitor arm's VESA head. Ensure it clicks into place or is secured with the provided locking mechanism.
- Taranglikni sozlash: Refer to Section 6.1 for adjusting the gas spring tension to match your monitor's weight.
6. Ishlash va sozlash
The MOUNTUP MU0034 monitor arm offers various adjustments for optimal viewqulaylik.
6.1. Gas Spring Tension Adjustment
The gas spring tension needs to be adjusted to match the weight of your monitor. This ensures the monitor stays in position once adjusted.
- If the monitor drifts down, turn the adjustment screw (usually located on the arm joint) clockwise ("+") to increase tension.
- If the monitor floats up, turn the adjustment screw counter-clockwise ("-") to decrease tension.
- Adjust gradually until the monitor remains stable at any height.
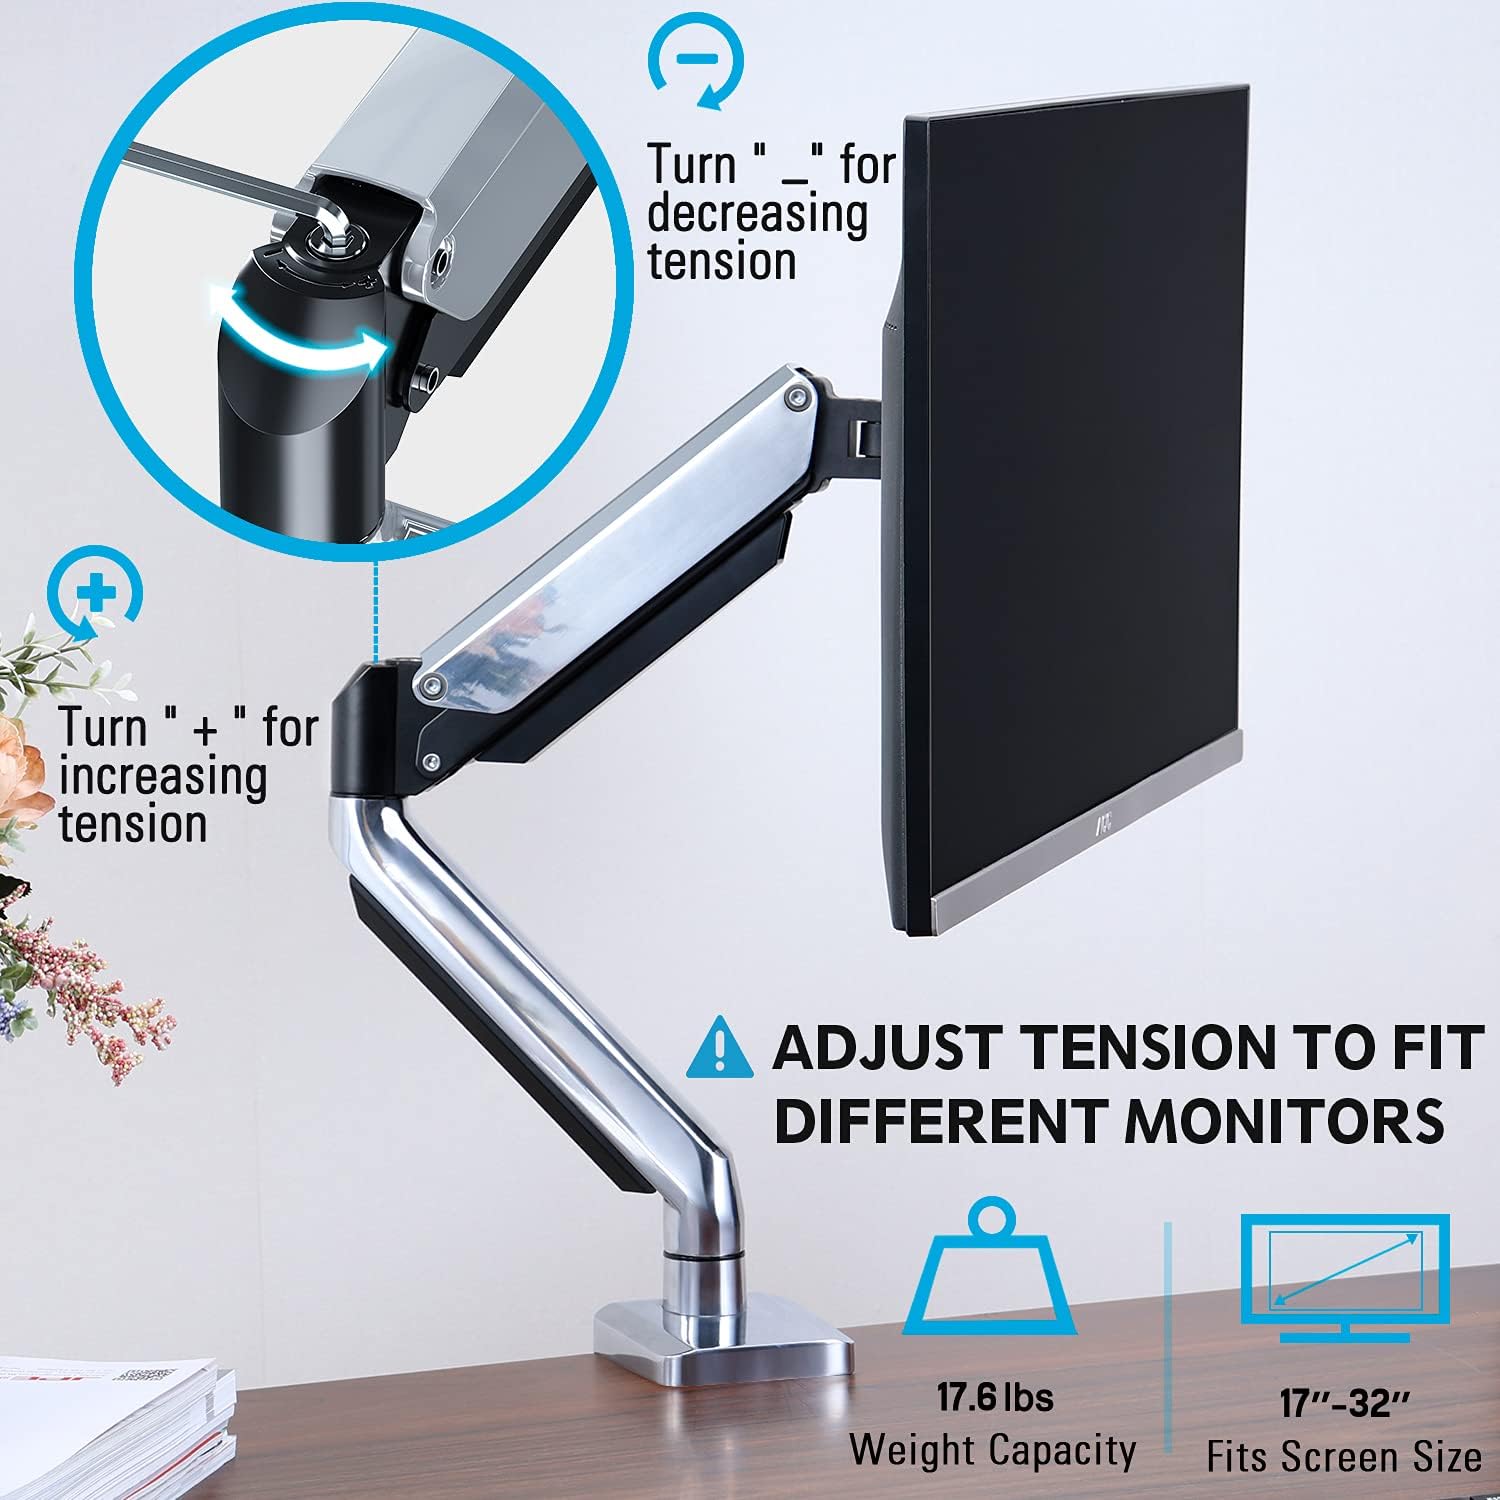
Figure 3: Instructions for adjusting the gas spring tension using an Allen key. Turning clockwise increases tension, counter-clockwise decreases it.
6.2. Balandlikni sozlash
Once the gas spring tension is correctly set, you can easily raise or lower your monitor to your desired ergonomic height. The arm allows for up to 11 inches of vertical adjustment.

Figure 4: Diagram illustrating the maximum height adjustment of 11 inches and maximum extension of 17.5 inches.
6.3. Tilt, Swivel, and Rotation
The monitor arm provides full motion capabilities:
- Nishab: Adjust the monitor screen +45° to -45° to reduce glare or find a comfortable viewkirish burchagi.
- Burilish: The arm can swivel 360° at the base and 360° at the middle joint. The monitor plate itself can swivel 180°. This allows for easy screen sharing or repositioning.
- Aylanish: Landshaft va vertikal yo'nalishlar o'rtasida almashish uchun monitorni 360° aylantiring.

Figure 5: Visual representation of the monitor arm's full motion capabilities, including 360° swivel, 180° swivel at the monitor plate, and +45° to -45° tilt.

Figure 6: An image demonstrating the monitor's ability to rotate 360 degrees, allowing for both landscape and portrait viewrejimlari.
7. Kabellarni boshqarish
The MOUNTUP MU0034 features integrated cable management to keep your workspace tidy.
- Route your monitor cables (power, video, etc.) along the underside of the arm.
- Use the provided cable clips or covers to secure the cables within the arm channels.
- Ensure cables have enough slack to allow for full range of motion without tension.

Figure 7: Illustration of how cables are routed and organized through the integrated channels on the monitor arm, keeping the desk clear.
8. Xizmat ko'rsatish
- Barcha vintlar va ulanishlarning mahkamlanganligiga ishonch hosil qilish uchun ularni muntazam ravishda tekshirib turing.
- O'rnatish joyini yumshoq, d bilan tozalangamp mato. Abraziv tozalash vositalaridan yoki erituvchilardan saqlaning.
- Gaz prujinasi mexanizmini moylamang.
9. Muammolarni bartaraf qilish; nosozliklarni TUZATISH
| Muammo | Mumkin sabab | Yechim |
|---|---|---|
| Monitor sags or won't stay up | Gaz prujinasining kuchlanishi monitor og'irligi uchun juda past. | Increase gas spring tension by turning the adjustment screw clockwise ("+"). |
| Monitor floats up or is hard to push down | Gaz prujinasining kuchlanishi monitor og'irligi uchun juda yuqori. | Decrease gas spring tension by turning the adjustment screw counter-clockwise ("-"). |
| Monitor is wobbly | Mount not securely fastened to desk or VESA plate not tight. | Barcha clni tekshiring va tortingamp/grommet screws and VESA plate screws. |
| Difficulty rotating/tilting monitor | Joints are too tight. | Loosen the corresponding joint screws slightly (do not remove). |
10. Kafolat va qo'llab-quvvatlash
The MOUNTUP MU0034 Single Monitor Desk Mount is backed by a 3-year support period. For technical assistance, missing parts, or warranty claims, please contact MOUNTUP customer support through their official channels or the retailer where the product was purchased.
Iltimos, kafolat uchun sotib olinganligingizni tasdiqlovchi hujjatni o'zingizda saqlang.
Ask a question about this manual
Ask about setup, troubleshooting, compatibility, parts, safety, or missing instructions. Manuals+ will review the question and use this page’s manual context to help answer it.