1. Kirish
Thank you for choosing the Crivit Auriol Radio-Controlled Projection Alarm Clock. This device combines a precise radio-controlled clock with a clear LCD display, dual alarms, and a convenient projection feature. This manual will guide you through the setup, operation, and maintenance of your new alarm clock.

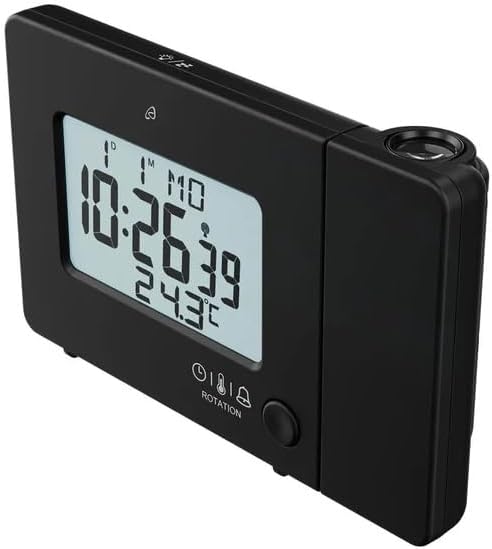
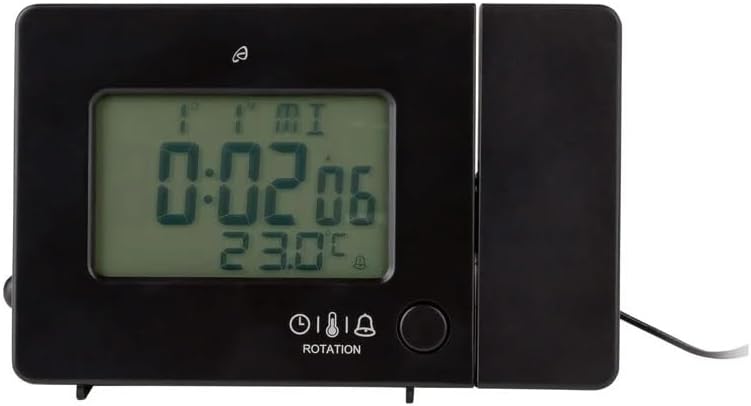
Old view of the alarm clock displaying time, date, and temperature.
2. Xavfsizlik bo'yicha ko'rsatmalar
- Ishlatishdan oldin barcha ko'rsatmalarni diqqat bilan o'qing va kelajakda foydalanish uchun saqlang.
- Qurilmani haddan tashqari harorat, to'g'ridan-to'g'ri quyosh nuri yoki yuqori namlik ta'sirida qoldirmang.
- Qurilmani yiqilib tushmaslik yoki kuchli zarbalarga duchor qilishdan saqlaning.
- Qurilmani o'zingiz qismlarga ajratishga yoki ta'mirlashga urinmang. Malakali xizmat ko'rsatish xodimlariga murojaat qiling.
- Batareyalarni bolalar qo'li etmaydigan joyda saqlang. Ishlatilgan batareyalarni mahalliy qoidalarga muvofiq utilizatsiya qiling.
- Use only the provided AC adapter or one with identical specifications.
3. Paket tarkibi
Paketda quyidagi elementlar mavjudligini tekshiring:
- Crivit Auriol Radio-Controlled Projection Alarm Clock (Model 373928)
- AC quvvat adapteri
- Batteries (pre-installed or separate)
- Foydalanuvchi uchun qo'llanma (ushbu hujjat)

Included AC power adapter.
4. Mahsulot xususiyatlari
- Radio boshqariladigan vaqt: Automatic time synchronization for precise timekeeping.
- Proyeksiya funktsiyasi: Projects time, alarm times, or ambient temperature onto a wall or ceiling.
- Pivoting Projection Arm: Adjustable projection angle with easy focus adjustment.
- LCD displey: Clear screen showing time, day, month, week number/day of the week, and indoor temperature.
- Ikkita signal: Two independent alarm settings with snooze function.
- Sensor sensori: Activates short-term projection and screen backlight.
- Quvvat imkoniyatlari: Operates via AC adapter or batteries.
- USB-A zaryadlash porti: Convenient 5V, 800mA output for charging external devices.
- Sozlanishi yorqinlik: Customizable display brightness.
5. Komponentni aniqlash
Old View:
Old view LCD displey bilan.
- LCD displey: Shows time, date, temperature, alarm status, and radio control signal.
- Touch Sensor Area: Located above the display, for temporary backlight and projection.
- Projection Indicator: Icon indicating projection is active.
- Signal ko'rsatkichlari: Icons for Alarm 1 and Alarm 2.
- Aylantirish tugmasi: Adjusts projection orientation.
Yon View (Projection Arm):
Yon view with projection arm extended.
- Proyeksiya qo'li: Pivots to direct the projection.
- Fokus g'ildiragi: Proyeksiyalangan tasvirning ravshanligini sozlaydi.
- Proyeksiya linzalari: Emits the time/temperature display.
Orqa View:

Orqa view with control buttons and ports.
- -/WEEK Button: Decreases values, sets week display.
- +/ZONE Button: Increases values, sets time zone.
- °C/°F tugmasi: Toggles temperature unit.
- LANG Button: Selects display language for day of the week.
- 12/24 tugmasi: Toggles 12/24 hour format.
- MODE tugmasi: Cycles through settings modes (Time, Alarm 1, Alarm 2).
- SET tugmasi: Enters setting mode for current display.
- RESET tugmasi: Resets the device to factory defaults (use a pointed object).
- Batareya bo'limi: Zaxira batareyalar uchun.
- DC IN porti: AC quvvat adapterini ulash uchun.
- USB-A chiqish porti: Tashqi qurilmalarni zaryadlash uchun.
6. Sozlash
6.1. Yoqish
The alarm clock can be powered by either the included AC adapter or batteries for backup.
- Batareyani o'rnatish: Open the battery compartment on the rear of the unit. Insert the included batteries, observing the correct polarity (+/-). Batteries primarily serve as backup in case of power outage.
- AC adapter ulanishi: Connect the small plug of the AC adapter into the DC IN port on the back of the alarm clock. Plug the AC adapter into a standard wall outlet. The display will light up.
Alarm clock connected to power.
6.2. Initial Setup and Radio Control Synchronization
Upon first power-up or after a reset, the clock will automatically attempt to synchronize with the radio-controlled time signal (DCF77). This process can take several minutes to an hour, depending on your location and signal strength. During synchronization, a radio tower icon will flash on the display.
- Signalni yaxshiroq qabul qilish uchun soatni oyna yoniga qo'ying.
- Uni shovqin keltirib chiqarishi mumkin bo'lgan elektron qurilmalar yoniga qo'ymang.
- Once synchronized, the radio tower icon will appear solid on the display.
If the radio signal is not received, you may need to set the time manually (see Section 7.1).
6.3. Basic Settings (if not automatically set or for adjustment)
ni bosing SET button to enter setting mode. Use the -/WEEK va +/ZONE buttons to adjust values, and SET tasdiqlash va keyingi sozlamalarga o'tish.
- Vaqt mintaqasi: Adjust if you are not in the standard time zone for the radio signal.
- 12/24 soat formati: ni bosing 12/24 button to toggle between 12-hour (with AM/PM) and 24-hour formats.
- Harorat birligi: ni bosing ° C/° F Selsiy va Farengeyt o'rtasida almashish uchun tugma.
- Displey tili: ni bosing LANG button to select the language for the day of the week display (5 languages available).
7. Foydalanish bo'yicha ko'rsatmalar
7.1. Vaqtni qo'lda sozlash
If the radio-controlled time signal is weak or unavailable, you can set the time manually:
- ni bosing va ushlab turing SET tugmasini soat raqamlari miltillaguncha bosing.
- dan foydalaning -/WEEK va +/ZONE soatni sozlash uchun tugmalar.
- bosing SET to confirm and move to minutes, then year, month, and day.
- bosing SET again to exit manual time setting.
7.2. Setting Alarms (Alarm 1 and Alarm 2)
Soat ikkita mustaqil signalga ega.
- ni bosing REJIM button once to display Alarm 1 time, or twice for Alarm 2 time. The corresponding alarm icon (e.g., A1) will flash.
- While the alarm time is displayed, press and hold the SET tugmasini soat raqamlari miltillaguncha bosing.
- dan foydalaning -/WEEK va +/ZONE soatni sozlash uchun tugmalar.
- bosing SET to confirm and move to minutes. Adjust minutes using -/WEEK va +/ZONE.
- bosing SET tasdiqlash va signal sozlamalaridan chiqish uchun yana bosing.
- Budilnikni yoqish/o'chirish uchun tugmasini bosing REJIM button to display the desired alarm, then press the +/ZONE button. The alarm icon (bell) will appear/disappear on the display.
7.3. Kechiktirish funksiyasi
When an alarm sounds, touch the Sensor maydonini bosing yoki tugmasini bosing SNOOZE / LIGHT button (if available, otherwise use the touch sensor) to activate the snooze function. The alarm will pause for approximately 5 minutes and then sound again. To stop the alarm completely, press any other button.
7.4. Proyeksiya funksiyasi
The alarm clock can project the time, alarm times, or ambient temperature onto a wall or ceiling.
- Activate Projection: The projection is continuously active when powered by the AC adapter. If running on batteries, touch the Sensor maydonini bosing for short-term projection.
- Proyeksiya burchagini sozlash: Pivot the projection arm to direct the image to your desired location.
- Fokusni sozlash: dan foydalaning Fokus g'ildiragi on the projection arm to sharpen the projected image.
- Change Projected Content: ni bosing REJIM button repeatedly to cycle through projecting Time, Alarm 1, Alarm 2, or Temperature.
- Proyeksiyani aylantirish: ni bosing Aylanish button to rotate the projected image by 90-degree increments (4 orientations available).

Time projected onto a surface.
7.5. Displeyning orqa nuri
When powered by the AC adapter, the display backlight is continuously on. When running on batteries, touch the Sensor maydonini bosing to activate the backlight for a few seconds.
7.6. USB Charging Output
The USB-A port on the back of the unit provides a 5V, 800mA output for charging small electronic devices like smartphones or tablets. Connect your device's USB charging cable to this port.
8. Xizmat ko'rsatish
- Tozalash: Qurilmani yumshoq, quruq mato bilan artib oling. Abraziv tozalash vositalarini yoki erituvchilarni ishlatmang.
- Batareyani almashtirish: If using batteries for backup, replace them annually or when the display becomes dim during power outages. Ensure correct polarity.
- Saqlash: Agar qurilma uzoq vaqt saqlansa, oqishning oldini olish uchun batareyalarni chiqarib oling.
9. Muammolarni bartaraf qilish; nosozliklarni TUZATISH
| Muammo | Mumkin sabab | Yechim |
|---|---|---|
| Displey bo'sh yoki xira. | No power, dead batteries, or AC adapter not connected. | Ensure AC adapter is securely connected. Replace batteries if using for backup. |
| Radio-controlled time not synchronizing. | Weak signal, interference, or incorrect time zone. | Move the clock to a window or open area. Avoid electronic devices. Manually set time if necessary. Check time zone setting. |
| Projection is blurry. | Fokus sozlanmagan. | ni sozlang Fokus g'ildiragi on the projection arm. |
| Signal eshitilmaydi. | Signal yoqilmagan yoki noto'g'ri o'rnatilgan. | Ensure the alarm icon is visible on the display. Recheck alarm time settings. |
| USB orqali zaryadlash ishlamayapti. | Device not properly connected, or device requires more power than 800mA. | Ensure the USB cable is securely connected. Check if your device's charging requirements exceed 5V/800mA. |
10. Texnik shartlar

Mahsulot o'lchamlari.
- Model raqami: 373928
- Olchamlari (U x G x Y): 15 x 3.81 x 9.5 cm (approx. 15l x 9.5H centimeters)
- Material: Plastik
- Displey turi: Raqamli LCD
- Quvvat manbai: AC Adapter (included) or Batteries (included)
- USB chiqishi: 5V, 800mA
- Maxsus xususiyatlar: Adjustable brightness, Snooze, Projection, Radio-controlled time
- Harakat turi: Kvarts
- O'rnatish turi: Stol usti
- Ichki/tashqi makonda foydalanish: Ichki
11. Kafolat va qo'llab-quvvatlash
This Crivit Auriol Projection Alarm Clock comes with a standard manufacturer's warranty. Please refer to the warranty card included in your package or contact your retailer for specific warranty terms and conditions.
For technical support or inquiries, please contact the customer service department of your retailer or the Crivit support line as indicated on the product packaging or official websayt.