
1. Mahsulot tugadiview
The AITRIP ESP32-C3 MINI Development Board is a compact, high-performance, and low-power IoT development board. It features an ESP32-C3 32-bit RISC-V single-core processor with an integrated FPU, operating at up to 160 MHz. This board is designed for low-power IoT applications and wireless wearable devices, offering WiFi and Bluetooth connectivity.
The package includes the ESP32-C3 development board and an accompanying expansion board, providing a rich set of interfaces for various projects.
Asosiy xususiyatlar:
- Protsessor: ESP32-C3, 32-bit RISC-V single-core, up to 160 MHz with FPU.
- Ulanish: Integrated WiFi and Bluetooth.
- Xotira: 400 KB RAM, 4 MB Flash.
- I/U: 11 digital I/Os (PWM capable), 4 analog I/Os (ADC capable).
- Interfeyslar: UART, I2C, SPI.
- Tugmalar: Reset button and Bootloader mode button.
- Quvvatlantirish manbai: Supports 3.3V to 6V external power supply.
Ilovalar:
The ESP32-C3's low power consumption makes it suitable for various IoT applications, including:
- Smart Home qurilmalari
- POS Machines
- Sanoatni avtomatlashtirish
- Xizmat robotlari
- Health Care devices
- Audio qurilmalar
- Maishiy elektronika
- Generic Low-power IoT Sensor Hubs
- Smart Agriculture solutions
- Umumiy kam quvvatli IoT ma'lumotlar jurnali

Image: The AITRIP ESP32-C3 MINI Development Board shown with its accompanying expansion board.
2. O'rnatish va ulanishlar
2.1 Elektr ta'minoti
The ESP32-C3 MINI Development Board can be powered via the USB-C port or an external power supply.
- USB quvvat: Connect the board to a computer or a 5V USB power adapter using a USB-C cable.
- Tashqi quvvat manbai: If using an external power supply, connect the positive (+) terminal of the external supply to the 5V pin on the board and the negative (-) terminal to the GND pin. The external power supply should be between 3.3V and 6V.
Important: When using an external power supply, do not connect the USB cable simultaneously. Only one power source (USB or external) should be connected at a time to prevent damage to the board.
2.2 Pinout diagrammasi
Understanding the pinout is crucial for connecting peripherals and sensors. The board provides various GPIOs, ADC pins, and serial communication interfaces.

Image: Detailed pinout diagram for the ESP32-C3 Super Mini Development Board, showing power, GND, ADC, SPI, Digital, and UART pins.
2.3 Expansion Board Connection
The included expansion board simplifies connections by breaking out the pins into more accessible headers, often with power rails. To connect the ESP32-C3 MINI Development Board to the expansion board:
- Align the pins of the ESP32-C3 MINI Development Board with the corresponding female headers on the expansion board.
- Gently press the development board into the expansion board until it is securely seated. Ensure all pins are correctly aligned to avoid bending or damage.

Image: The ESP32-C3 MINI Development Board securely mounted onto its expansion board, ready for use.
3. Foydalanish bo'yicha ko'rsatmalar
3.1 Programming the Board
The AITRIP ESP32-C3 MINI Development Board is compatible with various development environments, including the Arduino IDE and Espressif's ESP-IDF. To program the board:
- Drayvlarni o'rnatish: Ensure necessary USB-to-serial drivers are installed on your computer.
- Setup IDE: Configure your chosen IDE (e.g., Arduino IDE) to support ESP32-C3 boards. This typically involves adding the Espressif board manager URL and installing the ESP32 boards package.
- Connect Board: Connect the development board to your computer via the USB-C cable.
- Kengash va portni tanlang: In your IDE, select the correct board model (ESP32-C3 Dev Module) and the serial port assigned to your board.
- Upload Code: Write or load your program (sketch) and click the upload button. The IDE will compile and upload the code to the ESP32-C3.
3.2 Using Buttons
- Qayta tiklash tugmasi: Pressing the reset button will restart the program currently running on the ESP32-C3.
- Bootloader Mode Button: This button is typically used in conjunction with the reset button to put the ESP32-C3 into bootloader mode, which is necessary for flashing new firmware. Consult your IDE's documentation for the specific button sequence required for your programming setup.
3.3 Interfacing with Peripherals
The board offers multiple interfaces for connecting external components:
- GPIO pinlari: Use the General Purpose Input/Output pins for digital input/output, PWM, and other functions. Refer to the pinout diagram for specific pin capabilities.
- ADC Pins: The Analog-to-Digital Converter pins allow the board to read analog sensor data.
- UART: Universal Asynchronous Receiver/Transmitter for serial communication with other devices or for debugging via a serial monitor.
- I2C: Inter-Integrated Circuit bus for connecting multiple low-speed peripheral devices with two wires (SDA and SCL).
- SPI: Serial Peripheral Interface for high-speed synchronous serial communication with devices like displays or SD card modules.
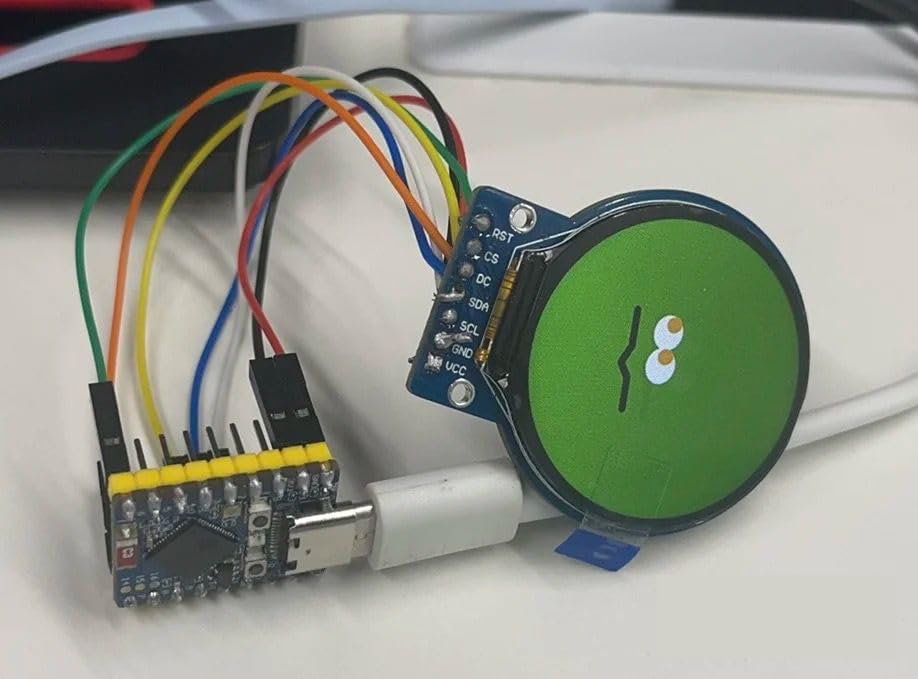
Rasm: sobiqample setup showing the ESP32-C3 MINI Development Board connected to an external display via jumper wires.
4. Xizmat va parvarish
To ensure the longevity and proper functioning of your AITRIP ESP32-C3 MINI Development Board, follow these maintenance guidelines:
- Ehtiyotkorlik bilan ishlang: Electronic components are sensitive. Avoid dropping the board or subjecting it to physical shock.
- Statik zaryadsizlanish: Always handle the board in a static-safe environment. Use an anti-static wrist strap if available.
- Quruq tuting: Protect the board from moisture and liquids. Water can cause short circuits and permanent damage.
- Tozalik: Keep the board free from dust and debris. Use a soft, dry brush or compressed air for cleaning. Avoid using liquid cleaners.
- Saqlash: Store the board in its original packaging or an anti-static bag when not in use, away from extreme temperatures.
- Power Off Before Connecting: Always disconnect power before connecting or disconnecting any wires or components to the board.
5. Muammolarni bartaraf qilish; nosozliklarni TUZATISH
If you encounter issues with your ESP32-C3 MINI Development Board, consider the following troubleshooting steps:
- Board Not Detected by Computer:
- USB-C kabeli to'liq ulangan va ishlayotganligiga ishonch hosil qiling.
- Verify that the correct USB-to-serial drivers are installed for your operating system.
- Boshqa USB port yoki kabelni sinab ko'ring.
- Code Upload Fails:
- Check that the correct board and serial port are selected in your IDE.
- Ensure the board is in bootloader mode if required by your IDE (often by holding the Boot button while pressing and releasing Reset, then releasing Boot).
- Verify your code for syntax errors.
- Quvvat indikatori yo'q:
- Confirm the power source (USB or external) is providing the correct voltage.
- Bo'shashgan ulanishlarni tekshiring.
- WiFi/Bluetooth Connectivity Issues:
- Ensure your code correctly initializes and configures the WiFi or Bluetooth module.
- Boshqa simsiz qurilmalardan shovqin mavjudligini tekshiring.
- Verify antenna connections if applicable (this board has an integrated antenna).
- Kutilmagan xatti-harakatlar:
- Review your code logic for errors.
- Check all wiring connections to external components.
- Ensure external components are powered correctly and compatible with the ESP32-C3's voltage darajalari.
For more detailed troubleshooting or specific programming issues, refer to the extensive online documentation and community forums available for ESP32-C3 development boards.
6. Texnik shartlar
Below are the technical specifications for the AITRIP ESP32-C3 MINI Development Board:
| Xususiyat | Spetsifikatsiya |
|---|---|
| Brend | AITRIP |
| Model nomi | ESP32-C3 Mini Development Board |
| Protsessor | ESP32-C3, 32-bitli RISC-V bir yadroli |
| CPU tezligi | 160 MGts |
| O'rnatilgan operativ xotira hajmi | 400 KB |
| Xotirani saqlash hajmi | 4 MB |
| Ulanish texnologiyasi | Wi-Fi, Bluetooth, I2C, SPI, UART, GPIO |
| Simsiz moslik | 802.11n |
| Operatsion tizimning muvofiqligi | Linux (for development environment) |
| Mos qurilmalar | Arduino microcontrollers (for programming environment) |
| UPC | 687117740892 |
| ASIN | B0DCZGQMPL |
7. Kafolat va qo'llab-quvvatlash
7.1 Kafolat haqida ma'lumot
The product comes with a 1-year warranty. Please retain your proof of purchase for any warranty claims. The warranty covers manufacturing defects but does not cover damage caused by misuse, accidents, unauthorized modifications, or improper handling.
7.2 Texnik yordam
For technical assistance, programming guides, or further inquiries, please refer to the following resources:
- Ishlab chiqaruvchining Websayt: Visit the AITRIP official webmahsulot hujjatlari va qo'llab-quvvatlash sayti.
- Onlayn hamjamiyatlar: Engage with the broader ESP32 development community on forums and platforms like GitHub for shared knowledge and troubleshooting tips.
- Chakana sotuvchini qo'llab-quvvatlash: Contact the retailer from whom you purchased the product for assistance with returns or exchanges.