
1. Mahsulot tugadiview
The Fuers H.265+ 8-Channel Security DVR Recorder (Model A1008CH) is a versatile surveillance solution designed for home and business security. This DVR supports various camera types including HD-CVBS, TVI, CVI, XVI, AHD, and IP analog cameras, allowing for flexible system expansion. It features H.265+ video compression for efficient storage and comes with a pre-installed 1TB hard drive for 24/7 recording.
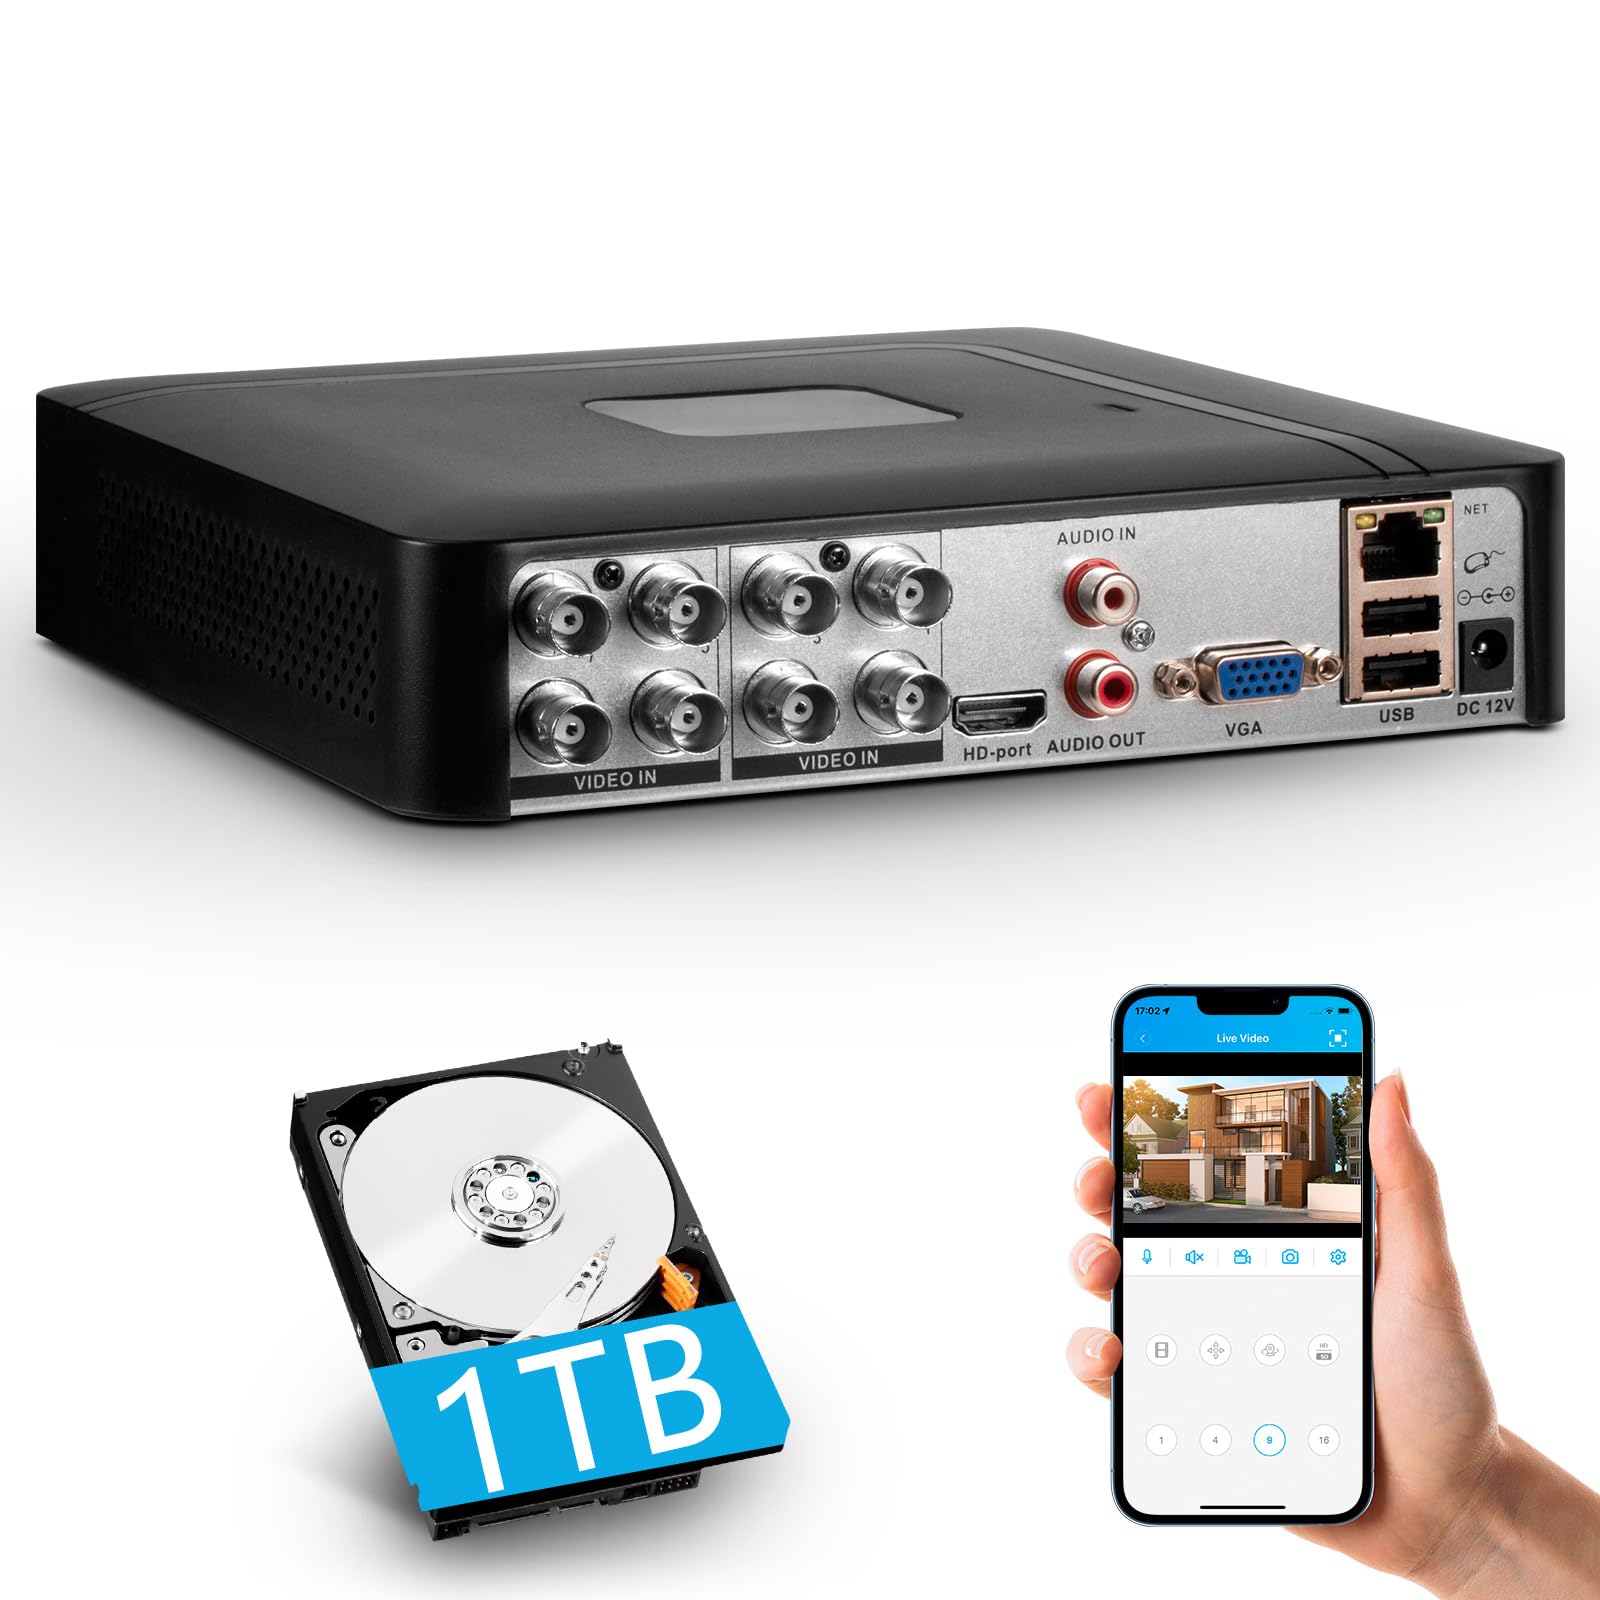
Image 1.1: Fuers H.265+ 8-Channel Security DVR Recorder.
Asosiy xususiyatlar:
- 8-Channel System: Supports up to 8 cameras simultaneously, compatible with HD-TVI, CVBS, CVI, XVI, AHD, and IP cameras.
- H.265+ videoni siqish: Offers extended recording time and saves up to 50% storage space compared to H.265 systems.
- Oldindan o'rnatilgan 1 TB HDD: Security-grade hard drive for continuous surveillance recording. Expandable up to 14TB via SATA port.
- Masofaviy kirish: View and manage your system remotely using the free iCSee App (iOS/Android) or VMS Client (Windows/Mac).
- Intellektual harakatni aniqlash: Receive mobile push notifications for detected motion types, including person and face detection.
- Plug & Play sozlamalari: Easy connection with simultaneous VGA/HDMI output.
2. O'rnatish va o'rnatish
2.1 Qutida nima bor
Boshlashdan oldin barcha komponentlar mavjudligiga ishonch hosil qiling:
- 1x A1008 8CH DVR
- 1x 1TB HDD (Pre-installed on DVR)
- 1x DVR quvvat adapteri
- 1 x USB sichqoncha
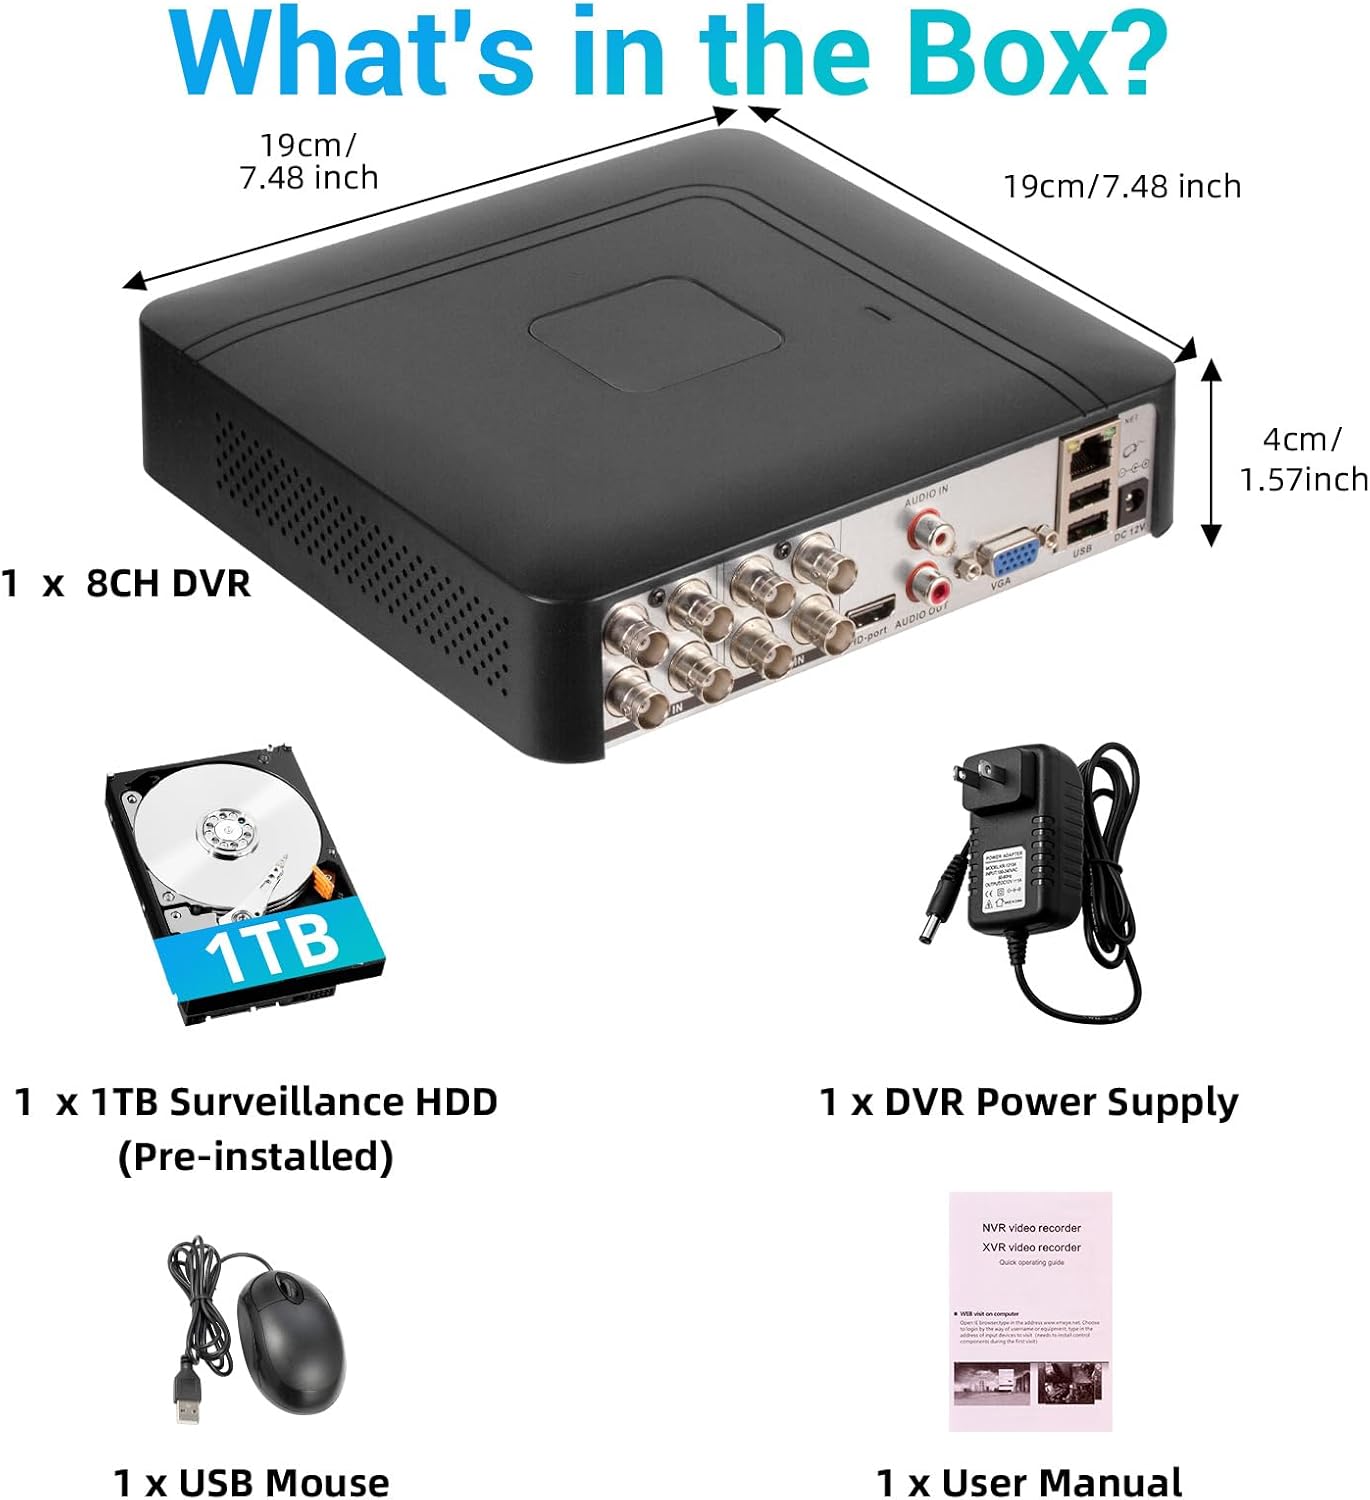
2.1-rasm: Mahsulot qadoqining tarkibi.
2.2 Hard Drive Installation (if not pre-installed or for upgrade)
The DVR comes with a pre-installed 1TB HDD. If you need to replace or upgrade the hard drive (up to 14TB), follow these steps:
- Unscrew the bottom cover of the DVR unit.
- C ni ehtiyotkorlik bilan ochingasing.
- Connect the SATA data cable and power cable from the DVR to the new hard drive.
- Secure the hard drive within the casing using the provided screws.
- Close the DVR casing and secure it with screws.

Image 2.2: Hard drive installation and expansion options.
2.3 Connecting the DVR System
Follow these steps to connect your DVR system:
- Kameralarni ulash: Connect your security cameras to the 'VIDEO IN' ports on the back of the DVR using BNC cables.
- Monitorni ulash: Monitorni HDMI yoki VGA portidan foydalanib DVRga ulang.
- USB sichqonchasini ulang: Plug the included USB mouse into one of the USB ports on the DVR.
- Connect Network (Optional for Remote Access): Masofadan uchun viewing and notifications, connect an Ethernet cable from your router to the 'NET' port on the DVR.
- Yoqilgan: Connect the DVR power adapter to the 'DC 12V' port and then plug it into a power outlet.

Image 2.3: Connecting cameras and network to the DVR.
2.4 Initial Setup and Channel Type Selection
Upon first power-on, the system may prompt for initial setup. You may need to select the appropriate channel type for your cameras.
- Right-click on the screen to access the Main Menu.
- ga oʻtish Tizim > Raqamli > Kanal turi.
- Select the configuration that matches your camera setup:
- First row: Supports 8 XVI, CVBS, AHD, TVI, CVI coaxial cameras.
- Second row: Supports 8 XVI, CVBS, AHD, TVI, CVI coaxial + 4 IP cameras.
- Third row: Supports 16 1080P IP cameras.
- Fourth row: Supports 16 5MP IP cameras.
- bosing OK to apply changes. The system may restart.

Image 2.4: DVR Channel Type selection screen.
3. Foydalanish bo'yicha ko'rsatmalar
3.1 Jonli View va Yozib olish
Once the DVR is powered on and cameras are connected, you should see the live feed on your connected monitor. The system is configured for 24/7 recording to the pre-installed 1TB hard drive.

Image 3.1: Live view of multiple camera feeds.
3.2 Remote Access via Mobile App
To access your DVR remotely, download the free iCSee App (for iOS/Android) or VMS Client (for Windows/Mac).
- Download the iCSee App from your device's app store.
- Open the app and register an account if you don't have one.
- In the DVR's main menu, navigate to Ma'lumot > Versiya to find the DVR's QR code.
- Use the iCSee app to scan the QR code to add your device.
- Qo'shilgandan so'ng, siz qila olasiz view live feeds, playback recordings, and receive alerts from anywhere with an internet connection.

Image 3.2: Steps for remote access via mobile app.
3.3 Playback Recorded Footage
Qaytaview yozib olingan video:
- Right-click on the screen to access the Main Menu.
- Tanlang Yozib olish > Oʻynatish.
- Choose the desired channel(s) and date/time range for playback.
- bosing Ijro etishni boshlang uchun view footage.

Image 3.3: Playback interface with timeline.
3.4 Motion Detection Alerts
The DVR supports intelligent motion detection, including person and face detection. When motion is detected, you can receive instant mobile push notifications.
- Configure motion detection settings in the DVR's Signal menyu.
- Ensure your mobile app is properly linked and notifications are enabled.

Image 3.4: Human and face detection in action.
4. Xizmat ko'rsatish
4.1 Qattiq diskni boshqarish
Oldindan o'rnatilgan 1 TB qattiq disk quyidagilarni ta'minlaydi ample storage. Due to H.265+ compression, storage is optimized. If more storage is needed, you can replace the internal HDD with a larger one (up to 14TB). Regularly check the hard drive status in the DVR's system settings to ensure optimal performance.
4.2 Umumiy parvarish
- Keep the DVR in a cool, dry, and well-ventilated area.
- Avoid exposing the unit to direct sunlight, extreme temperatures, or moisture.
- Clean the exterior of the DVR with a soft, dry cloth. Do not use liquid cleaners.
- Barcha kabel ulanishlari xavfsiz ekanligiga ishonch hosil qiling.
5. Muammolarni bartaraf qilish; nosozliklarni TUZATISH
5.1 Monitorda video chiqishi yo'q
- Check if the DVR is powered on and the power adapter is securely connected.
- Verify the HDMI or VGA cable connection between the DVR and the monitor.
- Monitor to'g'ri kirish manbasiga (HDMI/VGA) o'rnatilganligiga ishonch hosil qiling.
5.2 Cameras Not Displaying
- Check all camera power and video cable connections.
- Verify that the camera type (AHD, TVI, CVI, etc.) is compatible with the DVR.
- Ensure the correct channel type is selected in the DVR settings (refer to Section 2.4).
- Test cameras individually if possible to isolate the issue.
5.3 Masofaviy kirish ishlamayapti
- Confirm the DVR is connected to the internet via an Ethernet cable.
- Routeringizning internetga ulanishini tekshiring.
- Ensure the iCSee app is updated to the latest version.
- Verify that the DVR was added correctly to the app by scanning the QR code.
- For some networks, you might need to adjust router settings (e.g., port forwarding), consult your network administrator or ISP.
6. Texnik shartlar
| Xususiyat | Tafsilot |
|---|---|
| Brend | Yoqilg'i quyish shoxobchalari |
| Model raqami | A1008CH |
| Kanallar soni | 8 |
| Ulanish texnologiyasi | HDMI, USB, VGA |
| Mos qurilmalar | Desktop, Tablet, Camera, Smartphone |
| Mahsulot o'lchamlari | 7.48"L x 7.48"W x 1.57"Y |
| Xotirani saqlash hajmi | 1 TB (Pre-installed) |
| Hard-Drive Size | 1 TB (Expandable up to 14 TB) |
| Media formati Raqamli video | H.265 + |
| Video kiritish | AHD, CVI, HDMI, HDTVI, IP Input, VGA |
| UPC | 765142240850 |
7. Kafolat va qo'llab-quvvatlash
7.1 Mahsulot kafolati
This Fuers DVR Recorder is covered by a standard manufacturer's warranty. Please refer to the warranty card included with your product or visit the official Fuers webBatafsil kafolat shartlari va qoidalari uchun saytga tashrif buyuring. Kafolat da'volari uchun xaridni tasdiqlovchi hujjat sifatida xarid chekingizni saqlang.
7.2 Texnik yordam
For technical assistance, troubleshooting, or any questions regarding your Fuers DVR, please contact Fuers customer support. Contact information can typically be found on the product packaging, the official Fuers websayt yoki chakana sotuvchingiz orqali.
Onlayn manbalar:
- ga tashrif buyuring Fuers Store on Amazon mahsulot haqida ma'lumot va yangilanishlar uchun.