Yofidra sku006556Y_2-EU
Yofidra 2-in-1 Cordless Telescopic Electric Pruner Instruction Manual
Model: sku006556Y_2-EU
1. Kirish
Thank you for choosing the Yofidra 2-in-1 Cordless Telescopic Electric Pruner. This versatile tool is designed for efficient and safe pruning of branches up to 40mm in diameter, offering both handheld and extended pole operation. Please read this manual carefully before use to ensure safe and optimal performance.
2. Xavfsizlik bo'yicha muhim ko'rsatmalar
Yong'in, elektr toki urishi va shaxsiy jarohatlar xavfini kamaytirish uchun har doim asosiy xavfsizlik choralariga rioya qiling.
- Barcha ko'rsatmalarni o'qing: Boshqaruv elementlari va asbobdan to'g'ri foydalanish bilan tanishing.
- Tegishli shaxsiy himoya vositalarini (PPE) taqinglar: Always wear safety glasses, gloves, and sturdy footwear. Consider hearing protection and a hard hat when working overhead.
- Ish joyini toza va yaxshi yoritilgan holda saqlang: Tartibsiz yoki qorong'i joylar baxtsiz hodisalarni chaqiradi.
- Portlovchi muhitda ishlamang: Do not use the pruner in the presence of flammable liquids, gases, or dust.
- Bolalar va begona odamlardan uzoqroq tuting: Chalg'itadigan narsalar sizni nazoratni yo'qotishga olib kelishi mumkin.
- Tasodifiy boshlashdan saqlaning: Batareya blokini joylashtirishdan, asbobni olishdan yoki tashishdan oldin kalit o'chirilgan holatda ekanligiga ishonch hosil qiling.
- Use the right tool for the job: Asbobni kuch bilan ishlatmang; u ishni o'zi mo'ljallangan tezlikda yaxshiroq va xavfsizroq bajaradi.
- Maintain the tool with care: Keep cutting blades sharp and clean for better and safer performance. Follow instructions for lubricating and changing accessories.
- Disconnect battery pack: Remove the battery pack from the tool before making any adjustments, changing accessories, or storing the tool.
- Ishlamaydigan asboblarni saqlang: Foydalanilmayotganda asboblar quruq, baland yoki yopiq, bolalar qo'li etmaydigan joyda saqlanishi kerak.
- Shikastlangan qismlarni tekshiring: Keyingi ishlatishdan oldin, shikastlangan himoya vositasi yoki boshqa qism to'g'ri ishlashi va mo'ljallangan vazifasini bajarishini aniqlash uchun uni diqqat bilan tekshirish kerak.
- Haddan tashqari ko'tarmang: Har doim to'g'ri oyoq va muvozanatni saqlang.
- Do not modify the tool: Any modifications can be dangerous and will void the warranty.
3. Mahsulot komponentlari
The Yofidra 2-in-1 Cordless Telescopic Electric Pruner comes with the following main components:
- Electric Pruner Head with SK5 Steel Blades
- Extendable Telescopic Pole (1m to 2.3m)
- 2 x 3000mAh Lithium-ion Batteries
- Batareya zaryadlovchi
- Handle/Control Unit for Pole Operation
- Pichoqni moylash
- Sozlash vositalari

3.1-rasm: tugadiview of included components, including the pruner head, telescopic pole, two batteries, and accessories.
4. O'rnatish va yig'ish
4.1 Batareyalarni zaryadlash
Before first use, fully charge both lithium-ion batteries. Connect the charger to a power outlet and insert the battery. The indicator light on the charger will show the charging status. A full charge typically takes [X] hours (specific time not provided, user should refer to charger instructions).

4.1-rasm: Yofidra 3.0Ah Li-ion battery, featuring overcurrent, voltage, short circuit, chip, charging, temperature, and over-discharge protection.
4.2 Assembling the Telescopic Pole
- Ensure the pruner head is switched off and the battery is removed.
- Align the pruner head with the top section of the telescopic pole.
- Securely attach the pruner head to the pole using the provided locking mechanism.
- Attach the handle/control unit to the bottom section of the telescopic pole.
- Connect the internal wiring between the pruner head and the control unit, ensuring a secure connection.
- To extend the pole, release the locking clamps on each section and pull the pole to the desired length (1m to 2.3m). Securely fasten the clamps after adjustment.
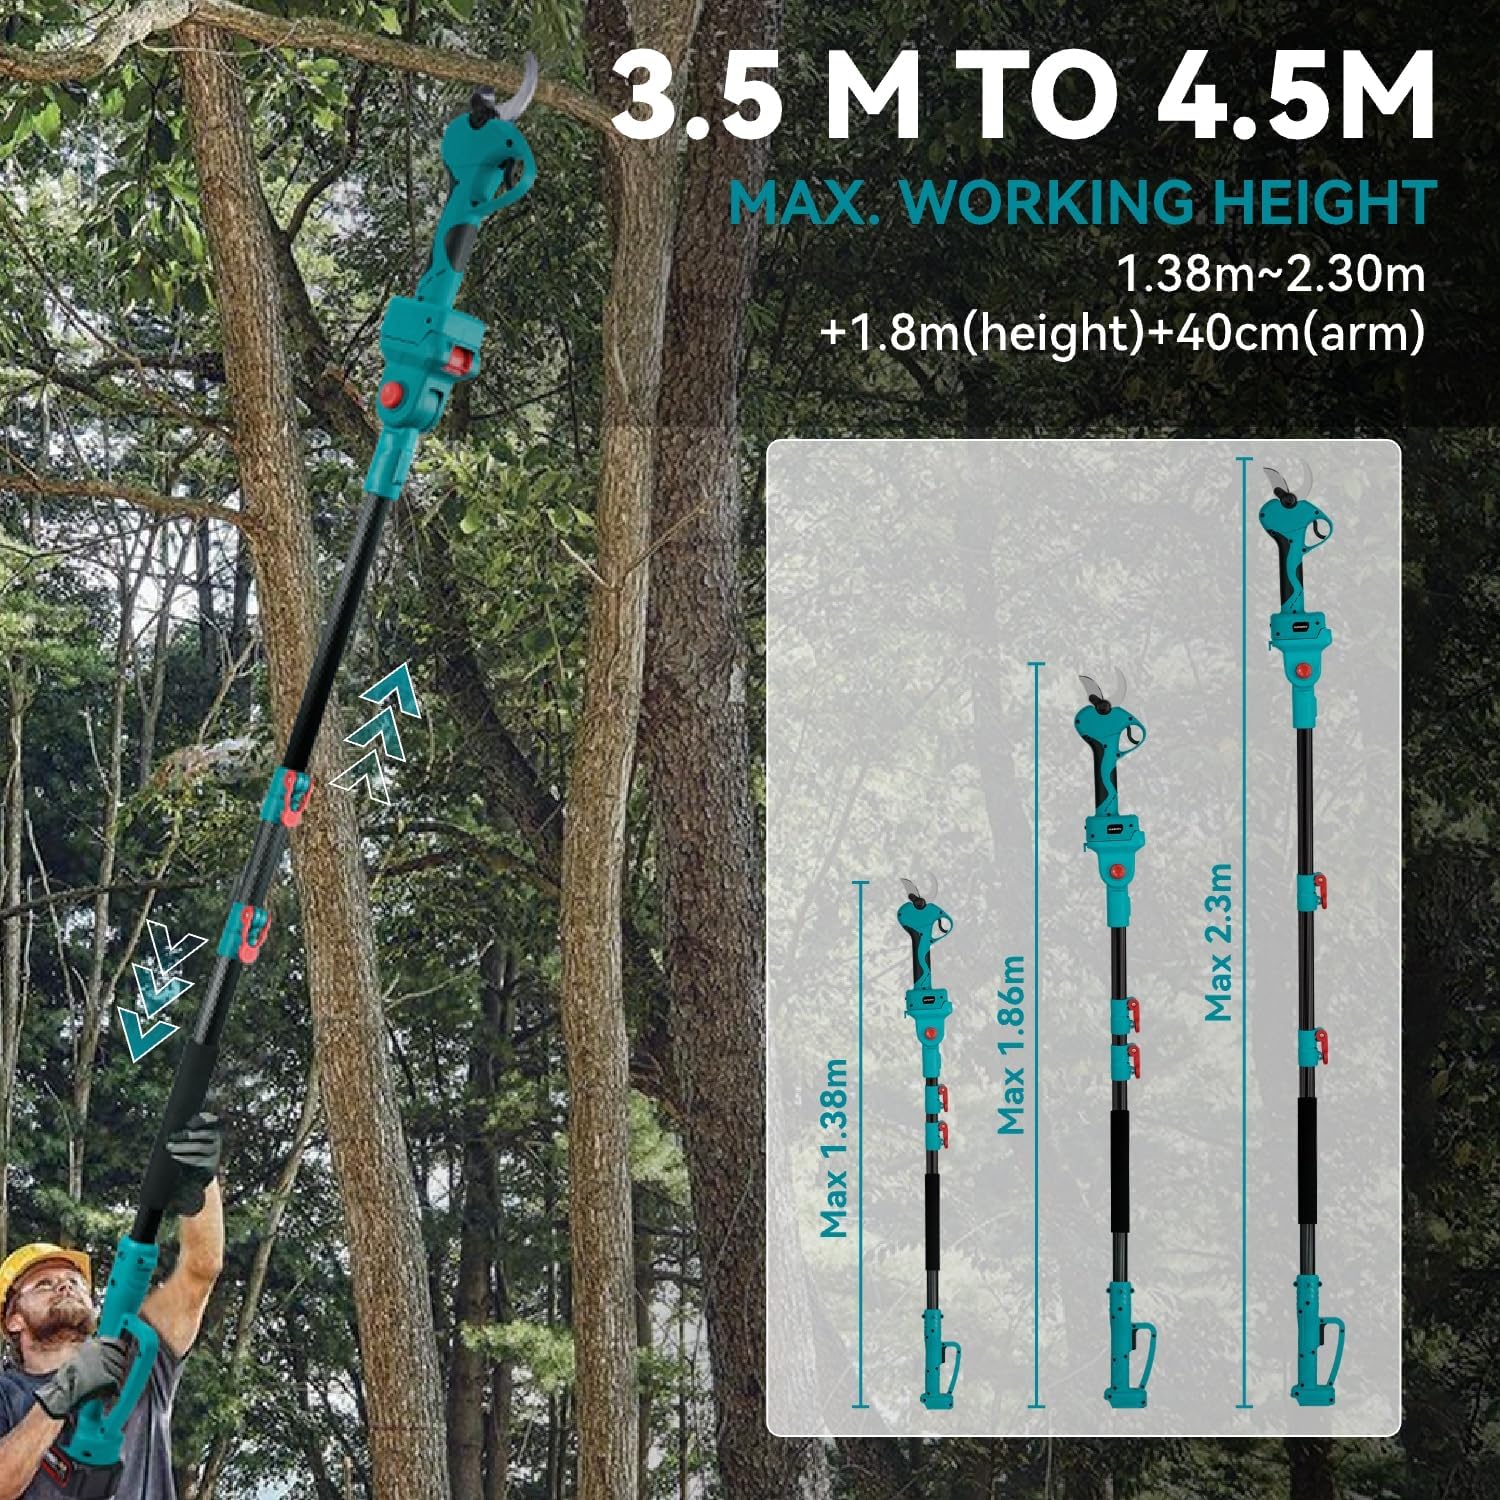
4.2-rasm: The telescopic pole in use, demonstrating its adjustable length for reaching branches up to 4.5m working height.
5. Foydalanish bo'yicha ko'rsatmalar
5.1 Handheld Pruner Operation
- Ensure the telescopic pole is detached and the pruner head is in handheld configuration.
- Insert a charged battery into the pruner handle.
- Activate the safety switch, then press the trigger to operate the blades.
- Position the blades around the branch to be cut, ensuring it is within the 40mm maximum cutting capacity.
- Press the trigger firmly to make a clean cut.
- The integrated LCD screen displays battery status and the number of cuts made.

5.1-rasm: Batafsil view of the pruner's features, including the LED display for battery and cut count, and the safety lock mechanism.

5.2-rasm: Example of the pruner cutting a branch, demonstrating its cutting capability (up to 40mm).
5.2 Telescopic Pole Operation
- Ensure the pruner head is securely attached to the extended pole and the battery is inserted into the control unit.
- Adjust the pole length to safely reach the desired branch without overreaching.
- Use the 180° rotating cutting head to achieve the optimal cutting angle. To rotate, press and hold the rotation buttons on both sides of the head, then manually adjust the pruner head.
- Activate the safety switch on the control unit, then press the trigger to operate the blades.
- Always maintain a stable footing and keep bystanders clear of the work area.

5.3-rasm: The adjustable pruner head, capable of rotating 180 degrees for versatile cutting angles.
6. Xizmat ko'rsatish
Regular maintenance ensures the longevity and optimal performance of your pruner.
- Pichoqni tozalash: After each use, remove the battery and clean the blades with a damp cloth to remove sap and debris.
- Pichoqni moylash: Apply a few drops of the provided blade lubricant (or a suitable alternative) to the blades regularly to prevent rust and ensure smooth operation.
- Pichoqni keskinlashtirish: If the blades become dull, they can be sharpened by a professional or replaced. Refer to the manufacturer's guidelines for replacement blades.
- Batareya parvarishi: Store batteries in a cool, dry place. Do not expose them to extreme temperatures. Charge them fully before long-term storage.
- Umumiy tekshiruv: Periodically check all screws, nuts, and moving parts for tightness and wear. Replace any worn or damaged parts immediately.
7. Muammolarni bartaraf qilish; nosozliklarni TUZATISH
| Muammo | Mumkin sabab | Yechim |
|---|---|---|
| Pruner does not start. | Battery not inserted correctly or discharged. Safety switch not disengaged. | Ensure battery is fully charged and properly inserted. Disengage the safety switch. |
| Blades cut poorly or jam. | Blades are dull or dirty. Cutting branches too thick. | Clean and lubricate blades. Sharpen or replace blades if necessary. Do not attempt to cut branches exceeding 40mm. |
| Batareyaning ishlash muddati qisqartirildi. | Battery not fully charged. Battery is old or damaged. | Ensure battery is fully charged before use. Consider replacing old batteries. |
| Pole connection feels loose. | Qulflash clamps not fully secured. | Ensure all locking clamps on the telescopic pole are securely fastened after adjustment. |
8. Texnik spetsifikatsiyalar
| Xususiyat | Spetsifikatsiya |
|---|---|
| Model raqami | sku006556Y_2-EU |
| Brend | Yofidra |
| Kesish qobiliyati | Maksimal 40 mm |
| Qutb uzunligi | 1 m to 2.3 m (extendable) |
| Max Working Height (with user) | 4.5 m gacha |
| Batareya turi | Litiy-ion |
| Batareya quvvati | 2 x 3000 mA / soat |
| Dvigatel turi | Cho'tkasiz motor |
| Pichoq materiali | SK5 Carbon Steel |
| Aylanadigan bosh | 180 ° sozlanishi |
| Tutqich materiali | Plastik |
| Overall Material | Carbon steel, plastic, aluminum |
| Paket o'lchamlari | 112 x 20 x 14 sm |
| Og'irligi | 4.06 kg (paket og'irligi) |

8.1-rasm: The 450W powerful brushless motor, designed for high efficiency and long endurance.
9. Kafolat va qo'llab-quvvatlash
For warranty information, technical support, or to purchase replacement parts, please contact Yofidra customer service. Refer to the product packaging or the official Yofidra webaloqa ma'lumotlari uchun sayt.
Ask a question about this manual
Ask about setup, troubleshooting, compatibility, parts, safety, or missing instructions. Manuals+ will review the question and use this page’s manual context to help answer it.