1. Kirish
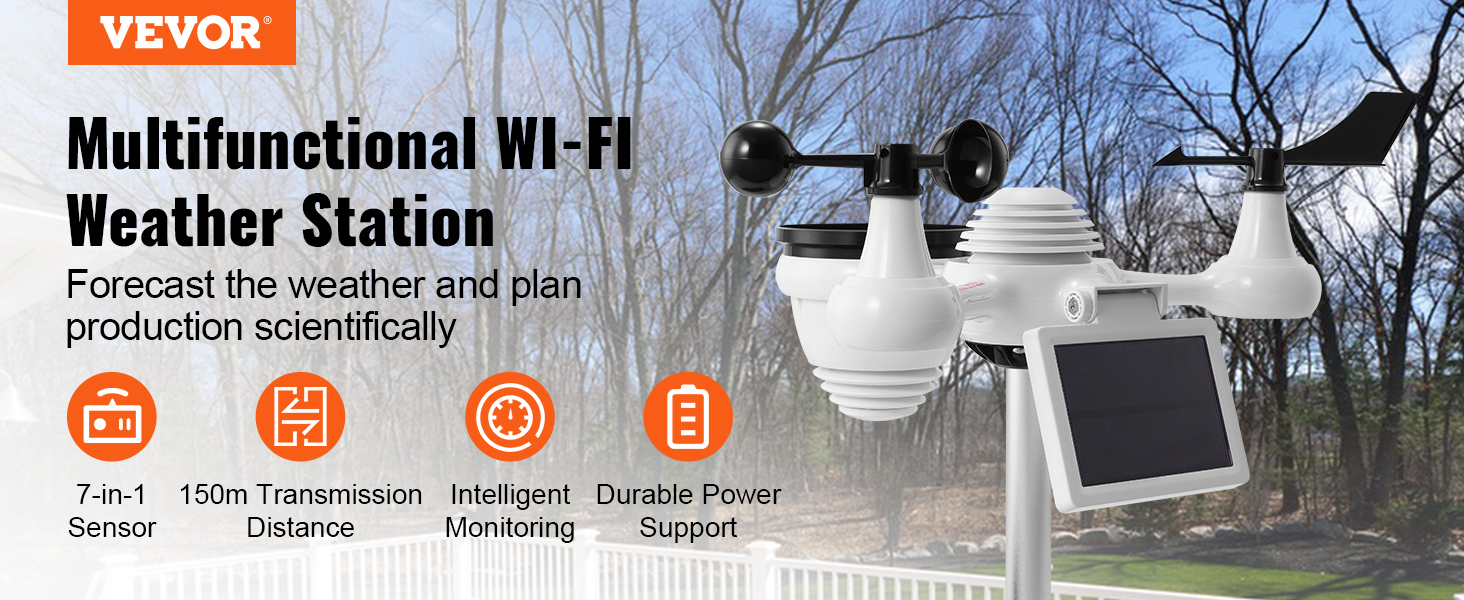
The VEVOR 7-in-1 Wi-Fi Weather Station provides comprehensive monitoring of various weather parameters. This manual will guide you through the setup, operation, and maintenance of your weather station to ensure accurate and reliable weather data.

2. Paket tarkibi
Paketda quyidagi elementlar mavjudligini tekshiring:
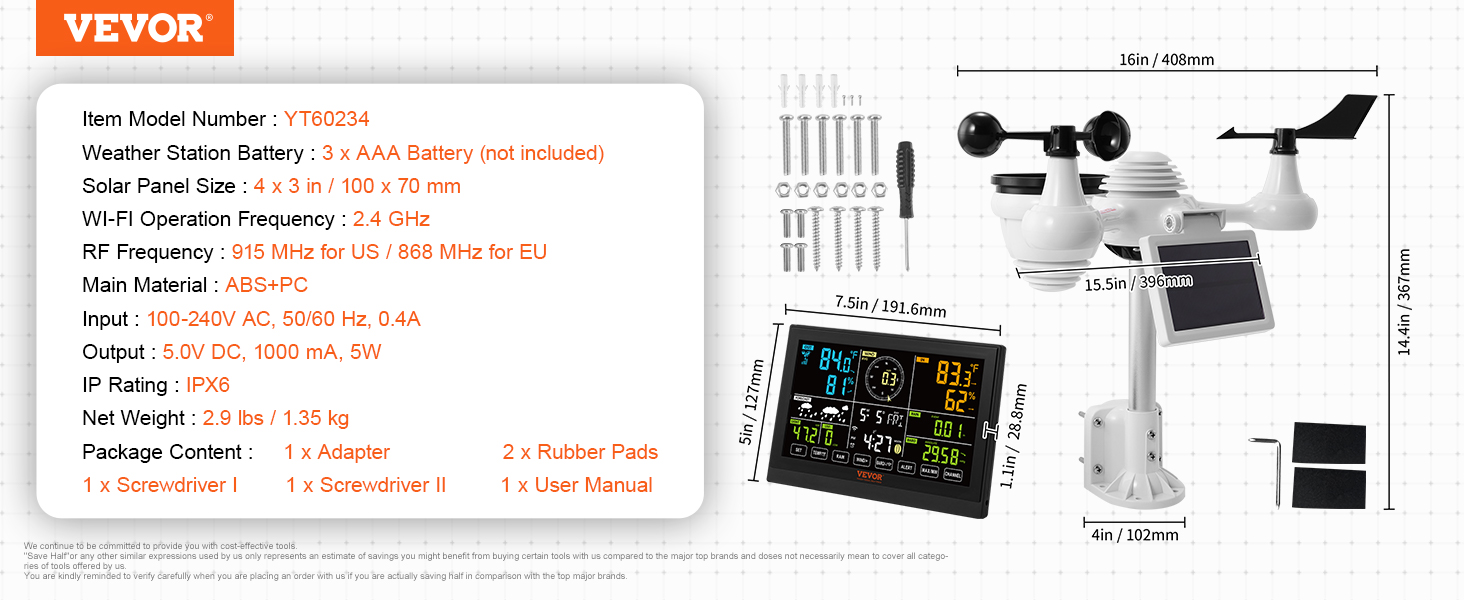
- 1 x Displey konsoli
- 1 x Outdoor 7-in-1 Sensor
- 1 x adapter
- 2 x kauchuk prokladkalar
- 1 x Screwdriver I
- 1 x Screwdriver II
- 1 x foydalanuvchi qo'llanmasi
3. Texnik shartlar
| Xususiyat | Spetsifikatsiya |
|---|---|
| Model raqami | YT60234 |
| Nazariya | Gigrometr |
| Sertifikatlash | CE |
| Weather Station Battery | 3 x AAA batareyasi (qo'shilmagan) |
| Sensor Main Power | 3.6V Ni-MH rechargeable battery pack, 2000 mA |
| Quyosh paneli | Illuminance 36000 LUX, 5.4V, 200mA |
| Quyosh paneli o'lchami | 4 x 3 dyuym / 100 x 70 mm |
| WI-FI Operation Frequency | 2.4 gigagertsli |
| RF chastotasi | 915 MHz for US / 868 MHz for EU |
| Kirish (adapter) | 100-240V o'zgaruvchan tok, 50/60 Hz, 0.4A |
| Output (Adapter) | 5.0V DC, 1000 mA, 5W |
| IP reytingi | IPX7 (Outdoor Sensor) |
| Sof og'irlik | 2.9 funt / 1.35 kg |
| Asosiy material | ABS+Kompyuter |
4. Xavfsizlik ma'lumotlari
- Qurilmani ishlatishdan oldin barcha ko'rsatmalarni diqqat bilan o'qing.
- Qurilmani suv va haddan tashqari haroratdan uzoqroq tuting.
- Qurilmani o'zingiz qismlarga ajratishga yoki ta'mirlashga urinmang. Xizmat ko'rsatish uchun malakali mutaxassislarga murojaat qiling.
- Use only specified batteries and power adapter.
- Ensure proper installation of the outdoor sensor to prevent damage from wind or other environmental factors.
5. O'rnatish va o'rnatish
Follow these steps to set up your VEVOR 7-in-1 Wi-Fi Weather Station:
5.1 Outdoor Sensor Assembly
- Fixing Sensor to Bracket: Insert the aluminum alloy pole into the base of the outdoor sensor and secure it.
- Install Wind Speed Cup: Shamol tezligi stakanlaridagi burama teshiklarni metall tayoqning tekis, vertikal tomoni bilan tekislang. Shamol tezligi stakanlarini metall tayoqqa soling va mahkam mahkamlang. Note: The wind cup needs to be followed on the left side of the solar panel. Incorrect installation will result in inaccurate wind speed readings.
- Install Wind Direction Vane: Shamol yo'nalishi qanotidagi burama teshiklarni metall tayoqning tekis, vertikal tomoni bilan tekislang. Shamol yo'nalishi qanotini metall novdaga joylashtiring va uni mahkamlash uchun mahkamlang. Note: The wind direction vane needs to be fitted to the right of the solar panel. The wrong position will result in inaccurate wind direction readings.
- Install Rain Collector: Remove the red "remove" tab from the rain collector mechanism inside the sensor, then place the rain collector funnel on top.
- Connect Battery Pack Cable: Open the battery compartment on the solar panel unit and connect the battery pack cable.
- Mount Battery Pack: Insert the rechargeable Ni-MH battery pack into its compartment and secure the cover with screws.
- Adjust Solar Cell: Loosen the screw at the joint of the solar panel. Adjust the vertical angle of the solar cell to optimize sun exposure. Tighten the screw until the gears lock in place.
- Himoya plyonkasini olib tashlang: Ensure all protective films, especially from the solar panel, are removed before final installation.
5.2 Outdoor Sensor Placement
For optimal performance and accurate readings, consider the following:
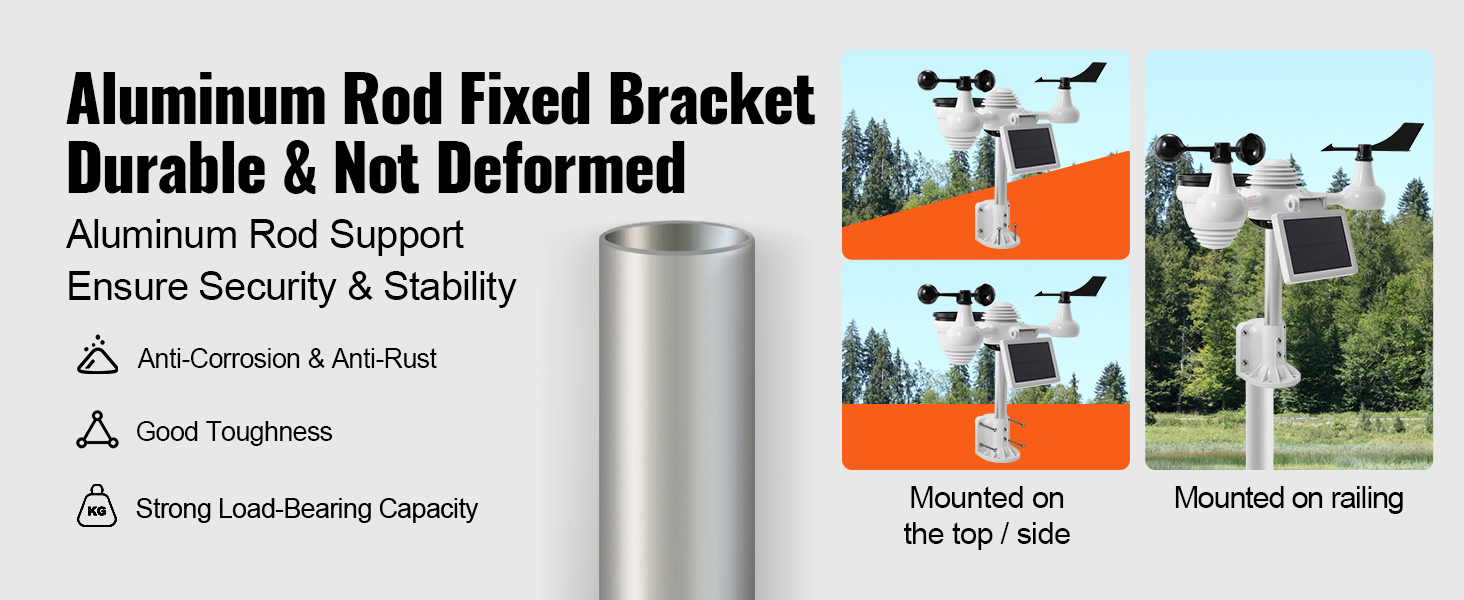
- Install the weather station away from walls, trees, and air conditioning units to minimize signal blockage and interference.
- Ensure the outdoor sensor is mounted in an open area, free from obstructions that could affect wind, rain, or sunlight readings.
- The aluminum rod fixed bracket is designed for durability and stability. It can be mounted on the top, side, or on a railing.
5.3 O'rnatish video qo'llanmasi
O'rnatish jarayoni bo'yicha vizual qo'llanma uchun quyidagi videoga qarang:
6. Operatsiya
6.1 Displey konsolining tugashiview
The 7.5-inch large display console provides a clear overview of all weather data. It features a 4-level dimming function (100%-60%-30%-0%) for comfortable viewturli yorug'lik sharoitlarida.
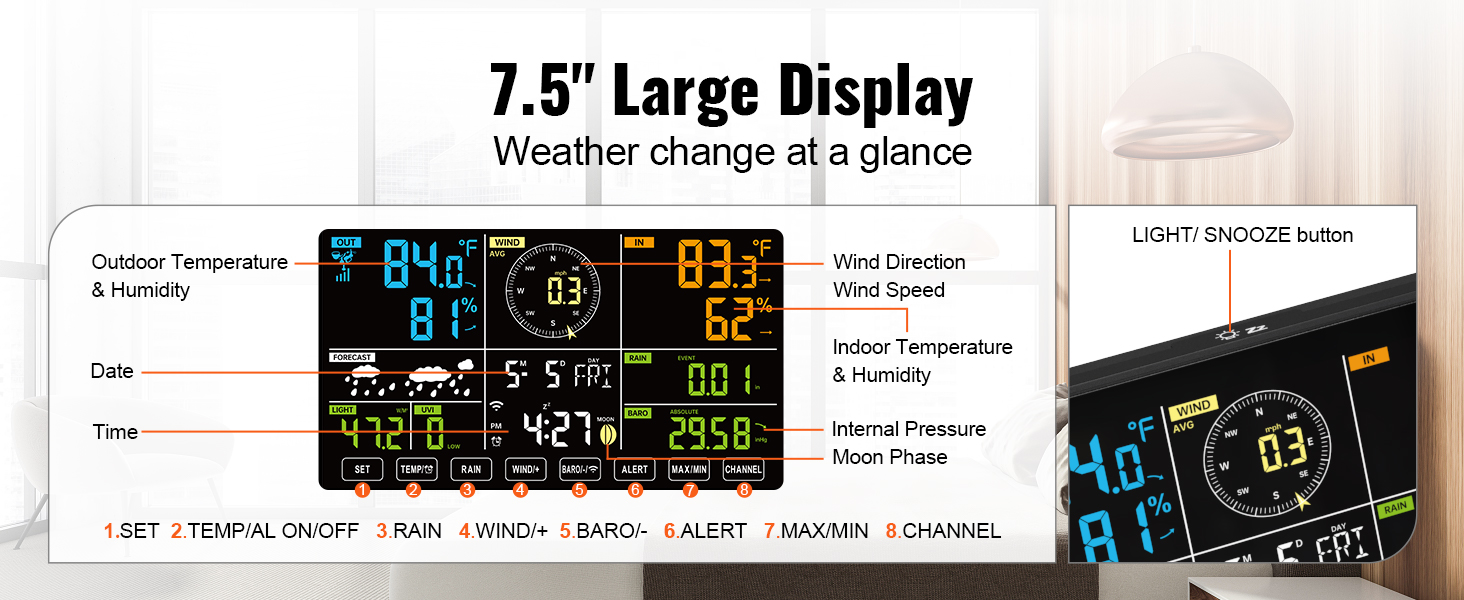
Key display elements include:
- Tashqi havo harorati va namligi
- Wind Direction & Wind Speed
- Bino ichidagi harorat va namlik
- Date, Time, Forecast
- Light (LUX), UV Index (UVI)
- DST (Yozgi vaqt)
- Barometric Pressure (BARO)
- Rainfall (RAIN)
- Oy fazasi
Control buttons on the console:
- O'rnatish: Access settings menu.
- TEMP/AL ON/OFF: Toggle temperature display or alarm.
- YOMGIR: View yog'ingarchilik ma'lumotlari.
- WIND+/BARO+/ALERT: Adjust wind/baro settings or set alerts.
- MAX/MIN: View qayd etilgan maksimal va minimal qiymatlar.
- KANAL: Switch between sensor channels (if applicable).
- YORQ/KARARLASH: Adjust backlight brightness or snooze alarm.
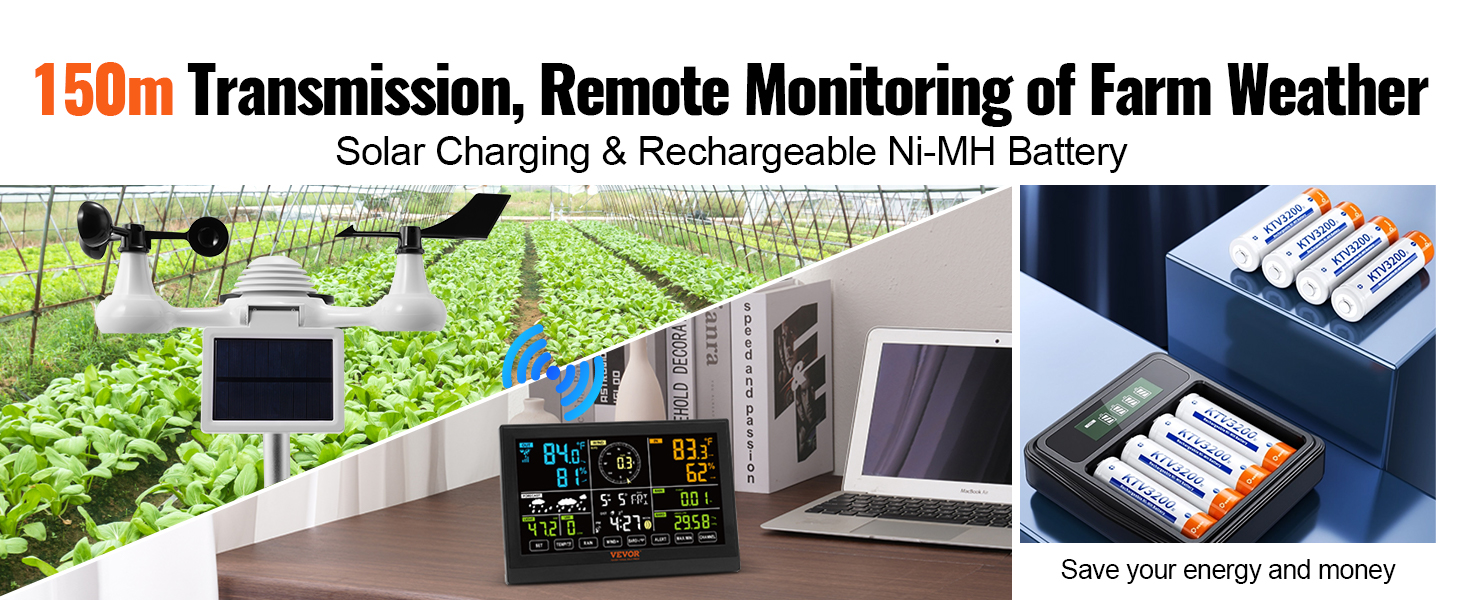
6.2 Wi-Fi Connection and Data Upload
The weather station supports Wi-Fi connectivity for real-time data transmission to online weather services. A power adapter is required for Wi-Fi connection.
- Ensure your router is operating on the 2.4 GHz band. The weather station does not support 5 GHz Wi-Fi. If you have a dual-band router, ensure you connect to the 2.4 GHz network.
- Access the Wi-Fi settings on the display console (refer to the user manual for specific navigation).
- Select your Wi-Fi Router (SSID) from the list and enter the router password.
- For weather server setup, you can upload data to Weather Underground and/or WeatherCloud. Enter your station ID and key/password for these services. Always double-check your password by clicking the eye icon if available.
- Configure Time Zone and Internet Time Server settings.
- Press "Apply" to confirm the settings.
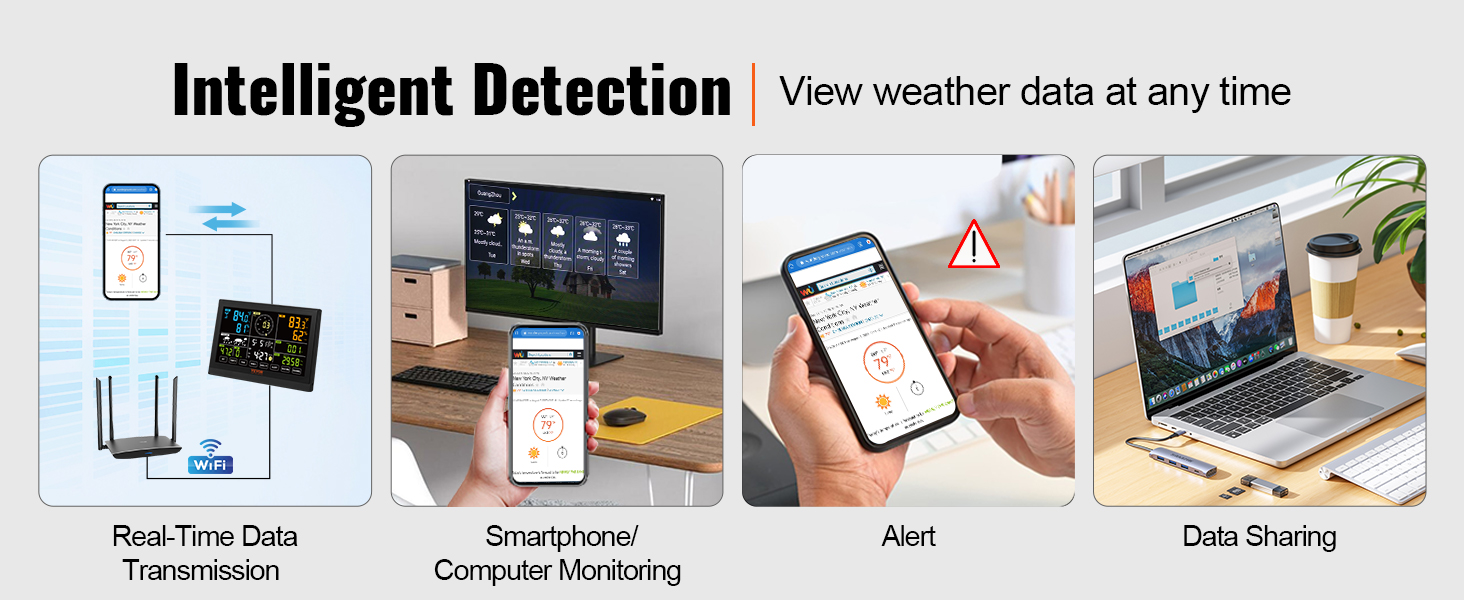
Once connected, you can monitor weather data on your smartphone, tablet, or computer by logging into the Weather Underground or WeatherCloud websites. (Note: A dedicated mobile app is not available; monitoring is done via web platforms).
7. Xizmat ko'rsatish
- Tozalash: Regularly wipe the display console and outdoor sensor with a soft, damp mato. Abraziv tozalash vositalaridan yoki erituvchilardan saqlaning.
- Yomg'ir yig'uvchi: Periodically check the rain collector for debris (leaves, insects) that might obstruct the tipping bucket mechanism. Clean as necessary.
- Quyosh paneli: Keep the solar panel clean to ensure efficient charging of the Ni-MH battery.
- Batareyani almashtirish: The outdoor sensor uses a rechargeable Ni-MH battery pack. For optimal performance, it is recommended to replace the 3x AAA batteries in the display console every 6 months, or when the low battery indicator appears.
- Sensorni joylashtirish: Periodically check the outdoor sensor's mounting to ensure it remains secure and free from new obstructions.
8. Muammolarni bartaraf qilish; nosozliklarni TUZATISH
- No outdoor data displayed / Inaccurate readings:
- Ensure the outdoor sensor is within the 150m transmission range and free from major obstructions.
- Check the outdoor sensor's battery. Ensure the rechargeable Ni-MH battery is properly installed and charging via the solar panel.
- Verify that the wind speed cups and wind direction vane are installed correctly (wind cup on left, vane on right of solar panel) and securely tightened. Incorrect installation can lead to inaccurate readings.
- Check the rain collector for any blockages.
- Ensure there are no strong interference sources (TVs, computers, microwaves, radios) near the display console.
- Wi-Fi ulanishi bilan bog'liq muammolar:
- Confirm your Wi-Fi router is set to 2.4 GHz. The weather station does not support 5 GHz networks.
- Ensure the display console is powered by the adapter, as Wi-Fi functionality requires it.
- Double-check the Wi-Fi password and weather server credentials (Station ID, Key/Password). Use the eye icon to reveal the password if available during setup.
- Restart both your router and the weather station console.
- Display console not turning on:
- Check if the power adapter is securely connected and functioning.
- Ensure the 3x AAA backup batteries (not included) are correctly inserted and have sufficient charge.
9. Foydalanuvchi maslahatlari
- Stansiya identifikatori: If you need to locate your station ID for Weather Underground or WeatherCloud, it is typically found within the device's Wi-Fi setup menu or on the packaging/manual.
- Mobile Monitoring: While there isn't a dedicated mobile app, you can access your weather data on the go by logging into the Weather Underground or WeatherCloud websites through your smartphone's browser.
- Batareya muddati: The outdoor sensor's rechargeable Ni-MH battery is powered by the solar panel. Ensure the solar panel is clean and receives adequate sunlight for continuous operation.
- Interferentsiya: Be mindful of potential interference sources when choosing the outdoor sensor's location. Electronic devices, large metal structures, and dense foliage can affect signal transmission.
10. Kafolat va qo'llab-quvvatlash
VEVOR products are designed for durability and performance. For warranty information, technical support, or service inquiries, please refer to the contact information provided with your purchase or visit the official VEVOR websayt.
Iltimos, kafolat da'volari uchun sotib olinganligingizni tasdiqlovchi hujjatingizni saqlab qo'ying.


