1. Kirish
This manual provides detailed instructions for the installation, operation, and maintenance of your REXING F9US Dash Camera. Please read this manual thoroughly before using the device to ensure proper functionality and to maximize your user experience.
2. Paket tarkibi
Iltimos, quyida keltirilgan barcha narsalar paketingizga kiritilganligini tekshiring:
- REXING F9US Dash Camera
- In-car charging cable
- Windshield Suction Cup mount
- USB kabeli
- Foydalanuvchi uchun qo'llanma
Eslatma: A Micro SD Card (Class 10 or higher, up to 128GB) is required for operation and is not included in the package.
3. Mahsulot tugadiview
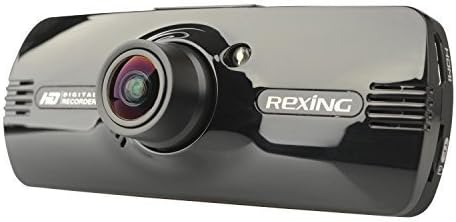
Image: REXING F9US Dash Camera
The REXING F9US Dash Camera is a compact, high-definition car dashboard camera designed to record your driving. It features a 170-degree wide-angle lens, a 2.7-inch 16:9 TFT LCD screen, and supports Full HD 1080p video recording. Key features include G-Sensor for automatic accident detection, Wide Dynamic Range (WDR) technology for optimal video quality in varying light conditions, and motion detection for recording when the vehicle is parked.
4. Sozlash
4.1 Installing the Micro SD Card
- Ensure the dash camera is powered off.
- Kameraning yon tomonidagi Micro SD karta uyasini toping.
- Insert a Class 10 or higher Micro SD card (up to 128GB) into the slot until it clicks into place.
- Olib tashlash uchun kartani tashqariga chiqquncha sekin suring.
4.2 Mounting the Dash Camera
- Clean the desired area on your windshield thoroughly.
- Attach the suction cup mount to the camera.
- Press the suction cup firmly against the windshield and flip the lever to secure it.
- Aniq bo'lishini ta'minlash uchun kamera burchagini sozlang view yo'lning.
4.3 Quvvatni ulash
- Connect the in-car charging cable to the camera's power input port.
- Plug the other end of the cable into your vehicle's 12V power outlet (cigarette lighter socket).
- The camera will typically power on automatically when the vehicle's ignition is turned on.
4.4 Dastlabki sozlamalar
Upon first use, or after a reset, you may need to set the date, time, and language. Navigate through the menu using the camera's buttons.
5. Foydalanish bo'yicha ko'rsatmalar
5.1 Asosiy yozish
- Once powered on and connected to power, the camera will automatically begin loop recording. A flashing red record indicator will confirm recording is active.
- To manually start/stop recording, press the REC tugmasi.
5.2 Menyu navigatsiyasi
The camera features several buttons for navigation and control:
- MENU tugmasi (bottom left): Press once to enter video settings, press twice to enter tool settings.
- EVENT Button (top right, with a triangle): Functions as an 'Up' button in menus. When held for 3 seconds during recording, it locks the current video file.
- MIC tugmasi: Functions as a 'Down' button in menus.
- REC tugmasi: Functions as 'Select' or 'OK' in menus.
- Rasm tugmasi (bottom right): When held, enters review rejimiga view qayd etilgan files.
5.3 Playback and File Boshqaruv
- Kimga view recordings on the camera, enter review mode using the Picture button.
- O'tkazish uchun files to a computer, connect the camera via the USB cable. The camera will appear as a removable disk.
- The camera also supports HDMI output for viewkattaroq displeyda.
6. Tushuntirilgan xususiyatlar
6.1 Loop yozish
The camera continuously records video in segments (e.g., 2, 3, or 5 minutes). When the memory card is full, the oldest unlocked video file is automatically overwritten by the newest recording. This ensures continuous recording without manual intervention.
6.2 G-Sensor (Accident Auto Detection Feature)
The built-in G-Sensor detects sudden movements or impacts (e.g., in case of a collision). When triggered, the current video segment is automatically locked and saved to prevent it from being overwritten by loop recording. These files are stored in a protected folder.
6.3 Wide Dynamic Range (WDR) Technology
WDR technology enhances video quality by balancing exposure in scenes with high contrast, such as driving from a dark tunnel into bright sunlight. This ensures clearer images with more detail in both bright and dark areas.
6.4 Harakatni aniqlash
When enabled, the camera will automatically start recording if it detects motion in front of the lens while the vehicle is parked. This feature is useful for monitoring your vehicle when it's unattended.
6.5 Tungi ko'rish
The camera supports night vision capabilities to improve recording quality in low-light conditions. Note that the built-in LED light is primarily for use when the camera is outside the car in battery mode, acting as a flashlight. For in-car recording, it's generally recommended to keep it off to avoid windshield reflections.
7. Xizmat ko'rsatish
- Tozalash: Kamera linzalari va ekranini tozalash uchun yumshoq, quruq matodan foydalaning. Abraziv tozalagichlar yoki erituvchilardan foydalanishdan saqlaning.
- SD kartani formatlash: It is recommended to format the Micro SD card periodically (e.g., once a month) within the camera's settings to ensure optimal performance and prevent data corruption. Back up any important files formatlashdan oldin.
- Saqlash: Store the camera in a cool, dry place away from direct sunlight and extreme temperatures when not in use.
8. Muammolarni bartaraf qilish; nosozliklarni TUZATISH
| Muammo | Mumkin yechim |
|---|---|
| Kamera yoqilmaydi. | Ensure the power cable is securely connected to both the camera and the vehicle's 12V outlet. Check the vehicle's power outlet for functionality. |
| Camera powers off unexpectedly or stops recording. | Verify the power connection is stable. Ensure the Micro SD card is Class 10 or higher and formatted correctly. Try a different Micro SD card. |
| Video sifati past yoki xira. | Clean the camera lens. Ensure the protective film (if any) has been removed from the lens. Check if the windshield is clean. |
| Micro SD karta xatosi. | Format the Micro SD card within the camera's settings. Ensure the card is Class 10 or higher. Try a different, reputable brand Micro SD card. |
| Sana va vaqt noto'g'ri. | Adjust the date and time settings in the camera's menu. |
9. Texnik shartlar
| Xususiyat | Tafsilot |
|---|---|
| Video ravshanligi | 1080FHD (1920x1080), 1080P (1440x1080), 720P (1280x720), WVGA (848x480), VGA (640x480), QVGA (320x240) |
| Ob'ektiv | 170 degree 6-layers glass lens |
| Ekran o'lchami | 2.7 inch 16:9 TFT LCD |
| Video File Format | MOV |
| Rasm File Format | JPG |
| Xotira kartasini qo'llab-quvvatlash | Up to 128GB Class10 or upper Micro SD/TF Card (not included) |
| Ulanish | HDMI, AV-OUT, USB |
| Ovoz yozish | Qo'llab-quvvatlanadi |
| Til tizimi | Ingliz, frantsuz, ispan, portugal, nemis, italyan, soddalashtirilgan xitoy, anʼanaviy xitoy, rus, yapon |
| Mahsulot o'lchamlari | 7 x 5 x 3 dyuym |
| Element og'irligi | 12.1 untsiya |
| Batareya | 1 Lithium Polymer battery required (internal) |
10. Kafolat va qo'llab-quvvatlash
For information regarding product warranty, technical support, or service inquiries, please visit the official REXING website or contact REXING customer service directly. Please have your product model number (F9US) and purchase details available when contacting support.


