1. Kirish
This manual provides detailed instructions for the installation, operation, and maintenance of your Vibe Powerbox Micro Mono Amplifier, model POWERBOX400.1M-V7. Please read this manual thoroughly before attempting installation or operation to ensure proper use and to prevent damage to the unit or your vehicle's audio system.
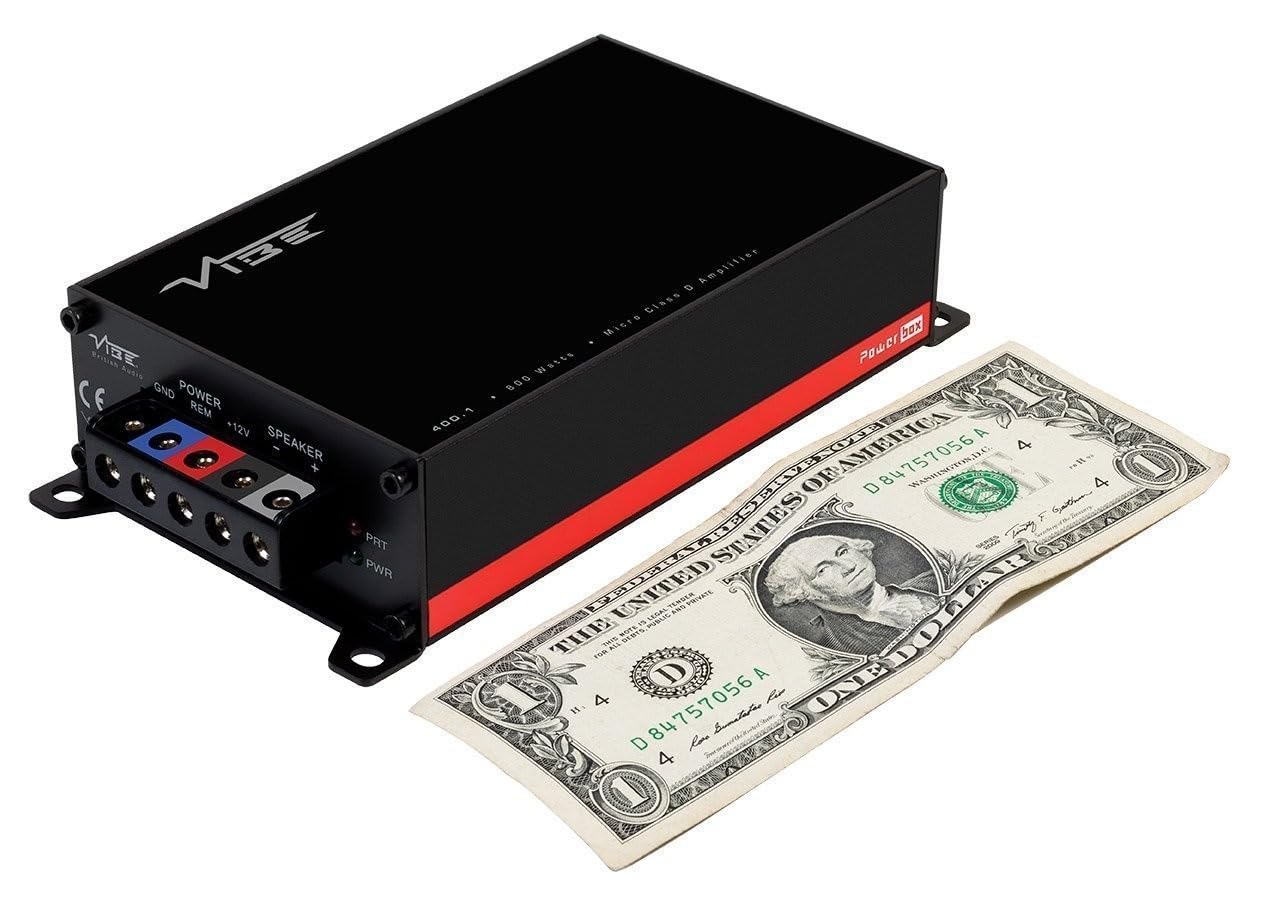
The Vibe Powerbox Micro Mono Amplifier is a compact, high-performance Class D amplifier designed for car audio systems. It delivers up to 400W RMS, making it suitable for powering subwoofers. Its small footprint allows for flexible installation options.
2. Xavfsizlik ma'lumotlari
- Har qanday elektr ishini boshlashdan oldin har doim avtomobil akkumulyatorining salbiy terminalini ajratib oling.
- Harakatlanuvchi qismlar yoki o'tkir qirralarning shikastlanishiga yo'l qo'ymaslik uchun barcha simlarning to'g'ri joylashtirilganligiga va mahkamlanganligiga ishonch hosil qiling.
- Use appropriate gauge wiring for power and speaker connections as specified in this manual to prevent overheating and potential fire hazards.
- ni o'rnatmang ampko'targichni to'g'ridan-to'g'ri quyosh nuri, haddan tashqari issiqlik, namlik yoki chang tushadigan joylarda ishlatmang.
- O'rnatish jarayonining biron bir qismiga ishonchingiz komil bo'lmasa, professional avtomobil audio o'rnatuvchisiga murojaat qiling.
- Operatsion amplifier at excessively high volumes for prolonged periods can cause hearing damage.
3. Paket tarkibi
O'rnatishni davom ettirishdan oldin barcha elementlar paketda mavjudligini tekshiring:
- Vibe Powerbox Micro Mono Amplifier (POWERBOX400.1M-V7)
- Remote Gain Control Unit
- RCA audio kabellari
- Mounting Hardware (screws, connectors)
- Foydalanuvchi uchun qo'llanma

4. Mahsulot xususiyatlari
- Class D Micro Amplifier design for high efficiency and compact size.
- Ultra-compact footprint for easy and discreet installation.
- Output: 1 x 400W RMS at 1 ohm, with a maximum output of 800W.
- Dimensions: 37 x 157 x 82mm (approximately 1.46 x 6.18 x 3.23 inches).
- Compatible with Critical Link Rapid kits for simplified integration.
- Features Deltabox™ Connectivity auto turn-on.
- VIBE Sound Studio™ Active crossovers.
- 1 Ohm Stable operation.
5. Komponentni aniqlash
5.1 Power and Speaker Terminals

The power input section includes terminals for Ground (GND), Remote Turn-On (REM), and +12V power. The speaker output section provides terminals for connecting your subwoofer.
5.2 Input and Control Panel
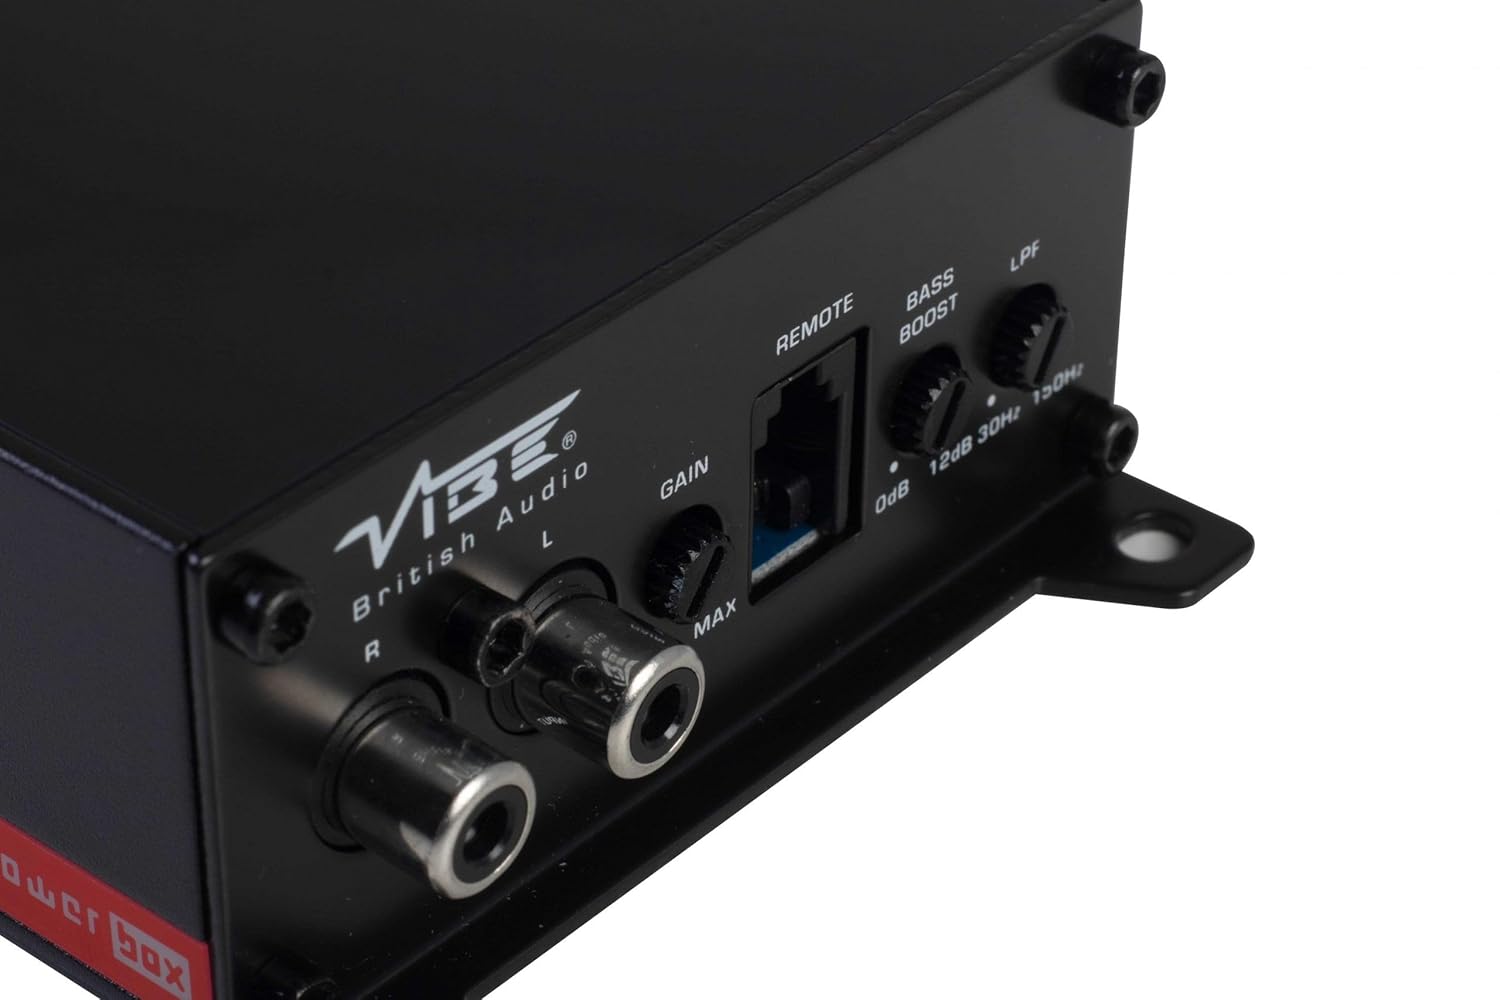
This panel features the RCA input jacks for audio signal, a Gain control knob to match the amplifier's input sensitivity to your head unit's output, a dedicated port for the remote gain control, a Bass Boost switch for enhancing low frequencies, and an LPF (Low Pass Filter) control to adjust the upper frequency limit for the subwoofer.
5.3 Remote Gain Control

The remote gain control unit connects to the amplifier via the 'REMOTE' port and allows for convenient adjustment of the subwoofer's output level from the vehicle's cabin.
6. O'rnatish va o'rnatish
Proper installation is crucial for optimal performance and safety. If you are not confident in your ability to install the ampliifier, professional yordam so'rang.
6.1 O'rnatish joyi
Choose a mounting location that is dry, well-ventilated, and away from direct heat sources. The compact size of the Powerbox Micro allows for installation under seats, behind trim panels, or in other discreet locations. Ensure there is sufficient airflow around the ampsovutish uchun ko'targich.
6.2 Simli ulanishlar
Quvvat simlari:
- ni ulang +12 V terminal to the vehicle's positive battery terminal using a suitable gauge power cable (e.g., 8 AWG or 10 AWG). Install an in-line fuse holder within 18 inches (45 cm) of the battery.
- ni ulang GND terminal to a clean, unpainted metal surface on the vehicle's chassis. Ensure a good electrical connection. The ground cable should be of the same gauge as the power cable and as short as possible.
- ni ulang REM (Remote Turn-On) terminal to the remote output of your head unit. This wire signals the amplifier to turn on and off with your stereo. If your head unit lacks a remote output, you can use an accessory wire that turns on with the ignition, or utilize the amplifier's auto-sense feature if applicable.
Karnay simlari:
- Sabvuferingizni tarmoqqa ulang Karnay chiqishi terminals (+ and -). Ensure correct polarity. This amplifier is 1 Ohm stable, allowing flexibility in subwoofer impedance configurations. Refer to your subwoofer's specifications for optimal impedance matching.
Signal Input (RCA):
- Connect the RCA output from your head unit or signal processor to the INPUT (L/R) RCA jacks on the amphayotiyroq.
Masofaviy daromadni boshqarish:
- Plug the remote gain control unit into the dedicated UZOQ ustidagi port amplifier. Route the cable to a convenient location for adjustment.
ISO T Harness / ISOAWK Kit:
- For simplified installation with existing stereo looms, an optional ISOAWK kit (available separately) can be used to make the amplifier compatible with an ISO T harness. This allows for plug-and-play integration for audio signal, power, and ground, potentially eliminating the need for separate battery connections.
7. Operatsiya
7.1 Dastlabki quvvatlanish
Barcha ulanishlar o'rnatilgandan va tekshirilgandan so'ng, transport vositasining batareyasini qayta ulang. Bosh blokingizni yoqing. amplifier's power indicator (PWR) should illuminate green. If the protection indicator (PRT) illuminates red, refer to the troubleshooting section.
7.2 Daromadni sozlash
The Gain control matches the ampko'targichning kirish sezgirligi chiqish hajmigatage of your head unit. To set the gain:
- ni aylantiring amplifier's Gain control to its minimum (MIN) setting.
- Bosh qurilmangizning ovoz balandligini maksimal darajadan taxminan 75-80% ga sozlang.
- Dinamik musiqa asarini ijro eting.
- Sekin -asta oshiring amplifier's Gain control until you hear distortion, then back it off slightly until the sound is clear.
The remote gain control unit allows for real-time adjustment of the subwoofer level without affecting the main system volume.
7.3 Past o'tish filtri (LPF)
The LPF control sets the upper frequency limit for the amplifier's output. This is essential for subwoofers, ensuring they only reproduce low frequencies. Adjust the LPF knob (typically 30Hz to 150Hz) to blend the subwoofer's output seamlessly with your main speakers. A common starting point is around 80-100Hz.
7.4 Bass Boost
The Bass Boost switch provides an adjustable low-frequency enhancement. Use this feature sparingly, as excessive bass boost can lead to distortion and potential damage to your subwoofer. Adjust the boost level (0dB to 12dB) to your preference.
8. Xizmat ko'rsatish
- Tozalash: Vaqti-vaqti bilan artib oling ampliferning tashqi qismini yumshoq, quruq mato bilan tozalang. Qattiq kimyoviy moddalar yoki abraziv tozalash vositalaridan foydalanmang.
- Ulanishlar: Regularly check all power, ground, and speaker connections to ensure they are secure and free from corrosion. Loose connections can cause performance issues or damage.
- Ventilyatsiya: Bunga ishonch hosil qiling amplifier's cooling fins are not obstructed to maintain proper heat dissipation.
9. Muammolarni bartaraf qilish; nosozliklarni TUZATISH
| Muammo | Mumkin sabab | Yechim |
|---|---|---|
| Quvvat yo'q (PWR LED o'chirilgan) | Sug'urta yonib ketgan, quvvat/yer ulanishi bo'shashgan, masofaviy signal yo'q. | Check in-line fuse, verify +12V, GND, and REM connections. |
| Protection Mode (PRT LED on) | Overheating, short circuit in speaker wiring, impedance too low. | Ensure proper ventilation, check speaker wiring for shorts, verify speaker impedance. |
| Ovoz chiqishi yo'q | No input signal, gain too low, speaker wires disconnected. | Check RCA input connections, adjust gain, verify speaker wiring. |
| Buzilgan ovoz | Gain set too high, LPF incorrectly set, poor ground connection. | Reduce gain, adjust LPF, check ground connection. |
10. Texnik shartlar
- Model raqami: POWERBOX400.1M-V7
- AmpQutqaruvchi turi: Sinf D Mono Amphayotiyroq
- RMS quvvat chiqishi: 1 x 400W RMS @ 1 Ohm
- Maksimal quvvat chiqishi: 800 Vt
- Mahsulot o'lchamlari (U x G x Y): Taxminan 157 x 82 x 37 mm (6.18 x 3.23 x 1.46 dyuym)
- Og'irligi: Taxminan 1.54 funt
- jildtage: 12 volt (nominal)
- Maksimal ta'minot hajmitage: 12 volt
- O'rnatish turi: Yuzaki o'rnatish
- Ishlab chiqaruvchi: Vibe Audio
- Birinchi mavjud sana: 21 yil 2018 iyul
11. Kafolat va qo'llab-quvvatlash
Vibe Audio products are designed and manufactured to the highest standards. For warranty information and technical support, please refer to the warranty card included with your product or visit the official Vibe Audio websayt. Kafolat da'volari uchun xaridingizni tasdiqlovchi hujjatingizni saqlang.


