1. Kirish
This manual provides comprehensive instructions for the installation, operation, and maintenance of the SINOTIMER TM919B 30A Programmable Electronic Timer Switch. This device is designed to automatically control the ON/OFF switching of various electrical appliances based on user-defined daily or weekly programs. Please read this manual carefully before installation and use to ensure proper function and safety.
2. Xavfsizlik ma'lumotlari
WARNING: Risk of electric shock. Installation should only be performed by a qualified electrician or trained personnel.
- Always disconnect power at the circuit breaker before installing or servicing the timer switch.
- Barcha simli ulanishlar xavfsiz va mahalliy elektr kodlariga mos kelishiga ishonch hosil qiling.
- Do not exceed the maximum load rating of 30A.
- This device is intended for indoor use only. Avoid exposure to moisture or extreme temperatures.
- Jihozni o'zingiz qismlarga ajratish yoki ta'mirlashga urinmang. Malakali xizmat ko'rsatish xodimlariga murojaat qiling.
3. Mahsulot tugadiview
The SINOTIMER TM919B is a digital timer switch featuring a large LCD display, multiple programming options, and a manual override function. It is designed for DIN rail mounting.
3.1. Komponentlar va boshqaruv elementlari
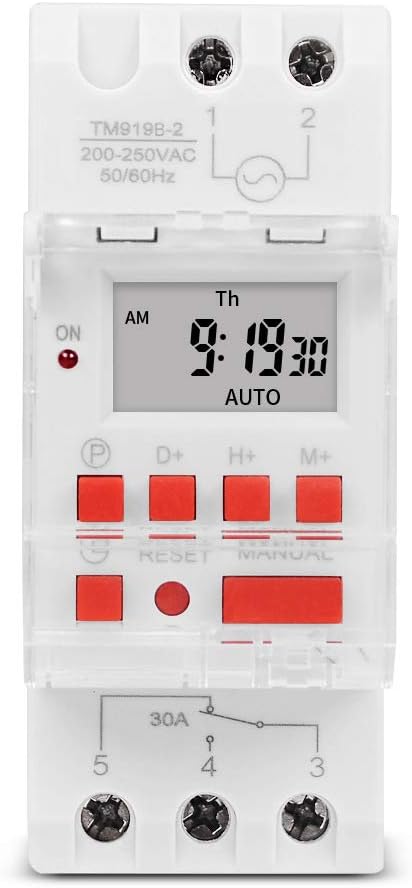
1-rasm: Old view of the TM919B timer switch, showing the LCD display, control buttons, and terminal connections.

2-rasm: Burchakli view of the TM919B with the transparent protective cover open, revealing the programming buttons (P, D+, H+, M+, RESET, MANUAL).
- LCD displey: Joriy vaqt, kun va dastur holatini ko'rsatadi.
- P (Dastur) tugmasi: Enters/exits program setting mode.
- D+ (Day) Button: Adjusts day of the week in setting modes.
- H+ (Hour) Button: Adjusts hour in setting modes.
- M+ (Minute) Button: Adjusts minute in setting modes.
- RESET tugmasi: Barcha sozlamalarni tozalaydi va taymerni zavod parametrlariga qaytaradi.
- MANUAL Button: Toggles between ON, AUTO, and OFF modes.
- Terminal ulanishlari: For power input and load output.
4. Texnik shartlar
| Xususiyat | Spetsifikatsiya |
|---|---|
| Model | TM919B |
| jildtage | 220V (AC200-250V) |
| Chastotasi | 50/60 Gts |
| Maksimal yuk | 30A (rezistorli yuk) |
| Dasturlar | 16 ON/OFF programs per day/week |
| Minimal interval | 1 daqiqa |
| Batareya zaxira | Built-in rechargeable battery (for memory retention) |
| O'rnatish | 35 mm DIN temir yo'l |
| O'lchamlari | 3-rasmga qarang |

3-rasm: Detailed dimensions of the TM919B timer switch, showing height, width, and depth measurements.
5. O'rnatish va o'rnatish
Follow these steps for safe and correct installation of your timer switch.
5.1. O'rnatish
- Asosiy o'chirgichda quvvat uzilganligiga ishonch hosil qiling.
- Mount the TM919B onto a standard 35mm DIN rail. The device features a clip mechanism on the back for secure attachment.
- Press the orange clip at the bottom of the unit to release it from the DIN rail if removal is necessary.

4-rasm: Yon view of the TM919B, highlighting the orange DIN rail mounting clip.

5-rasm: Orqaga view of the TM919B, illustrating the DIN rail mounting mechanism.
5.2. Ulanish sxemasi
Refer to the diagram below for correct wiring connections. Ensure all connections are tight and insulated.

6-rasm: Yon view of the TM919B showing the wiring diagram printed on the casing. Terminals 1 and 2 are for power input (L and N). Terminals 3, 4, and 5 are for load output (Common, Normally Open, Normally Closed).
- Terminals 1 & 2: Power Input (L - Live, N - Neutral). Connect your 220V AC supply here.
- 3-terminal: Common (COM) for the output relay.
- 4-terminal: Normally Open (NO) output. The load will be powered when the timer is ON.
- 5-terminal: Normally Closed (NC) output. The load will be powered when the timer is OFF.
For typical applications where the load is switched ON by the timer, connect the load between Terminal 3 (COM) and Terminal 4 (NO).
6. Foydalanish bo'yicha ko'rsatmalar
6.1. Initial Setup and Reset
- After connecting power, the display may be blank or show random characters. Press the RESET button with a pointed object (e.g., a pen tip) to clear all memory and reset the timer. The display will show "0:00" and "MO".
- Allow the internal battery to charge for at least 30 minutes before programming for optimal performance and memory retention during power outages.
6.2. Joriy vaqt va kunni sozlash
- ni bosing va ushlab turing D+ button to set the current day of the week (MO, TU, WE, TH, FR, SA, SU).
- ni bosing va ushlab turing H+ button to set the current hour (0-23).
- ni bosing va ushlab turing M+ button to set the current minute (0-59).
- Release the buttons when the correct time and day are displayed. The timer will automatically save the settings.
6.3. ON/OFF sikllarini dasturlash
The TM919B supports up to 16 ON/OFF programs. Each program consists of an ON time and an OFF time.
- ni bosing P button once. The display will show "1 ON". This is for the first ON program.
- Foydalanish D+ to select the day(s) for this program. Options include:
- MO TU WE TH FR SA SU (Every day)
- MO (Monday only)
- TU (Tuesday only)
- ...
- MO TU WE TH FR (Weekdays)
- SA SU (Weekends)
- MO TU WE (Mon-Wed)
- TH FR SA (Thu-Sat)
- MO WE FR (Mon, Wed, Fri)
- TU TH SA (Tue, Thu, Sat)
- MO TU WE TH FR SA (Mon-Sat)
- Foydalanish H+ va M+ to set the desired ON hour and minute.
- ni bosing P button again. The display will show "1 OFF". This is for the first OFF program.
- Foydalanish D+, H+, va M+ to set the desired OFF day, hour, and minute. Ensure the OFF time is after the ON time for the same program.
- Repeat steps 1-5 for additional ON/OFF programs (up to 16). If you don't need all 16 programs, simply press P to cycle through unused programs until you return to the current time display.
- To exit programming mode and save settings, press the clock button (usually labeled with a clock icon, or simply wait for 30 seconds without input).
6.4. Qo'lda bekor qilish
ni bosing QO'LLANMA Ish rejimlari orasida o'tish uchun tugma:
- ON: The timer output is continuously ON, ignoring all programs.
- AVTO: Taymer dasturlashtirilgan ON/OFF davrlariga muvofiq ishlaydi. Bu standart ish rejimi.
- O'chirish: The timer output is continuously OFF, ignoring all programs.
Taymerning o'rnatilganligiga ishonch hosil qiling AVTO for programmed operation.
7. Xizmat ko'rsatish
- The TM919B is designed for maintenance-free operation.
- Tashqi qismini yumshoq, quruq mato bilan tozalang. Abraziv tozalagichlar yoki erituvchilardan foydalanmang.
- Ensure the internal battery is charged by keeping the unit powered for at least 24 hours initially, and periodically thereafter, to maintain time and program memory during power outages.
8. Muammolarni bartaraf qilish; nosozliklarni TUZATISH
| Muammo | Mumkin sabab | Yechim |
|---|---|---|
| Displey bo'sh. | No power supply; internal battery discharged. | Check power connections. Allow unit to charge for 30 minutes. |
| Timer not switching load. | Incorrect wiring; timer in MANUAL ON/OFF mode; incorrect program settings. | Verify wiring (refer to Figure 6). Ensure timer is in AUTO mode. Check program times and days. |
| Dasturlar quvvat ulangandan keyin yo'qoladitage. | Internal battery not fully charged or faulty. | Ensure unit is powered for at least 24 hours to fully charge the battery. If problem persists, contact support. |
| Tugmalar javob bermayapti. | Unit frozen; temporary glitch. | ni bosing RESET tugmasi. |
9. Kafolat va qo'llab-quvvatlash
SINOTIMER products are manufactured to high-quality standards. For warranty information or technical support, please refer to the documentation provided with your purchase or visit the official SINOTIMER websayt. Xarid kvitansiyasini xaridni tasdiqlovchi hujjat sifatida saqlang.
For further assistance, you may contact SINOTIMER customer service through their official channels.


