1. Kirish
The ASRock B450 PRO4 R2.0 is an ATX AMD motherboard designed to support AMD AM4 Socket Ryzen™ 2000, 3000, 4000 G-Series, 5000, and 5000 G-Series Desktop Processors. This motherboard offers robust features for building a reliable and high-performance system.
Asosiy xususiyatlar:
- Supports DDR4 3200+ (OC) memory.
- Equipped with 2 PCIe 3.0 x16 slots and 4 PCIe 2.0 x1 slots.
- Supports AMD Quad CrossFireX™ for multi-GPU configurations.
- Multiple graphics output options: HDMI, Display Port, and D-Sub.
- Features 7.1 CH HD Audio (Realtek ALC892/897 Audio Codec).
- Storage includes 6 SATA3 ports, 1 Ultra M.2 (PCIe Gen3 x4), and 1 M.2 (PCIe Gen3 x2 & SATA3).
- Connectivity options include 2 USB 3.2 Gen2 (Rear Type A+C) and 6 USB 3.2 Gen1 (2 Front, 4 Rear).
- Integrated Realtek Gigabit LAN for stable network connectivity.

Figure 1: ASRock B450 PRO4 R2.0 Motherboard Retail Box (Front View)

Figure 2: ASRock B450 PRO4 R2.0 Motherboard Retail Box (Rear View highlighting features)
2. Paket tarkibi
Anakart paketida barcha elementlar mavjudligiga ishonch hosil qiling:
- ASRock B450 PRO4 R2.0 Motherboard
- Tez o'rnatish uchun qo'llanma
- Qo'llab-quvvatlash CD
- I/O paneli qalqoni
- 2 x SATA ma'lumot kabellari
- M.2 Socket Screws (for SSD installation)
3. O'rnatish va o'rnatish
Before beginning installation, ensure your workspace is clean and static-free. Always handle the motherboard by its edges to avoid damaging components.
3.1 CPU o'rnatish
Carefully open the CPU socket lever. Align the triangular mark on your AMD AM4 processor with the corresponding mark on the socket. Gently place the CPU into the socket without forcing it. Once seated, close the lever to secure the CPU.
3.2 RAMni o'rnatish
This motherboard supports DDR4 memory. Open the clips on both ends of the DIMM slots. Align the notch on the RAM module with the key in the DIMM slot. Press down firmly on both ends of the RAM module until the clips snap into place. For optimal performance, install memory modules in a dual-channel configuration as recommended in the Quick Installation Guide.
3.3 Saqlash joyini o'rnatish
The motherboard provides multiple storage options:
- SATA drayverlari: Connect your SATA hard drives or SSDs to the 6 SATA3 ports using SATA data cables.
- M.2 SSD'lar: The motherboard features one Ultra M.2 slot (PCIe Gen3 x4) and one M.2 slot (PCIe Gen3 x2 & SATA3). Insert your M.2 SSD into the appropriate slot and secure it with the provided M.2 screw.
3.4 Grafik kartani o'rnatish
Insert your graphics card into one of the PCIe 3.0 x16 slots. Ensure it is firmly seated and secure it with the case's retention mechanism. Connect any necessary PCIe power cables from your power supply to the graphics card.
3.5 Quvvat ulanishlari
Connect the 24-pin ATX power connector from your power supply to the motherboard. Also, connect the 8-pin CPU power connector (ATX 12V) located near the CPU socket.

Figure 3: ASRock B450 PRO4 R2.0 Motherboard (Top View with components)

Figure 4: ASRock B450 PRO4 R2.0 Motherboard (Angled View)
4. Foydalanish bo'yicha ko'rsatmalar
4.1 BIOS sozlamalari
Upon first boot, press the 'Del' or 'F2' key during startup to enter the BIOS setup utility. Here you can configure system settings, boot order, and monitor hardware status. Refer to the Quick Installation Guide for detailed BIOS navigation and options.
4.2 Operatsion tizimni o'rnatish
Insert your operating system installation media (USB drive or DVD) and set it as the primary boot device in the BIOS. Follow the on-screen prompts to install your preferred operating system. After installation, install the necessary drivers from the provided Support CD or ASRock's official website for full hardware functionality.
5. Xizmat ko'rsatish
Doimiy texnik xizmat ko'rsatish anakartning uzoq umr va optimal ishlashini ta'minlaydi:
- Changni tozalash: Vaqti-vaqti bilan siqilgan havo yordamida anakart va korpus fanatlaridan changni tozalang. Tozalashdan oldin tizim o'chirilganligiga va elektr tarmog'idan uzilganligiga ishonch hosil qiling.
- BIOS yangilanishlari: Check ASRock's official website for the latest BIOS updates. Updating the BIOS can improve compatibility, stability, and performance. Follow the update instructions carefully.
- Kabelni boshqarish: Ensure all cables are neatly routed and secured to promote better airflow and prevent interference.
6. Muammolarni bartaraf qilish; nosozliklarni TUZATISH
Agar sizda muammolar bo'lsa, quyidagi asosiy muammolarni bartaraf etish bosqichlarini sinab ko'ring:
- Quvvat yo'q: Check all power connections (24-pin ATX, 8-pin CPU, GPU power). Ensure the power supply is switched on.
- Displey yo'q: Verify that your monitor is connected to the correct graphics output (either motherboard or discrete GPU). Reseat the graphics card and RAM modules.
- Tizimning beqarorligi: Check RAM seating. Ensure CPU cooler is properly installed. Update BIOS and drivers.
- Komponent aniqlanmadi: Verify that the component (e.g., M.2 SSD, SATA drive) is correctly installed and connected. Check BIOS settings to ensure it is enabled.
7. Texnik shartlar
| Xususiyat | Spetsifikatsiya |
|---|---|
| Brend | ASRock |
| Seriya | B450 PRO4 R2.0 |
| Model raqami | B450 PRO4 R2.0 |
| CPU soket | Soket AM4 |
| Mos keladigan protsessorlar | AMD AM4 Socket Ryzen™ 2000, 3000, 4000 G-Series, 5000 and 5000 G-Series Desktop Processors |
| Chipset turi | AMD B450 |
| RAM xotira texnologiyasi | DDR4 |
| Xotira tezligi | 3200+ (OC) MHz |
| Maksimal xotira hajmi | 128 GB (based on typical 4-slot configuration) |
| PCIe slotlari | 2 x PCIe 3.0 x16, 4 x PCIe 2.0 x1 |
| Grafik chiqish | HDMI, Display Port, D-Sub |
| Audio kodek | Realtek ALC892/897 Audio Codec (7.1 CH HD Audio) |
| SATA portlari | 6 x SATA3 |
| M.2 uyasi | 1 x Ultra M.2 (PCIe Gen3 x4), 1 x M.2 (PCIe Gen3 x2 & SATA3) |
| USB 3.2 Gen2 (Rear) | 2 (Type A+C) |
| USB 3.2 Gen1 (Rear) | 4 |
| USB 3.2 Gen1 (Front) | 2 |
| LAN | Realtek Gigabit LAN |
| Form faktor | ATX |
| Mahsulot o'lchamlari | 1.1 x 9.7 x 6.5 dyuym |
| Element og'irligi | 2.6 funt |
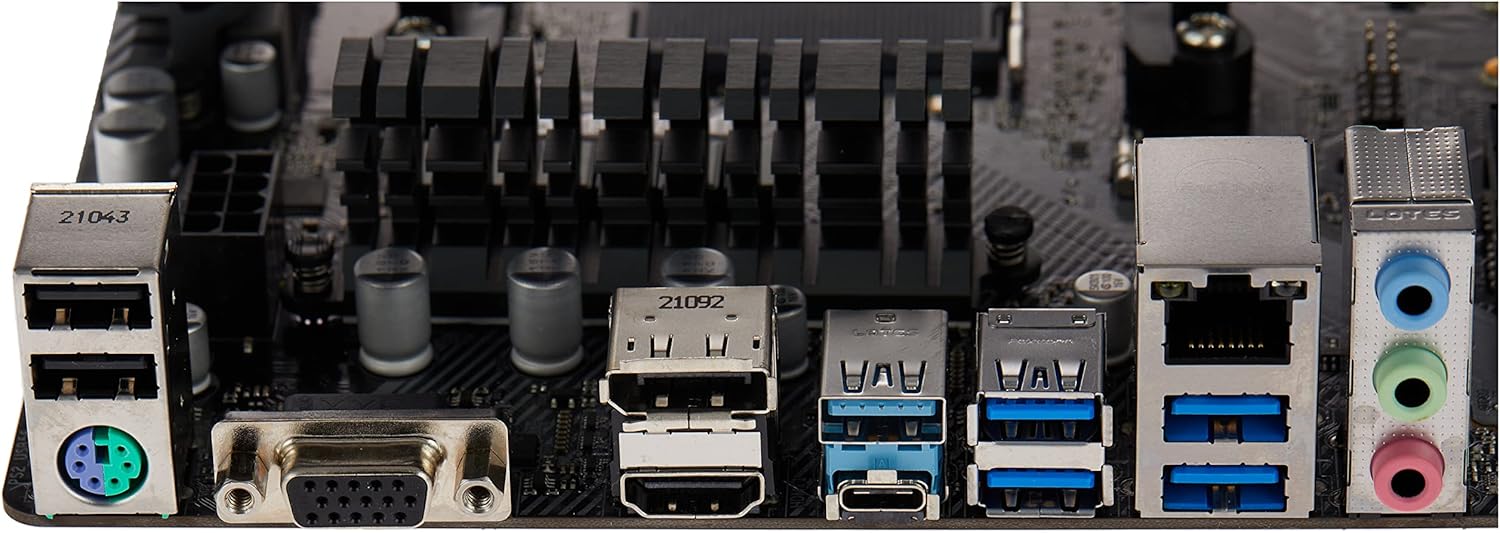
Figure 5: ASRock B450 PRO4 R2.0 Motherboard Rear I/O Ports

Figure 6: ASRock B450 PRO4 R2.0 Motherboard Dimensions
8. Kafolat va qo'llab-quvvatlash
For warranty information and technical support, please refer to the documentation included in your product package or visit the official ASRock websayt. Kafolat da'volari uchun xaridingizni tasdiqlovchi hujjatingizni saqlang.


