1. Kirish
The Audio-Technica AT-LP70X is a fully automatic belt-drive turntable designed for high-fidelity audio playback from vinyl records. It features an integrated AT-VM95C cartridge, a J-shaped tonearm engineered to minimize tracking errors, and a built-in switchable phono preamplifier for versatile connectivity. The turntable's three-piece, anti-resonance chassis is designed to reduce unwanted noise, ensuring clear and warm analog sound reproduction.
2. Xavfsizlik ma'lumotlari
Please read and understand all safety instructions before operating this product. Keep this manual for future reference. Always disconnect the power cord from the outlet before cleaning or performing any maintenance. Do not expose the unit to rain or moisture. Avoid placing the unit near heat sources or in direct sunlight. Ensure proper ventilation around the turntable.
3. Paket tarkibi
O'rnatishdan oldin barcha elementlarning mavjudligini tekshiring:
- AT-LP70X Automatic Turntable
- Dust Cover with Hinges
- Laganda
- Drive Belt (pre-installed on platter)
- Kigiz mat
- AT-VM95C Cartridge (pre-installed on tonearm)
- 45 RPM adapter
- RCA Audio Cable (dual RCA male to dual RCA male with ground wire)
- AC adapteri
- Tez boshlash qo'llanmasi (ushbu qo'llanma)
4. Mahsulot tugadiview
The AT-LP70X features a sleek design with intuitive controls for an optimal vinyl listening experience.

1-rasm: Yuqori view of the Audio-Technica AT-LP70X Automatic Turntable with the dust cover open, showcasing the platter, tonearm, and control buttons.
Asosiy komponentlar:
- Tovoq: The rotating surface where records are placed.
- Tonearm: Holds the cartridge and stylus, tracking the record grooves.
- Cartridge (AT-VM95C): Converts groove vibrations into electrical signals.
- Qalam: The needle that reads the record grooves.
- Tezlik selektori: Allows switching between 33-1/3 and 45 RPM.
- Start/Stop Buttons: Controls automatic playback initiation and cessation.
- O'rnatilgan Preamp: Switchable phono/line output for connecting to various audio systems.
- Chang qoplami: Aylanuvchi patnisni chang va qoldiqlardan himoya qiladi.
5. Sozlash
5.1 Paketni ochish va dastlabki joylashtirish
Carefully remove all components from the packaging. Place the turntable on a stable, level surface away from direct sunlight, heat sources, and strong vibrations.
5.2 Plitalar va kamarlarni o'rnatish
The drive belt is typically pre-installed on the platter. Gently place the platter onto the turntable spindle. Ensure the drive belt is correctly positioned around the motor pulley, which can be accessed through an opening in the platter.
Video 1: This video demonstrates the setup process for the Audio-Technica AT-LP70X turntable, including platter and belt installation. It shows how to correctly position the drive belt around the motor pulley for proper operation.
5.3 Cartridge and Stylus Preparation
The AT-VM95C cartridge is pre-installed on the J-shaped tonearm. Before use, carefully remove the clear stylus protector by sliding it forward. Handle the stylus with care to avoid damage.

2-rasm: Yaqin planda view of the J-shaped tonearm and the pre-installed AT-VM95C cartridge on the Audio-Technica AT-LP70X turntable.
5.4 Audio tizimga ulanish
The AT-LP70X features a built-in switchable phono preamplifier, allowing connection to various audio components.
- Fono chiqishi: Agar sizning amplifier has a dedicated PHONO input, set the PHONO/LINE switch on the turntable's rear panel to "PHONO". Connect the RCA audio cable to the PHONO input on your ampko'targich va yerga ulash simini ampko'targichning yerga ulash terminali.
- Chiziq chiqishi: Agar sizning amplifier or powered speakers do not have a PHONO input, set the PHONO/LINE switch to "LINE". Connect the RCA audio cable to any available LINE input (e.g., AUX, CD, TAPE) on your amplifier or directly to powered speakers.
- Bluetooth ulanishi: The turntable can connect wirelessly to Bluetooth-enabled speakers or headphones. Press and hold the Bluetooth button on the front panel until the indicator light flashes, then pair with your desired device.
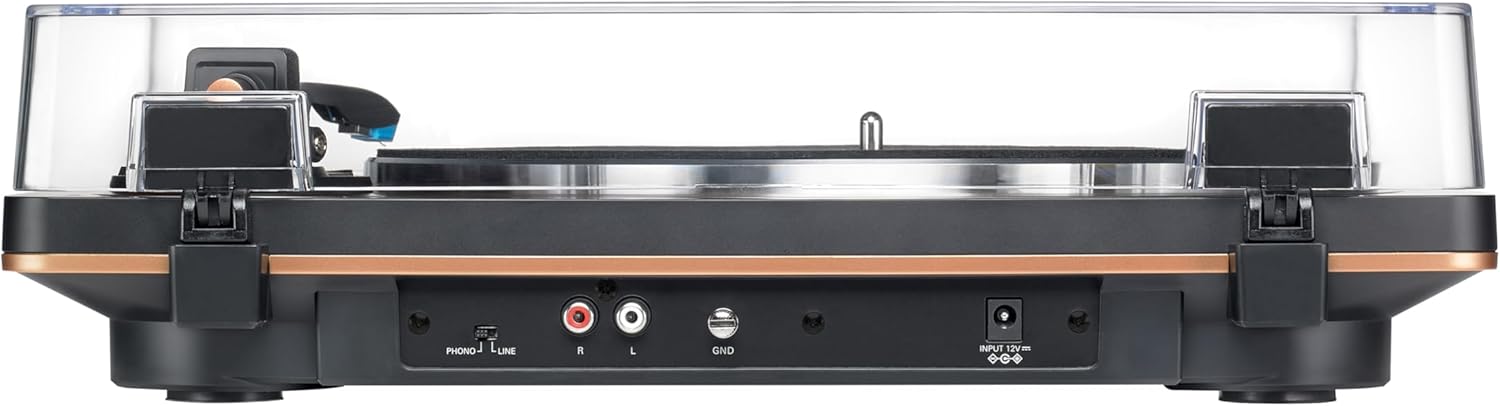
Figure 3: Rear panel of the AT-LP70X, illustrating the RCA output jacks, ground terminal, PHONO/LINE switch, and power input.
5.5 Chang qopqog'ini o'rnatish
Attach the hinges to the dust cover and then insert the hinges into the slots on the rear of the turntable. The dust cover can be easily removed if preferred.
6. Foydalanish bo'yicha ko'rsatmalar
6.1 Quvvatni yoqish/o‘chirish
Connect the AC adapter to the turntable and a power outlet. The turntable is ready for operation when the power indicator light is on.
6.2 Playing a Record (Automatic Operation)
- Plastinaga rekord qo'ying.
- Select the appropriate speed (33 or 45 RPM) using the SPEED button.
- Press the START button. The tonearm will automatically move to the beginning of the record and lower the stylus.
- At the end of the record, the tonearm will automatically return to its rest position, and the platter will stop spinning.
Video 2: This video provides an introduction to the Audio-Technica AT-LP70X Automatic Turntable, highlighting its automatic playback features and ease of use.
6.3 Stopping Playback
To stop playback at any time, press the STOP button. The tonearm will lift, return to its rest position, and the platter will stop.
6.4 Manual Operation (Cueing)
While the AT-LP70X is fully automatic, you can manually cue the tonearm. Use the tonearm lift lever to raise and lower the tonearm. Gently position the tonearm over the desired track on the record, then lower it using the lever.
7. Xizmat ko'rsatish
7.1 Tozalash
- Turntable Body: Wipe with a soft, dry cloth. Do not use harsh chemicals or abrasive cleaners.
- Qalam: Use a soft brush designed for stylus cleaning, brushing gently from back to front.
- Chang qoplami: Clean with a soft cloth and mild, non-abrasive cleaner.
7.2 Stylusni almashtirish
The AT-VM95C cartridge allows for easy stylus replacement. When the stylus wears out (typically after 300-500 hours of playback), it can be replaced with any stylus from the Audio-Technica VM95 Series (e.g., AT-VMN95E, AT-VMN95ML, AT-VMN95SH). Refer to the stylus replacement instructions provided with the new stylus.
8. Muammolarni bartaraf qilish; nosozliklarni TUZATISH
| Muammo | Yechim |
|---|---|
| Ovoz yo'q yoki past ovoz | Check audio cable connections. Ensure PHONO/LINE switch is set correctly. Verify amplifier/speaker volume. |
| O'tkazib yuborilgan yoki buzilgan ovoz | Clean the record and stylus. Ensure the turntable is on a level surface. Check for stylus wear. |
| Tovoq aylanmaydi | Check power connection. Ensure drive belt is correctly installed around the motor pulley. |
| Bluetooth ulanishi bilan bog'liq muammolar | Ensure Bluetooth device is in pairing mode and within range. Disconnect and re-pair. |
9. Texnik shartlar
| Xususiyat | Tafsilot |
|---|---|
| Model raqami | AT-LP70X |
| Haydash usuli | Tasmali haydovchi |
| Dvigatel turi | DC motor |
| Tezliklar | 33-1 / 3 RPM, 45 RPM |
| Tovoq materiali | alyuminiy |
| Kartrij turi | AT-VM95C (conical stylus) |
| Tonearm turi | J shaklidagi |
| Oldindanamphayotiyroq | Built-in, switchable Phono/Line |
| Chiqish ulagichlari | RCA (L/R) with ground |
| Olchamlari (G x D x Y) | 15.75 x 12.99 x 4.33 dyuym |
| Og'irligi | 6.4 funt |
| Material | Aluminum, Metal, Plastic |
10. Kafolat va qo'llab-quvvatlash
For warranty information and customer support, please refer to the official Audio-Technica websaytga yoki mijozlarga xizmat ko'rsatish bo'limiga murojaat qiling. Har qanday kafolat da'volari uchun xaridingizni tasdiqlovchi hujjatni saqlang.


