Mahsulot tugadiview
The Dosatron D40MZ2 is a water-powered chemical injector dosing pump designed for precise and reliable chemical dilution across various applications. This unit operates without electricity, utilizing water flow to accurately inject concentrates into the water line.
- Flow Rate: Up to 40 GPM (Gallons Per Minute).
- Dilution Range: 0.2% to 2%.
- Connection Size: 1 1/2" NPT.
- Power Source: Water Powered.
- Features: 63% fewer parts for simplified maintenance, metal-free piston for enhanced durability.

The D40MZ2 is suitable for irrigation, livestock, and industrial applications, ensuring consistent and repeatable results regardless of fluctuations in pressure or flow.
Texnik xususiyatlari
- Brend: Dosatron
- Model raqami: D40MZ2VFII
- Rang: Moviy
- Material: Polipropilen (PP)
- Mahsulot o'lchamlari: 8.5"L x 8.5"W x 25.25"Y
- Mahsulot og'irligi: 12 funt
- Maksimal oqim tezligi: Daqiqada 40 galon
- Quvvat manbai: Water Powered
- UPC: 850019843668

Bu qanday ishlaydi
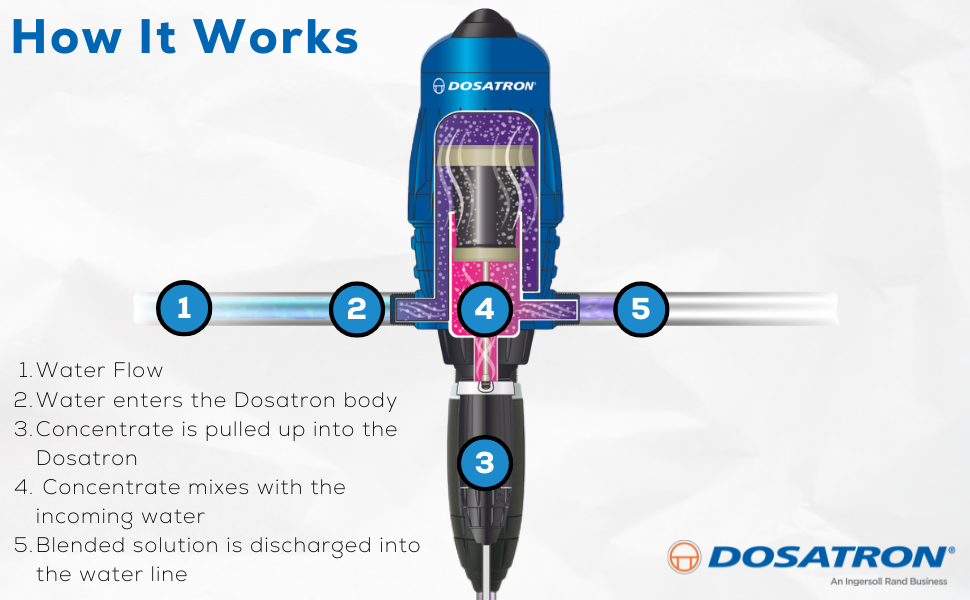
The Dosatron D40MZ2 operates on a simple, water-powered principle to ensure accurate and consistent chemical injection:
- Water flow initiates the process.
- Water enters the Dosatron body, activating the internal piston.
- The piston pulls the concentrated chemical solution up from the supply tank.
- The concentrate mixes precisely with the incoming water inside the Dosatron.
- The blended solution is then discharged into the main water line at the set dilution rate.
O'rnatish
For optimal performance and safety, ensure proper installation of your Dosatron D40MZ2 unit. It is recommended to install the unit in a bypass line to allow for maintenance without interrupting the main water flow.
- Install the unit vertically with the suction hose pointing downwards.
- Barcha ulanishlar xavfsiz va oqmasligiga ishonch hosil qiling.
- Connect the suction hose to the chemical concentrate tank.
- Verify that the water supply is within the specified pressure and flow ranges.
Refer to the detailed installation guide provided with your product for specific plumbing configurations and best practices.
Operatsiya
The Dosatron D40MZ2 allows for easy adjustment of the dilution setting to meet your specific application needs.
- Identify the desired dilution percentage or ratio for your application.
- Locate the adjustment sleeve on the lower part of the injector.
- Rotate the adjustment sleeve to align the indicator with your desired setting on the scale.
- Ensure the setting is locked into place to prevent accidental changes.
Always verify the actual dilution rate by testing the output solution, especially when precise chemical concentrations are critical.
Maintenance: Seal Kit Service
Regular maintenance, including seal kit replacement, is crucial for the longevity and accurate operation of your Dosatron D40MZ2. This video demonstrates the process of servicing your injector with a seal kit.
Safety Instructions Before Servicing:
- Qo'lqop kiying.
- Xavfsiz ko'zoynak taqing.
- Wear an apron/work coat.
- Rinse your dosing pump with clean water before disassembly.
Kerakli qismlar:
D40MZ2 Complete Seal Kit (Part Number: #PJDI120V)
Demontaj bosqichlari:
- Unscrew the suction hose nut and remove the suction hose.
- Unscrew the injection stem nut and pull the injection stem straight out from the body.
- Unscrew and remove the check valve nut. Grab the barb and pull the check valve assembly straight out and discard.
- Unscrew and remove the lock nut.
- C-cl ni olib tashlangamp by spreading the opening and sliding it down over the threads.
- Unscrew and remove the adjusting nut.
- Push the white injection stem up and out of the black sleeve. Set the black sleeve aside.
- Remove and replace the injection stem O-ring (Part Number: #JDI122).
- Remove and replace the sleeve O-ring (Part Number: #JDI100).
- Set the stem aside and remove the plunger seal by pinching and rolling it off the plunger.
- Install the new plunger seal into the groove on the plunger (Part Number: #JDI121).
Reassembly Steps:
- Align the groove in the white stem with the tooth inside the lower portion of the black sleeve and slide the stem down as far as possible.
- Slide the injection stem nut onto the black sleeve.
- Thread the adjusting nut back onto the sleeve about halfway.
- Replace the C-clamp by sliding it over the threads. Rotate it until it clicks into place.
- Thread on the lock nut and hand tighten.
- Install the new check valve assembly and reinstall the check valve nut (Part Number: #PJDI118).
- Align the notches in the lower part of the blue body with the teeth on the top of the black injection sleeve and reinstall the nut hand tight.
- If the scale you prefer is not facing out, loosen the stem nut, pull the stem down slightly, rotate, and push it back up. Tighten the nut hand tight.
- Before installing the suction hose, inspect it. If it flares out, cut an inch or so off and reinstall. If the suction hose is cracked, rigid, or looks old, replace it.
- Thread the suction hose nut onto the hose. Slide the hose onto the barb and hand tighten the nut.
- Set the injector to your desired dilution setting.
Muammolarni bartaraf qilish; nosozliklarni TUZATISH
This video provides guidance on how to troubleshoot common issues with your Dosatron D40MZ2 injector.
Umumiy muammolar va echimlar:
The three key areas to troubleshoot are:
- The injector is clicking but not drawing the concentrate.
- The injector is clicking but water is going down into the tank.
- The injector isn't clicking.
The first two issues often originate in the stem area.
Troubleshooting Steps for Stem-Related Issues:
- Check for Suction: While the unit is installed and water is on, remove the suction hose nut and suction hose. Check for suction on your finger. If no suction is felt, turn off the water.
- Bo'shatish bosimi: Release pressure by pressing the air bleed button on top of the Dosatron unit.
- Disconnect Suction Hose: Unscrew the hose nut and remove the chemical pickup hose.
- Stolni olib tashlash: Unscrew the injection stem nut and pull the stem straight out from the injector body. Set the injection stem aside.
- Inspect Plunger Seal: Remove the plunger by twisting it a quarter turn counterclockwise and pulling it out. Hold the plunger and inspect the seal for nicks, grooves, or wear. Test the plunger seal by inserting the plunger down into the stem. When pulled out, it should make a pop sound. If it doesn't pop or if you see damage, replace the plunger seal (Part Number: #JDI121). To change, roll the old seal off and install a new one.
- Tekshirish valfini tekshiring: Pick up the black stem. Unscrew and remove the check valve nut. Pull the check valve straight out. Set the stem aside and grasp the white retainer, twisting it a quarter turn counterclockwise to release the check valve parts. Inspect all parts (cone, spring, guide) for damage, gumminess, stickiness, or missing components. If parts are dirty, clean and reinstall. If damaged or missing, replace them.
- Reassemble Check Valve: To reassemble, put the cone into the top of the barb. Slide the spring over the shaft and position the top guide over the shaft. Align the guide and twist it a quarter turn clockwise to lock. Give it a tug to ensure everything is in position. Reinstall the check valve assembly into the stem. Then reinstall the check valve nut.
- Reattach Plunger: Pick up the piston and plunger and reattach the plunger onto the lower end of the piston by twisting it clockwise to lock.
- Inspect Suction Hose: Take a look at the top of the suction hose. If it flares out, cut an inch or so off and reinstall. If the suction hose is cracked, rigid, or looks old, replace it.
- Reinstall Suction Hose: Thread the suction hose nut onto the hose. Slide it onto the barb and hand tighten the nut.
- Reset Desired Dosage: Make sure you reset your injector to the desired setting.
Troubleshooting Steps for Non-Clicking Injector:
- Remove Bell Housing: If the injector isn't clicking, use a strap wrench to loosen the blue bell housing. Then remove the bell housing and pull the piston straight out.
- Inspect Piston Flanges: Visually inspect the upper and lower flanges on the piston shell (Upper Flange Part Number: #PDI1093, Lower Flange Part Number: #PDI1092). If they are worn or have scratches, the flanges will need to be replaced.
- Fit Test Flanges: Another way to check the flanges is by doing a fit test.
- To test the upper flange, invert the piston and insert it into the blue bell housing. It should have a uniform snugness.
- To test the lower flange, remove the plunger by turning it a quarter turn counterclockwise and pulling it straight out. Now insert the piston into the body. It should have uniform snugness.
- Replace Upper Flange: To replace the upper flange (Part Number: #PDI1093), locate the release lever, press it down, and rotate the lock ring counterclockwise. Remove the lock ring and piston flange by lifting straight up. To install the new upper flange, locate the square and open edges. Then slide the flange over the upper portion of the piston shell with the square edge facing upward. Align the white tooth inside the lock ring with the black lever in the piston shell. Press it down into place and twist clockwise until it locks.
- Replace Lower Flange: The procedure is similar for the bottom flange. To replace the lower flange (Part Number: #PDI1092), locate the release lever. Press it down and rotate the lock flange clockwise. Remove the lock ring and piston flange by lifting straight up. To install the new lower flange, locate the square and open edges. Then slide the flange over the lower portion of the piston shell with the square edge facing downward. Align the white tooth inside the lock ring with the black lever in the piston shell. Press them down into place and twist counterclockwise until it locks.
- Reinstall Piston and Bell Housing: Reinstall the plunger into the piston by aligning the top with the retainer. Press the plunger in and turn it a quarter turn clockwise to lock. Place the piston back into the body and reinstall the blue bell housing hand tight.
Kafolat va qo'llab-quvvatlash
For information regarding product warranty, technical support, or to purchase replacement parts, please contact Dosatron customer service or visit the official Dosatron website. Protection plans are available for purchase separately.


